
Gardening isn’t just a summer pastime—it can be a year-round adventure. Winter sowing, an innovative and sustainable gardening method, allows you to start your vegetable garden even in the coldest months. This guide dives into everything you need to know about winter sowing, from its benefits to the step-by-step process that ensures success.
What is Winter Sowing?
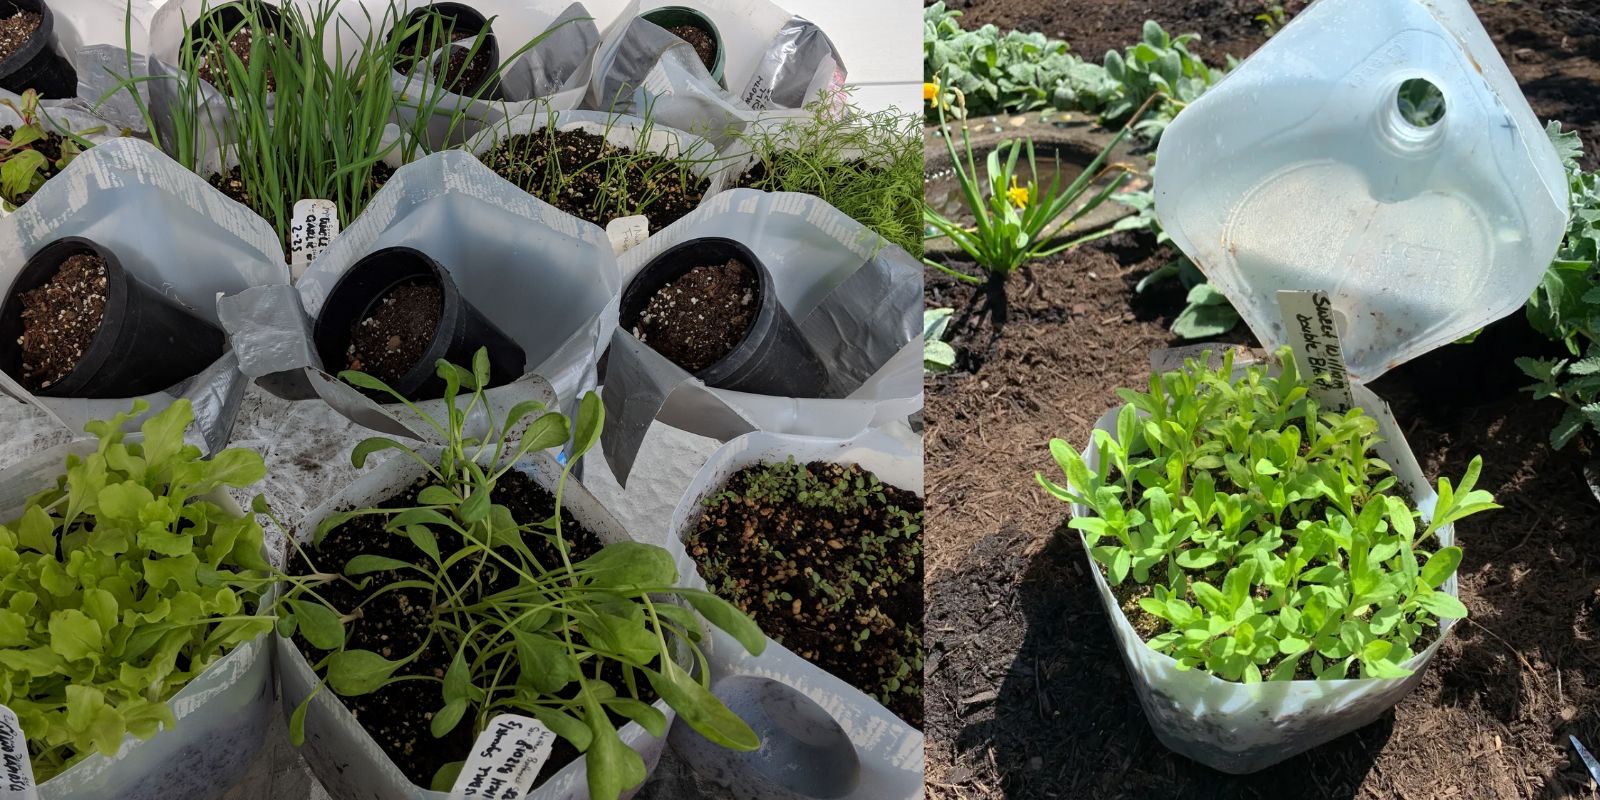
Winter sowing is the process of planting seeds in mini-greenhouses created from repurposed containers, such as milk jugs or soda bottles, and leaving them outdoors during winter. The seeds go through natural freeze-thaw cycles, mimicking the conditions they experience in nature. As the temperature warms, the seeds germinate and grow strong, resilient plants.
This method is ideal for cold-hardy vegetables like kale, spinach, and carrots, as well as flowers that thrive in cooler weather. Winter sowing is a cost-effective, low-maintenance way to get a jump-start on your gardening season.
Why Winter Sow Your Garden?
- Extended Growing Season:
Winter sowing allows you to start seeds early, providing you with a head start on the growing season. - Natural Stratification:
Seeds that require cold stratification benefit from the natural freeze-thaw cycles during winter, leading to higher germination rates. - Low Cost:
Using recycled containers and minimal supplies keeps the process budget-friendly. - No Need for Indoor Space:
Unlike traditional seed-starting methods, winter sowing eliminates the need for grow lights, heat mats, and indoor space. - Hardier Plants:
Plants grown through winter sowing are naturally acclimated to outdoor conditions, making them stronger and more resistant to pests and diseases.
How to Winter Sow a Vegetable Garden
Step 1: Choose the Right Seeds
Not all seeds are suitable for winter sowing. Choose cold-hardy vegetables that can withstand low temperatures. Popular options include:
- Kale
- Spinach
- Broccoli
- Carrots
- Swiss chard
- Lettuce
Step 2: Gather Supplies
You don’t need fancy equipment for winter sowing. Gather these items:
- Clear plastic containers (milk jugs, soda bottles, or plastic takeout boxes)
- Sharp scissors or a knife
- Potting soil or seed-starting mix
- Seeds
- Duct tape
- A permanent marker
Step 3: Prepare the Containers
Transform your plastic containers into mini-greenhouses:
- Cut the container horizontally, leaving a hinge to open and close it.
- Poke drainage holes in the bottom to prevent waterlogging.
- Make small air holes at the top for ventilation.
Step 4: Fill with Soil
Add about 2-3 inches of moist, well-draining potting soil or seed-starting mix to the container. Avoid using garden soil, as it can compact and hinder seed growth.
Step 5: Plant the Seeds
Sow your seeds according to the packet instructions. Cover them lightly with soil and gently water them.
Step 6: Seal and Label
Close the container and secure it with duct tape. Use a permanent marker to label the container with the seed variety and the planting date.
Step 7: Place Outdoors
Set the containers outside in a sunny spot. They don’t need to be protected from snow or rain—the elements will help create the perfect growing environment.
Step 8: Monitor Progress
Check the containers periodically to ensure the soil stays moist. As the weather warms, watch for signs of germination.
Step 9: Ventilate and Transplant
When seedlings emerge, open the containers during warm days to provide airflow and prevent overheating. Once the frost risk has passed and seedlings are strong, transplant them into your garden or larger pots.
Tips for Success
- Choose the Right Location: Place your containers in an area that receives ample sunlight and is protected from strong winds.
- Moisture Matters: Keep the soil moist but not waterlogged. Snowmelt and rainfall usually provide enough water, but check during dry spells.
- Label Everything: It’s easy to forget what you planted, so clear labeling is crucial.
Common Mistakes to Avoid
- Starting Too Early:
While winter sowing relies on cold weather, starting seeds too early can cause premature germination. Late winter or early spring is the best time. - Using the Wrong Soil:
Always use well-draining potting soil or seed-starting mix. Heavy garden soil can stunt growth. - Overwatering or Underwatering:
Balance is key. Overwatering can lead to root rot, while underwatering can dry out the seeds. - Neglecting Ventilation:
Once seedlings start to grow, proper ventilation is crucial to prevent mold and overheating.
Benefits of Winter Sowing for the Environment
Winter sowing is an eco-friendly gardening method:
- Reuses Plastic: Instead of throwing away containers, repurpose them into greenhouses.
- No Electricity Needed: Unlike indoor seed-starting, winter sowing doesn’t require grow lights or heating mats.
- Reduces Waste: Growing your vegetables means fewer store-bought options with packaging.
What to Expect
Winter sowing isn’t an instant process, but it’s highly rewarding. Seeds may take weeks or even months to germinate, depending on the weather. However, the plants that emerge will be strong and ready to thrive in your garden.
Conclusion:
Winter sowing is an accessible and sustainable way to garden year-round. With a little preparation and patience, you can enjoy an early start to the growing season and harvest fresh, cold-hardy vegetables. Whether you’re a seasoned gardener or a beginner, this method is a game-changer.
Have you tried winter sowing before? Share your tips and experiences in the comments below! Let’s grow together!
#WinterSowing #VegetableGarden #GardeningTips #GrowYourOwnFood #EcoFriendlyGardening #GardeningLife #YearRoundHarvest #SeedStarting #ColdSeasonGardening