Gardening enthusiasts often face challenges with water management, especially in regions where water conservation is critical. Enter the wicking bed: a self-watering gardening solution that combines efficiency, sustainability, and simplicity. Designed to keep plants hydrated with minimal manual intervention, wicking beds have become a game-changer for gardeners worldwide. In this article, we’ll delve into the construction and performance of wicking beds, their benefits, and how they can revolutionize your gardening experience.
What is a Wicking Bed?
A wicking bed is essentially a self-watering garden bed that utilizes capillary action (or wicking) to deliver water from a reservoir at the base of the bed to the plant roots. This system mimics natural processes, providing plants with consistent moisture while reducing water waste and the need for frequent watering.
Benefits of Wicking Beds
- Water Conservation: Wicking beds are incredibly water-efficient, reducing evaporation and ensuring plants receive only the water they need.
- Healthier Plants: By keeping the root zone consistently moist, wicking beds promote strong root growth and healthier plants.
- Low Maintenance: With less frequent watering required, wicking beds save time and effort, making them ideal for busy gardeners.
- Sustainability: These systems prevent overwatering and nutrient runoff, contributing to a more eco-friendly garden.
- Versatility: Wicking beds are suitable for a wide variety of plants, from vegetables to flowers.
How to Build a Wicking Bed
Step 1: Choose Your Container
- Select a sturdy container with a depth of at least 30 cm (12 inches).
- Options include raised garden beds, large wooden boxes, or even repurposed containers like bathtubs or plastic bins.
Step 2: Create the Reservoir
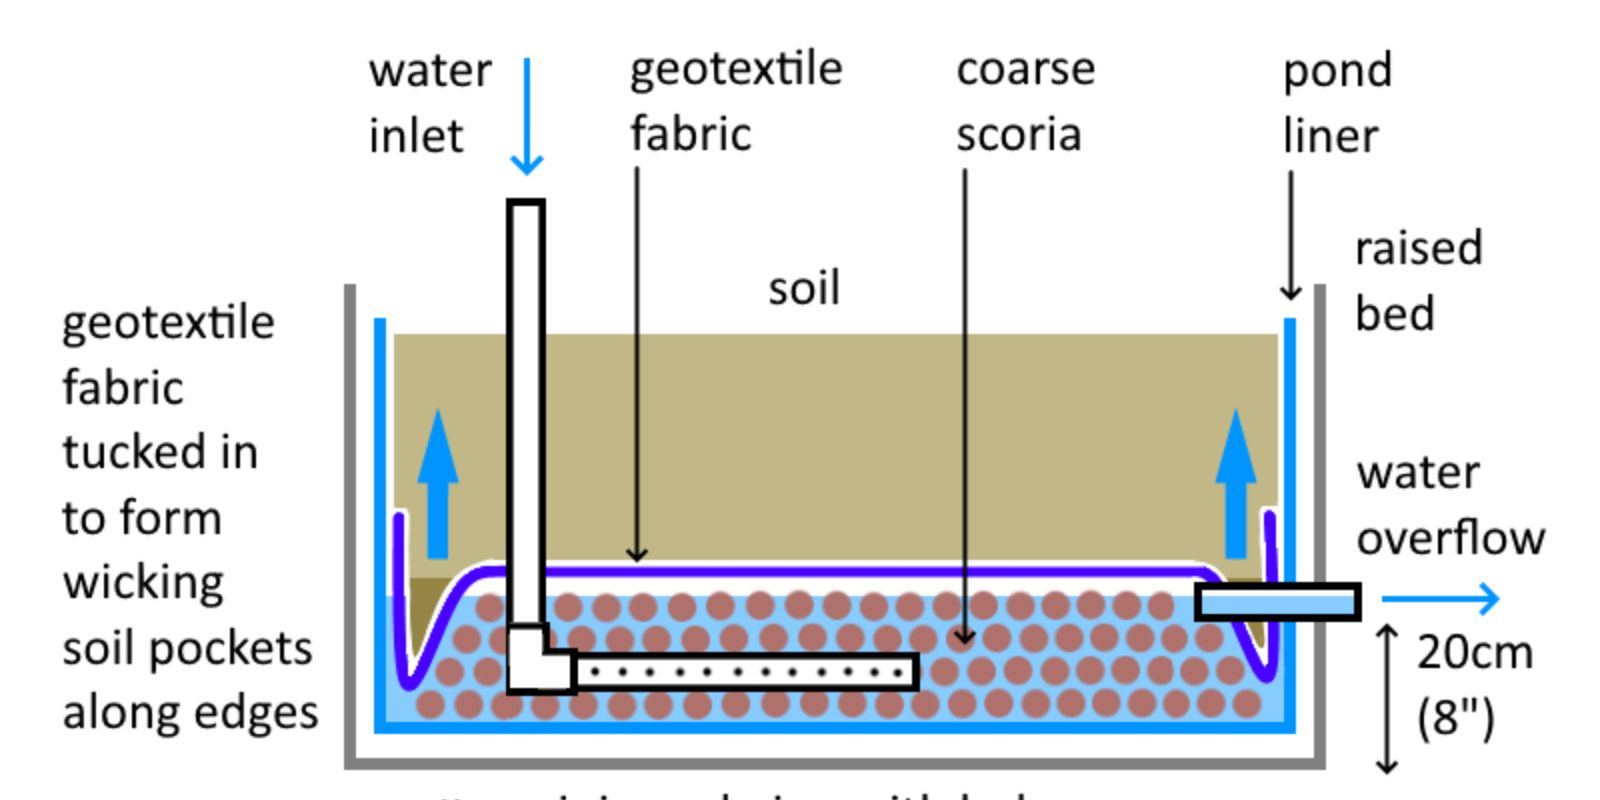
- Line the bottom of the container with a waterproof liner, such as heavy-duty plastic or pond liner, to create the water reservoir.
- Install a drainage outlet near the top of the reservoir to prevent overfilling.
Step 3: Add a Wicking Layer
- Fill the bottom of the container (the reservoir) with a wicking material such as gravel, coarse sand, or scoria.
- Ensure the layer is level for even water distribution.
Step 4: Install a Water Pipe
- Place a vertical PVC pipe or similar material into the reservoir for easy water refilling. The pipe should extend above the surface of the soil.
Step 5: Separate the Soil and Water Layers
- Add a layer of geotextile fabric or shade cloth over the wicking material to prevent soil from mixing with the reservoir.
Step 6: Add Soil
- Fill the remaining space in the container with nutrient-rich soil. This layer should be deep enough to support healthy root growth.
Step 7: Plant and Mulch
- Plant your desired vegetables, herbs, or flowers.
- Cover the soil surface with mulch to minimize evaporation and maintain consistent soil moisture.
Step 8: Water and Maintain
- Fill the reservoir via the water pipe until water begins to seep from the drainage outlet.
- Monitor water levels and refill as needed, typically once every few days to a week, depending on the climate.
Performance of Wicking Beds
Water Efficiency
Wicking beds can reduce water usage by up to 50% compared to traditional garden beds. The closed system minimizes evaporation and ensures that water is directed straight to the roots.
Improved Plant Growth
The consistent moisture provided by the wicking system eliminates the stress plants experience from irregular watering, leading to better growth and higher yields.
Weed Control
The soil surface remains relatively dry, discouraging weed germination and making maintenance easier.
Adaptability to Climate
Wicking beds perform exceptionally well in hot, dry climates where water conservation is essential. They also work in cooler regions, provided the reservoir doesn’t freeze.
Creative Ideas for Wicking Beds
- Vertical Wicking Beds: For small spaces, consider stacking smaller wicking beds to create a vertical garden.
- Repurposed Materials: Use old bathtubs, barrels, or crates to construct unique and sustainable wicking beds.
- Portable Wicking Beds: Build smaller wicking beds in containers with wheels for flexibility and mobility.
- Decorative Touches: Paint or decorate the exterior of your wicking bed to enhance your garden’s aesthetics.
Common Mistakes to Avoid
- Improper Layering: Ensure the reservoir, wicking material, and soil layers are correctly constructed to avoid waterlogging or uneven wicking.
- Using Non-Biodegradable Materials: Avoid materials that can leach harmful chemicals into the soil and plants.
- Ignoring Water Levels: Regularly check the water level in the reservoir to prevent plants from drying out.
- Overcrowding Plants: Space plants appropriately to ensure adequate water and nutrient distribution.
Maintenance Tips for Optimal Performance
- Inspect Regularly: Check the reservoir, drainage outlet, and water pipe for blockages or leaks.
- Replenish Nutrients: Since the system minimizes nutrient runoff, ensure the soil remains fertile by adding compost or organic fertilizers.
- Adjust for Seasons: In rainy seasons, reduce watering frequency. In dry periods, monitor the reservoir more closely.
Conclusion
Wicking beds are a revolutionary gardening method that combines efficiency, sustainability, and convenience. Whether you’re a seasoned gardener or a beginner, constructing a wicking bed can significantly enhance your gardening experience while conserving resources. By following the steps outlined in this guide, you’ll create a thriving garden that’s both eco-friendly and low-maintenance.
Ready to start your wicking bed journey? Share your progress and tips with fellow gardeners!
#WickingBeds #WaterSmartGardening #SustainableGardening #DIYGardenProjects #GrowYourOwnFood #GardeningHacks #EcoFriendlyGardening #EffortlessGardening

