
Introduction
Imagine turning your kitchen waste into a vibrant, productive garden of fresh carrots! Growing carrots from discarded stems is not only a sustainable way to recycle kitchen scraps but also a rewarding gardening project that yields delicious results. This method is perfect for both novice gardeners and seasoned green thumbs who want to add a bit of creativity to their gardening routine. In this comprehensive guide, we’ll walk you through the entire process of growing carrots from discarded stems, offering tips and insights to ensure your success.
Understanding the Basics
Carrots (Daucus carota) are a versatile and nutritious vegetable enjoyed by many. While most gardeners start from seeds or seedlings, using discarded stems is an innovative approach to propagate these root vegetables. The process leverages the fact that the green tops of carrots contain the potential to grow new roots. This method is particularly useful for those who wish to maximize their gardening efforts while minimizing waste.
Materials You Will Need
Before starting, gather the following materials:
- Fresh, organic carrots with healthy green tops
- A shallow container or dish
- Clean water
- Potting soil or garden soil
- A garden bed or large pot
- Mulch (optional)
Step-by-Step Guide to Growing Carrots from Discarded Stems
1. Select the Right Carrots
Choose fresh, organic carrots that have healthy, vibrant green tops. Carrots should be firm and not overly mature or starting to rot. The quality of the carrot tops will impact the success of your new carrot crop.
2. Prepare the Carrot Tops
Carefully cut the tops off the carrots, leaving about 1-2 inches of the stem attached. This part of the carrot will be used to generate new growth. Make sure to remove any excess dirt from the tops to prevent contamination.
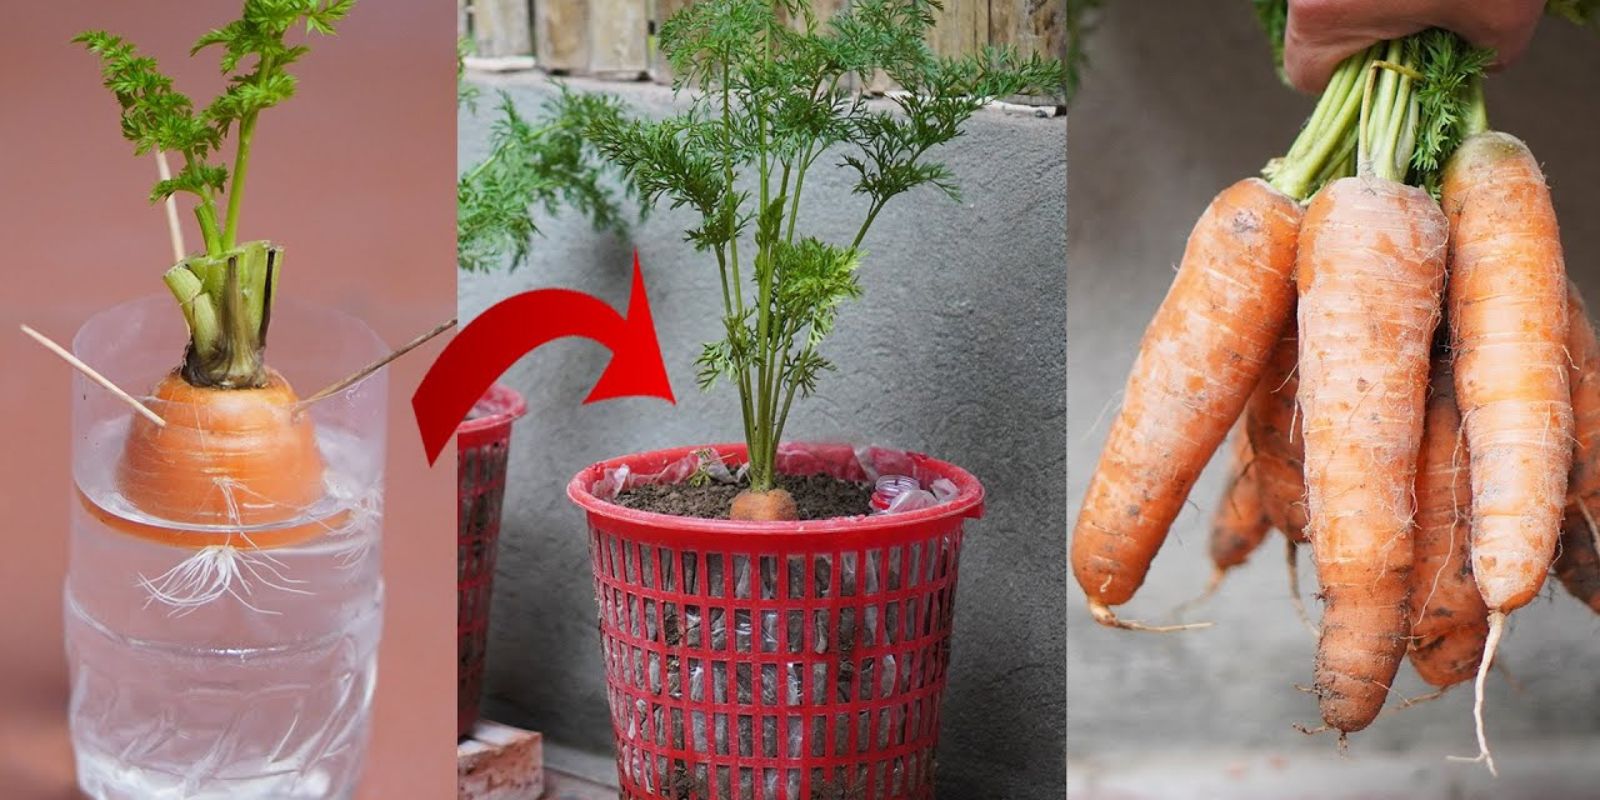
3. Place in Water
Fill a shallow container with clean water, enough to cover the cut ends of the carrot tops. Place the carrot tops in the container, ensuring that the cut ends are submerged. This will allow the tops to start growing new shoots.
4. Provide Sunlight
Position the container in a sunny spot where it can receive indirect sunlight. Carrots need light to stimulate growth, so a well-lit area will encourage the development of new shoots. Avoid placing the container in direct sunlight, as this may cause the water to become too warm.
5. Change Water Regularly
To keep the growing environment clean and promote healthy growth, change the water in the container daily. This helps prevent the growth of mold and keeps the water fresh for the carrot tops.
6. Transplant to Soil
Once the carrot tops develop new green shoots, it’s time to transfer them to soil. Prepare a garden bed or large pot with well-draining soil. Create holes about 1 inch deep and place the carrot tops in the holes with the green shoots facing upward. Space them about 2-3 inches apart to give each plant enough room to grow.
7. Water and Mulch
Water the newly planted carrot tops thoroughly to help them settle into the soil. Keep the soil consistently moist but not waterlogged. Applying a layer of mulch around the carrot tops can help retain moisture, reduce weed growth, and regulate soil temperature.
8. Monitor Growth
As the carrot tops grow, you’ll notice the development of carrot roots beneath the soil. Keep an eye on the plants, ensuring they receive adequate water and sunlight. Be mindful of pests and diseases, and address any issues promptly to maintain healthy plants.
9. Harvesting Carrots
In approximately 6-8 weeks, the carrots will be ready for harvest. Gently pull the carrots from the soil, being careful not to damage the roots. If you planted them in a pot, you can simply lift the entire pot to check for mature carrots. Freshly harvested carrots can be enjoyed raw, cooked, or stored for later use.
10. Replanting and Extending the Season
If you want to continue growing carrots, you can replant new carrot tops or sow carrot seeds directly into the soil. Carrots can be grown year-round in many climates, so consider starting a new batch to enjoy a continuous harvest.
Benefits of Growing Carrots from Discarded Stems
- Sustainability: This method reduces kitchen waste by repurposing discarded carrot tops.
- Cost-Effective: It eliminates the need to purchase seeds or seedlings for your carrot crop.
- Educational: Provides a valuable learning experience about plant propagation and growth.
- Fresh Produce: Enjoy the satisfaction of growing your own fresh, organic carrots.
Challenges and Considerations
While growing carrots from discarded stems is an exciting and innovative approach, there are a few challenges to be aware of:
- Root Development: The success of root development can vary, and not all carrot tops will produce large or healthy carrots.
- Space: Ensure you have enough space to accommodate the growing carrot plants, especially if you’re growing them in containers.
- Timing: Be patient, as it may take several weeks to see significant growth and yield.
Conclusion
Growing carrots from discarded stems is a rewarding and eco-friendly gardening technique that allows you to transform kitchen scraps into a thriving vegetable garden. By following these steps, you can enjoy fresh, homegrown carrots while contributing to a more sustainable lifestyle. Whether you’re an experienced gardener or just starting out, this method offers a creative way to maximize your gardening efforts and minimize waste.
Motivation Sentence
Ready to turn kitchen scraps into a flourishing carrot garden? Start growing your own fresh carrots today and experience the joy of home gardening! 🌱🥕 #CarrotGardening #KitchenScraps #SustainableLiving #HomegrownVeggies #GardeningTips #EcoFriendlyGardening #GrowYourOwnFood