
Orchids are captivating, delicate, and sometimes challenging plants to grow. Their exotic blooms and elegant structures make them a favorite among gardeners, but these beauties often come with their share of challenges. If your orchid is not blooming, has yellowing leaves, or displays other signs of distress, this ultimate troubleshooting guide will help you diagnose, treat, and prevent the most common issues.
In this article, we’ll walk through each problem, from watering mistakes to pests and diseases, and give you actionable advice to restore your orchids to health. Let’s dive in!
1. Orchid Not Blooming
One of the most common frustrations for orchid owners is the lack of blooms. This problem can arise from several issues, including improper light, inadequate fertilization, or unsuitable temperature.
Possible Causes:
- Insufficient Light: Orchids need bright, indirect light. If they are kept in low-light conditions, they won’t have enough energy to produce flowers. Phalaenopsis orchids, for example, thrive in medium to bright indirect light.
- Incorrect Temperature: Orchids are sensitive to temperature changes. Most orchids prefer temperatures between 60°F to 80°F (15°C to 27°C) during the day and slightly cooler at night.
- Improper Fertilization: Orchids require regular feeding to encourage blooming. Fertilizing with a balanced orchid-specific fertilizer can help promote flowering.
- Seasonal Dormancy: Some orchids naturally go through a dormancy period after blooming. During this time, they conserve energy for the next bloom cycle.
Solutions:
- Increase Light Exposure: Move your orchid to a brighter location or supplement with grow lights, especially during the winter months.
- Check Temperature: Maintain a stable temperature within the recommended range, and avoid placing your orchid near drafty windows or heating vents.
- Fertilize Properly: Use a balanced orchid fertilizer (20-20-20 or 30-10-10) once a month, but reduce feeding during the dormant period.
- Be Patient: If your orchid is dormant, allow it time to rest before the next blooming season.
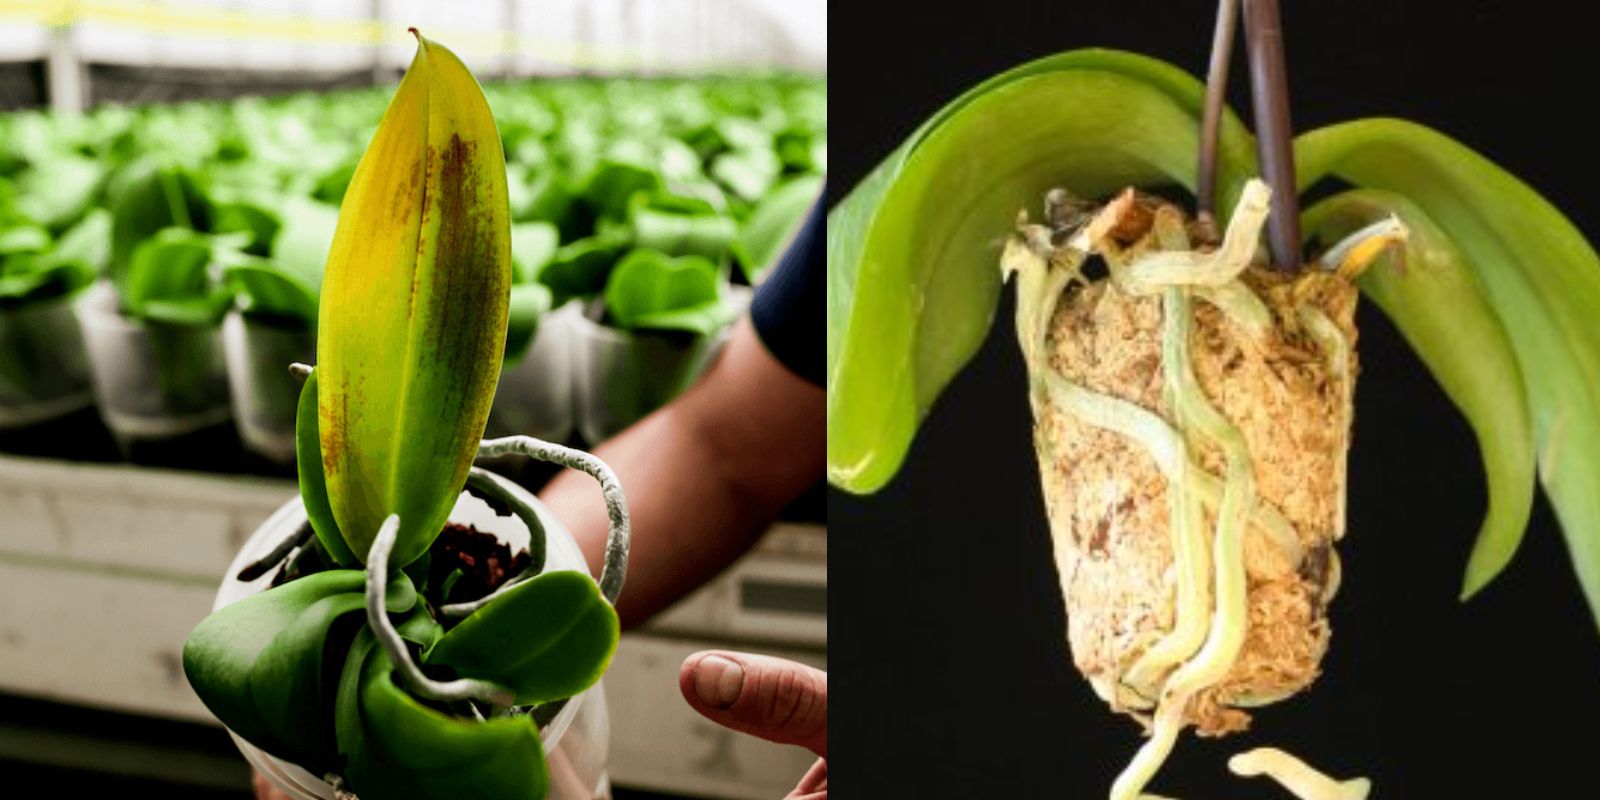
2. Yellow Leaves
Yellowing leaves are often a sign of stress in orchids. This can result from overwatering, underwatering, or improper lighting.
Possible Causes:
- Overwatering: Orchids are epiphytes, meaning they naturally grow in trees where water drains quickly. Overwatering can lead to root rot, which manifests in yellow leaves.
- Underwatering: On the other hand, too little water can cause the plant to dehydrate, leading to yellowing leaves.
- Too Much Direct Sunlight: Excessive direct sunlight can scorch the leaves, causing them to yellow.
- Natural Aging: Sometimes, the oldest leaves will turn yellow and fall off as part of the plant’s natural cycle.
Solutions:
- Check Watering Habits: Water your orchid once a week, or when the potting medium is dry to the touch. Make sure the plant is in a well-draining orchid potting mix and never allow it to sit in standing water.
- Adjust Lighting: Move your orchid to a spot where it receives indirect light. If the leaves are turning yellow on one side, the plant may be getting too much direct sunlight.
- Trim Old Leaves: If the yellowing is due to natural aging, gently trim off the affected leaves to keep your orchid looking tidy.
3. Root Rot
Root rot is a serious issue that often occurs due to overwatering or poor drainage. Healthy orchid roots are firm and white or greenish in color. Infected roots, however, become brown, black, or mushy.
Possible Causes:
- Overwatering: Consistently moist potting medium suffocates orchid roots and leads to rot.
- Poor Drainage: If your orchid’s pot doesn’t have proper drainage, water can accumulate at the bottom, leading to root rot.
- Wrong Potting Medium: Using regular soil or a potting mix that retains too much moisture can cause roots to rot.
Solutions:
- Repot Immediately: If you notice root rot, repot your orchid in fresh, well-draining orchid bark or sphagnum moss. Remove any infected roots with sterilized scissors.
- Improve Drainage: Ensure your orchid’s pot has drainage holes. Elevating the pot slightly or placing pebbles at the bottom can help excess water escape.
- Adjust Watering Routine: After repotting, water the orchid sparingly, ensuring the medium dries out between watering sessions.
4. Wrinkled or Limp Leaves
Wrinkled or limp orchid leaves typically indicate dehydration or root damage, making it difficult for the plant to absorb water.
Possible Causes:
- Underwatering: If orchids don’t receive enough water, they won’t be able to maintain firm, plump leaves.
- Root Damage: Damaged or rotting roots can’t absorb water properly, leading to dehydration symptoms in the leaves.
Solutions:
- Increase Watering: Gradually increase watering frequency and make sure the potting medium is sufficiently moist between waterings.
- Check Roots: Gently remove your orchid from its pot and inspect the roots. Remove any damaged or dead roots and repot the plant in fresh medium.
5. Bud Blast (Orchid Buds Falling Off)
It’s disheartening when orchid buds develop but fall off before opening. This phenomenon, known as bud blast, is often caused by environmental stress.
Possible Causes:
- Temperature Fluctuations: Sudden changes in temperature, especially cold drafts, can cause buds to drop.
- Low Humidity: Orchids thrive in humid environments, and low humidity can stress them, leading to bud blast.
- Relocation Stress: Moving an orchid to a new environment can cause it to lose buds as it adjusts to the new conditions.
Solutions:
- Stabilize Temperature: Keep your orchid in a stable environment, away from cold drafts and sudden temperature changes.
- Increase Humidity: Mist your orchid regularly or use a humidity tray to increase the moisture level in the air around the plant.
- Minimize Relocation: If possible, avoid moving your orchid, especially when it’s forming buds.
6. Brown or Black Leaf Spots
Brown or black spots on orchid leaves are often signs of fungal or bacterial infections. These infections thrive in moist environments and can spread quickly if left untreated.
Possible Causes:
- Fungal Infection: Fungal infections usually appear as small, water-soaked spots that grow and darken over time.
- Bacterial Infection: Bacterial infections often cause soft, mushy spots that may release fluid if pressed.
Solutions:
- Improve Air Circulation: Place your orchid in a well-ventilated area to reduce moisture buildup. Avoid misting the leaves if the environment is already humid.
- Prune Affected Areas: Trim off any infected leaves using sterilized scissors to prevent the infection from spreading.
- Treat with Fungicide: Use a fungicide or a bactericide specifically designed for orchids to treat the affected plant.
7. Pests (Aphids, Mealybugs, Scale, Spider Mites)
Pests can infest orchids, damaging their leaves, flowers, and stems. Common pests include aphids, mealybugs, scale, and spider mites.
Possible Causes:
- Poor Air Circulation: Stagnant air can create a favorable environment for pests to thrive.
- Overcrowded Plants: Orchids placed too close together can allow pests to spread quickly from one plant to another.
Solutions:
- Isolate Affected Plants: Quarantine any orchids with pests to prevent the infestation from spreading.
- Wipe Down Leaves: Use a cotton ball soaked in rubbing alcohol to wipe off visible pests.
- Apply Insecticidal Soap: Treat the entire plant with insecticidal soap, neem oil, or another natural pesticide. Be sure to follow the instructions carefully to avoid damaging the plant.
8. Mold or Mildew on the Potting Medium
A white or gray fuzzy mold growing on your orchid’s potting medium is typically caused by excessive moisture and poor air circulation.
Possible Causes:
- Overwatering: Consistently damp conditions encourage mold and mildew growth.
- Inadequate Ventilation: Poor air circulation, especially in humid environments, can cause moisture to accumulate in the potting medium.
Solutions:
- Remove Mold: Gently remove the top layer of the affected medium and replace it with fresh, clean material.
- Improve Ventilation: Place your orchid in an area with good airflow. A fan can help circulate air and prevent mold from forming.
- Reduce Watering: Allow the medium to dry out slightly between watering to prevent mold growth.
Conclusion
Caring for orchids can sometimes be a challenge, but understanding the signs of stress and knowing how to troubleshoot common issues can save your plant. From watering habits to pest control, mastering these skills will help you grow thriving, beautiful orchids that bloom year after year. By following this guide, you’ll be able to diagnose and address problems quickly, ensuring that your orchid stays healthy and vibrant.
Remember, orchids are resilient plants when cared for properly, and with time and attention, even the most distressed orchids can bounce back and reward you with stunning blooms.