
Rosemary (Salvia rosmarinus) is a versatile and fragrant herb, widely used in cooking, medicine, and even as an ornamental plant. While it can be grown from seeds, propagating rosemary from cuttings is a much faster and more reliable way to grow healthy new plants. Rooting rosemary cuttings at home is simple, cost-effective, and a rewarding gardening project.
In this comprehensive guide, we’ll cover everything you need to know about propagating rosemary, from selecting the right cuttings to providing the best conditions for growth. Whether you’re a beginner or an experienced gardener, follow these steps to successfully root rosemary cuttings and expand your herb garden.
Why Propagate Rosemary from Cuttings?
Growing rosemary from cuttings offers several advantages over starting from seeds:
✅ Faster Growth – Seeds take months to germinate, while cuttings root within weeks.
✅ Genetic Consistency – Cuttings produce identical plants to the parent, preserving desirable traits.
✅ Higher Success Rate – Rosemary seeds have a low germination rate, making cuttings a more reliable option.
✅ Cost-Effective – No need to buy new plants when you can multiply your existing ones for free!
Step-by-Step Guide to Rooting Rosemary Cuttings
1. Selecting and Cutting Rosemary Stems
The first step to successful propagation is choosing the right cuttings.
- Select a healthy, mature rosemary plant that is free from pests and diseases.
- Choose softwood or semi-hardwood stems that are young and flexible, as they root faster than older, woody stems.
- Use a sharp, clean pair of scissors or pruning shears to cut stems that are about 10-15 cm (4-6 inches) long.
📌 Pro Tip: Cuttings taken in the spring or early summer tend to root faster since the plant is in an active growth phase.
2. Preparing the Cuttings for Rooting
Once you have your cuttings, preparation is key to successful rooting.
- Remove the bottom leaves from the lower half of the cutting. This prevents rot and encourages root development.
- Make a clean cut at the base at a slight angle. This increases the surface area for root growth.
- Dip the cut end in a rooting hormone (optional but recommended). Rooting hormones contain growth stimulants that encourage faster and stronger root development.
- If you prefer a natural alternative, soak the cuttings in lentil water, honey water, or aloe vera gel, which contain natural growth-promoting properties.
📌 Pro Tip: Let the cuttings dry for a few hours before planting to prevent fungal infections.
3. Choosing the Best Rooting Method
There are two main methods for rooting rosemary cuttings: water propagation and soil propagation.
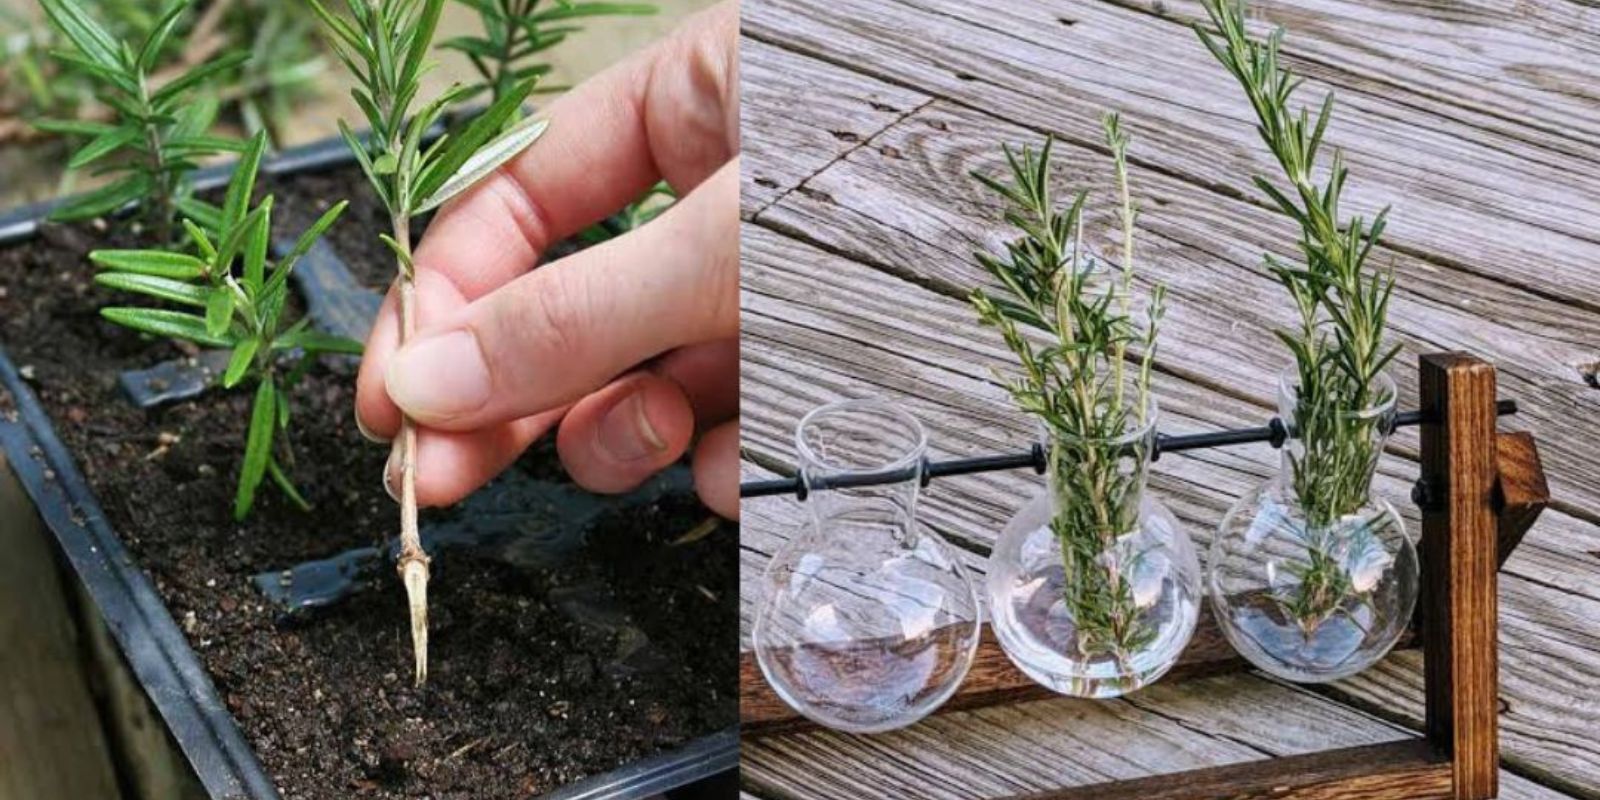
Method 1: Rooting in Water
- Place the prepared cuttings in a jar of clean water, ensuring that only the lower part is submerged.
- Change the water every 2-3 days to prevent bacterial growth.
- Keep the jar in a warm location with indirect sunlight.
- Roots should begin to appear within 2-4 weeks.
📌 Pro Tip: Once roots are at least 2 cm (1 inch) long, transfer the cuttings to soil to prevent transplant shock.
Method 2: Rooting in Soil
- Fill a small pot with well-draining potting mix (a mix of perlite, sand, and peat moss works well).
- Make a hole in the soil and insert the cutting, gently pressing the soil around it.
- Water the soil lightly to keep it moist but not soggy.
- Cover the pot with a plastic bag or dome to create a humid environment, helping the cuttings retain moisture.
- Place the pot in a warm spot with indirect sunlight.
📌 Pro Tip: If using the soil method, mist the cuttings regularly to maintain humidity and prevent drying out.
4. Providing the Ideal Growing Conditions
For rosemary cuttings to thrive, you need to provide the right environment:
🌡 Temperature: Keep the cuttings in a warm location, ideally between 18-24°C (65-75°F). Avoid extreme heat or cold.
💡 Light: Place the cuttings in bright, indirect sunlight. Avoid direct sun exposure, which can cause dehydration.
💧 Watering: Keep the soil or water slightly moist. Avoid overwatering, as rosemary is prone to root rot.
🌱 Humidity: Covering the cuttings with a plastic bag helps create a humid environment, especially in dry climates.
📌 Pro Tip: Remove the plastic cover for a few minutes daily to prevent fungal growth.
5. Transplanting Rooted Rosemary Cuttings
Once your rosemary cuttings have developed strong roots (after 4-6 weeks), they are ready for transplanting.
- Prepare a larger pot or garden bed with well-draining soil (sandy or loamy soil is ideal).
- Carefully remove the cuttings from their water or propagation pot, handling them gently to avoid damaging the roots.
- Dig a small hole and plant the cutting, pressing the soil firmly around the base.
- Water lightly and place the newly transplanted rosemary in a partially shaded area for a few days before moving it to full sun.
📌 Pro Tip: If planting outdoors, space the rosemary plants 30-60 cm (12-24 inches) apart to allow proper air circulation.
Caring for Your New Rosemary Plants
Now that your rosemary cuttings have been successfully transplanted, follow these care tips to ensure healthy growth:
☀️ Sunlight: Rosemary loves full sun! Provide at least 6-8 hours of sunlight daily.
💦 Watering: Water only when the soil is dry to the touch. Avoid overwatering, as rosemary prefers slightly dry conditions.
✂️ Pruning: Regularly trim your rosemary to encourage bushy growth and prevent legginess.
🌱 Fertilizing: Feed your rosemary with a diluted organic fertilizer every 6-8 weeks for healthy growth.
📌 Pro Tip: Harvest rosemary regularly by snipping off sprigs, but avoid cutting more than one-third of the plant at a time.
Common Mistakes to Avoid
🚫 Overwatering: Too much moisture can cause root rot. Always let the soil dry out between watering.
🚫 Using Old, Woody Stems: Choose young, flexible stems for better rooting success.
🚫 Lack of Humidity: Dry air can cause the cuttings to wilt. Keep the humidity level balanced.
🚫 Skipping Rooting Hormone: While not essential, using a rooting hormone or natural alternative can speed up the process.
Conclusion
Rooting rosemary cuttings at home is an easy and rewarding way to grow this aromatic herb. By following these simple steps—choosing healthy cuttings, preparing them properly, selecting the best rooting method, and providing ideal conditions—you can successfully propagate rosemary and enjoy an endless supply in your garden or kitchen.
So why not give it a try? Start your rosemary propagation today and let us know how it goes in the comments! Happy gardening! 🌿✨