
Roses are a timeless symbol of beauty, often cherished in gardens worldwide. Over the years, various creative techniques for propagating roses have emerged, including the unconventional use of tomato slices. While this idea sounds intriguing, it lacks scientific evidence to support its effectiveness. Instead, reliable methods like propagating roses from stem cuttings remain tried and true. This guide explores the myths around using tomato slices and provides a step-by-step approach to propagate roses successfully using stem cuttings.
Debunking the Tomato Slice Method
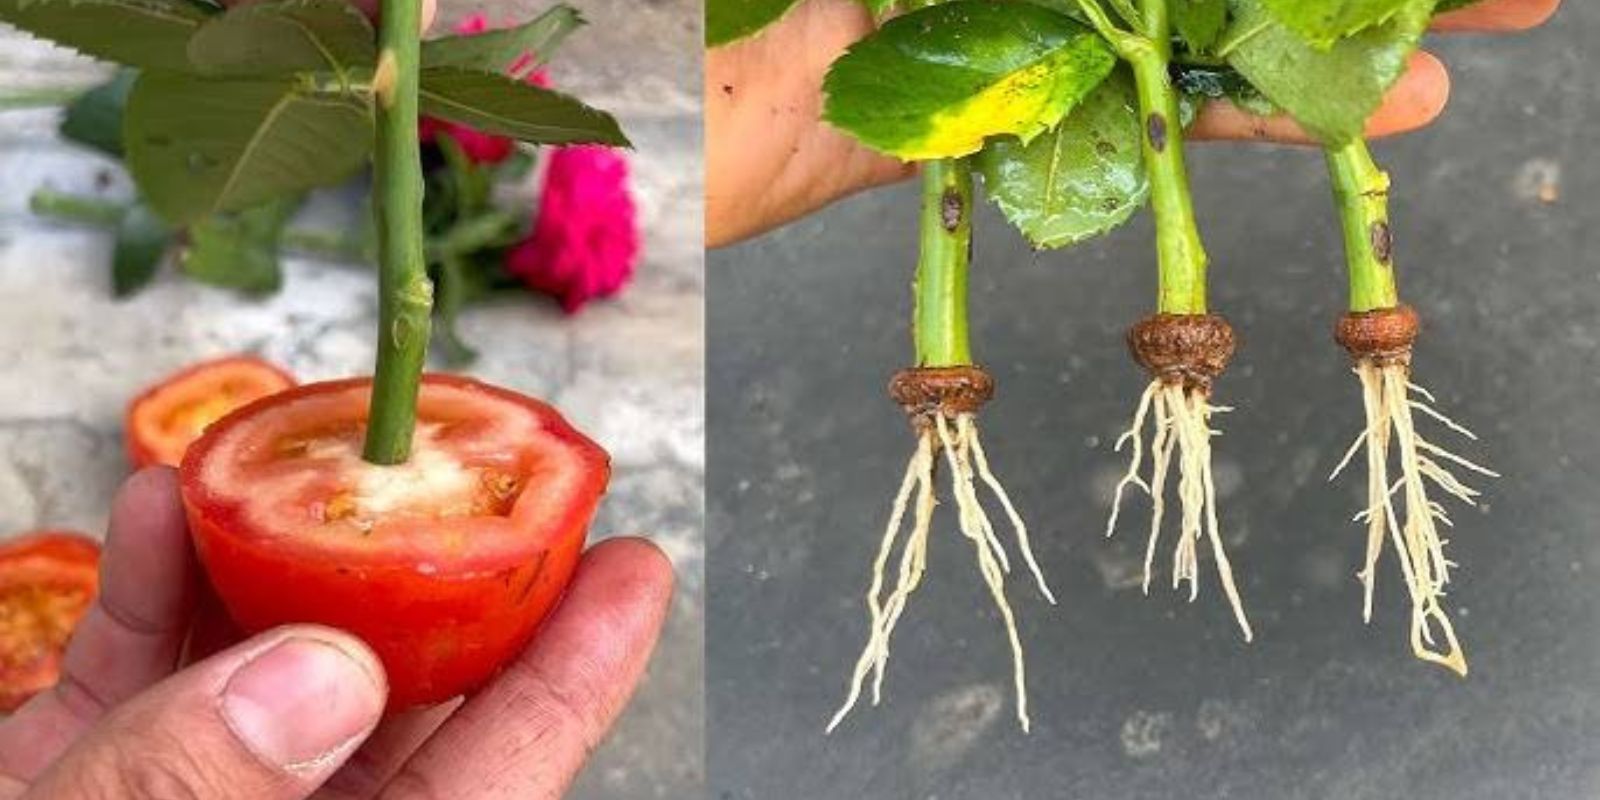
The concept of placing a rose stem with tomato slices into the soil has gained attention due to its simplicity and appeal. Proponents claim the tomato’s moisture and nutrients create an ideal environment for the rose stem to root. However, roses and tomatoes are from different plant families, and their biological differences make this technique highly unreliable. While the tomato slices may retain moisture, they are not sufficient to trigger root formation in rose stems. Instead of experimenting with uncertain methods, focus on proven propagation techniques.
Proven Method: Propagating Roses Using Stem Cuttings
Propagating roses through stem cuttings is a reliable and straightforward way to grow new plants. This method works because the stem has natural nodes that can produce roots when placed in the right conditions.
Why Use the Stem Cutting Method?
- High success rate compared to unconventional methods.
- Requires minimal materials and effort.
- Allows gardeners to clone their favorite rose varieties.
Materials Needed:
- A healthy rose plant.
- Pruning shears or a sharp knife.
- Rooting hormone (optional but helpful).
- Small pots or containers.
- Well-draining potting mix.
- Clear plastic bags or humidity domes.
- Spray bottle for misting.
Step-by-Step Guide to Propagating Roses
1. Select a Healthy Stem
Choose a healthy, semi-hardwood stem from the parent rose plant. The stem should be 6-8 inches long, slightly mature but not too woody. Look for stems with at least 3-4 leaf nodes (small bumps where leaves grow).
2. Make a Clean Cut
Using sharp pruning shears, cut the stem at a 45-degree angle just below a leaf node. This increases the surface area for rooting. Remove any flowers, buds, and lower leaves, leaving only a couple of leaves at the top.
3. Prepare the Cutting
(Optional) Dip the cut end into a rooting hormone to encourage root formation. While this step is optional, it can significantly improve the success rate, especially for novice gardeners.
4. Plant the Cutting
Fill a small pot with well-draining potting mix. Make a hole in the soil using a pencil or stick, then gently place the stem cutting into the hole, about 2 inches deep. Firm the soil around the cutting to ensure stability.
5. Create a Humid Environment
Cover the pot with a clear plastic bag or a humidity dome to retain moisture. This acts like a mini greenhouse, preventing the cutting from drying out. Ensure the plastic doesn’t touch the leaves to avoid mold growth.
6. Provide Ideal Conditions
Place the pot in a location with bright, indirect light. Avoid direct sunlight as it can scorch the cutting. Maintain a temperature range of 65-75°F (18-24°C).
7. Water and Mist Regularly
Keep the soil consistently moist but not waterlogged. Use a spray bottle to mist the cutting daily, ensuring the leaves stay hydrated.
8. Monitor for Root Growth
Check for signs of root development after 4-6 weeks. Gently tug on the cutting to see if there is resistance, indicating roots have formed.
9. Transplanting
Once the roots are well-established, transplant the rose into a larger pot or directly into your garden. Choose a sunny location with well-draining soil and water the plant regularly.
Tips for Successful Rose Propagation
- Choose the Right Season: Late spring and early summer are ideal for taking cuttings.
- Avoid Overwatering: Too much water can cause the stem to rot before rooting.
- Use Sterile Tools: Clean pruning shears to reduce the risk of infection.
- Patience is Key: Rooting takes time; avoid disturbing the cutting frequently.
Common Mistakes to Avoid
- Using Diseased or Weak Stems: This lowers the chances of success.
- Planting in Poor Soil: Roses require nutrient-rich, well-draining soil for healthy growth.
- Neglecting Humidity: Without adequate moisture, the cutting may dry out.
Why Tomato Slices Don’t Work for Rose Propagation
Despite its popularity as a gardening hack, the tomato slice method does not cater to the biological needs of rose cuttings. While tomatoes can provide moisture, they lack the structure and nutrients necessary for rooting. The excess moisture can also lead to fungal growth, further decreasing the likelihood of success. Stick to proven methods like stem cuttings to save time and effort.
Conclusion
Growing new roses from cuttings is a rewarding process that allows gardeners to expand their collections and preserve favorite varieties. While the idea of using tomato slices may seem like a fun experiment, it is unreliable. Instead, follow the step-by-step stem cutting method outlined above for a higher success rate and healthier plants.
🌹 Have you ever tried propagating roses? Share your success stories or tips in the comments below!
#RosePropagation #GardeningHacks #GrowYourOwn #DIYGardening #BeautifulBlooms