
In a world increasingly focused on sustainability, gardeners and farmers are revisiting ancient techniques to conserve resources while ensuring robust plant growth. One such age-old method making a comeback is olla irrigation—a simple yet ingenious way to water plants efficiently. Originating over 2,000 years ago in arid regions, this technique delivers water directly to plant roots, minimizing wastage and promoting healthier growth. In this article, we’ll explore what an olla is, why it works so well, and how you can create and use one in your garden.
What is an Olla?
An olla is an unglazed, porous clay pot that is buried in soil and filled with water. The porous walls of the olla allow water to seep out slowly, providing consistent moisture directly to the roots of nearby plants. This system eliminates surface evaporation, reduces water waste, and ensures that plants receive just the right amount of hydration.
The simplicity of this technique makes it a sustainable and cost-effective solution for gardeners, particularly in areas prone to drought or for those looking to reduce water usage.
Why Does Olla Irrigation Work So Well?
The science behind olla irrigation lies in the natural properties of porous clay. Here’s why it’s so effective:
- Slow Release of Water:
The porous nature of the clay pot ensures water seeps out gradually, directly into the surrounding soil. This prevents overwatering and provides plants with consistent hydration. - Root-Centered Hydration:
Plants naturally grow their roots toward the water source. By placing an olla near plants, you encourage deep root growth, leading to stronger, healthier plants. - Water Conservation:
Unlike traditional surface watering methods, an olla reduces evaporation and runoff. This makes it ideal for water-scarce regions or for gardeners aiming to conserve resources. - Low Maintenance:
Once an olla is in place, it requires minimal attention. Simply refill it with water every few days or as needed, depending on the weather and plant needs. - Eco-Friendly:
Ollas are reusable, biodegradable, and require no external energy sources, making them an excellent choice for environmentally conscious gardeners.
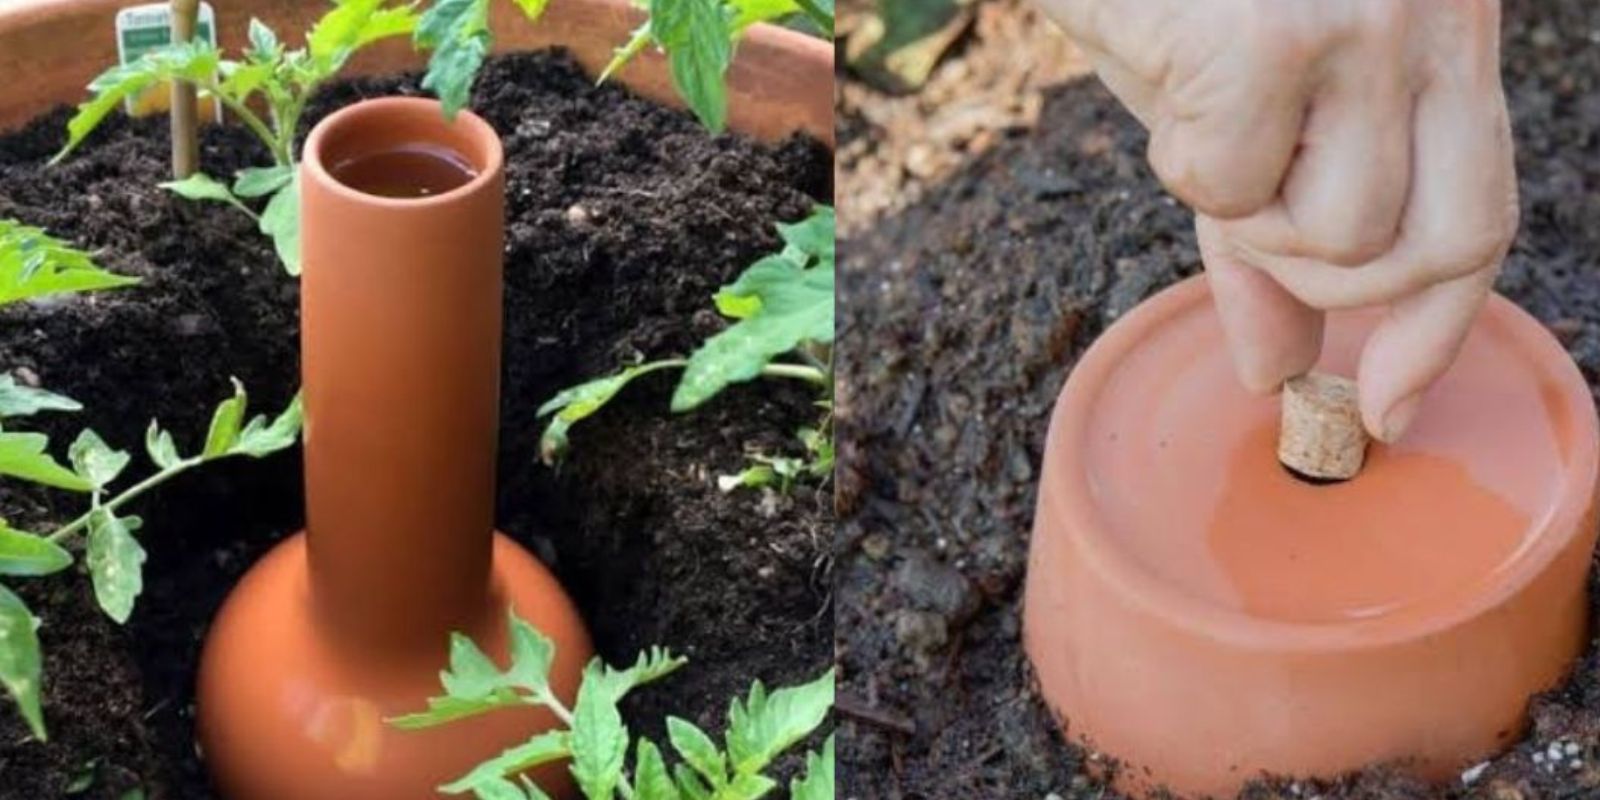
How to Make Your Own Olla at Home
Creating an olla is surprisingly simple and affordable. Here’s a step-by-step guide to help you craft your own:
Materials Needed:
- Two unglazed terracotta pots (same size)
- Waterproof sealant (such as silicone or clay)
- A small tile or similar material to cover the bottom hole
- Soil and plants for use
Instructions:
- Seal the Bottom Hole:
Take one terracotta pot and seal the drainage hole at the bottom using a waterproof sealant. Allow it to dry completely before proceeding. - Join the Pots:
Place the second pot upside down on top of the first one, aligning the rims. Use the sealant to secure the two pots together, creating a hollow vessel. - Optional Lid:
To prevent debris from entering the olla, use a small lid, stone, or cork to cover the open top of the upper pot. - Install the Olla:
Dig a hole in your garden or planter deep enough to bury the olla, leaving only the top portion exposed. - Fill with Water:
Fill the olla with water, cover the opening, and watch as it slowly hydrates your plants over the next few days.
How to Use an Olla in Your Garden
- Placement:
Position the olla near plants that require consistent moisture, such as vegetables, flowers, or shrubs. - Spacing:
The coverage area of an olla depends on its size. A small olla can hydrate plants within a 1-foot radius, while larger ones may cover up to 3 feet. - Refilling:
Check the water level every few days and refill as needed. During hot weather, you may need to refill more frequently. - Seasonal Adjustments:
In cooler months, plants require less water, so ollas may need refilling less often.
Benefits of Using Ollas in Gardening
- Cost-Effective:
Once installed, ollas save money on water bills and reduce the need for frequent irrigation. - Improved Soil Health:
By preventing surface water runoff, ollas help maintain soil structure and reduce erosion. - Fewer Weeds:
Since water is delivered directly to plant roots, the surrounding soil remains dry, discouraging weed growth. - Supports Sustainable Practices:
Ollas are a natural way to reduce water waste and promote eco-friendly gardening.
Pro Tips for Using Ollas Effectively
- Use High-Quality Clay Pots:
Choose unglazed terracotta pots, as their porosity is essential for slow water release. - Combine with Mulch:
Adding a layer of mulch around the olla can further reduce evaporation and help retain soil moisture. - Monitor Plant Needs:
Different plants have varying water requirements. Observe your plants to ensure they’re receiving the right amount of hydration. - Use Multiple Ollas for Larger Gardens:
For larger areas, install multiple ollas to ensure even watering. - Winter Care:
In regions with freezing temperatures, remove ollas during the winter to prevent cracking.
Who Can Benefit from Olla Irrigation?
Ollas are versatile and beneficial for various types of gardeners:
- Urban Gardeners: Perfect for balcony or rooftop gardens where water access may be limited.
- Beginner Gardeners: Easy to set up and maintain, making it ideal for those new to gardening.
- Sustainable Gardeners: An excellent choice for those committed to eco-friendly practices.
- Farmers in Arid Regions: Particularly useful in areas with limited water resources.
Conclusion: Water Smartly, Grow Abundantly
The ancient technique of olla irrigation proves that sometimes, the simplest methods are the most effective. By delivering water directly to plant roots, this system saves resources, promotes healthier growth, and simplifies garden maintenance. Whether you’re a seasoned gardener or just starting, incorporating ollas into your garden is a step toward more sustainable and efficient gardening.
Ready to give it a try? Let us know in the comments if you’ve used ollas before or if you plan to make one for your garden. Together, we can grow greener and smarter!