
Flower propagation is one of the most rewarding aspects of gardening. It allows you to grow new plants from the ones you already have, expanding your garden without the need to purchase new flowers. Whether you’re looking to clone your favorite blooms, create a beautiful new display, or share plants with friends and family, knowing the right propagation techniques is essential. This guide reveals the secret to propagating flowers easily, helping you take cuttings and turn them into new, thriving plants.
Why Propagate Flowers?
Before we dive into the methods, let’s talk about why you should consider propagating flowers in the first place. Flower propagation offers several key benefits:
- Cost-Effective: Buying new flowers, especially premium or rare varieties, can be expensive. Propagating your own flowers allows you to save money while growing more of what you love.
- Expand Your Garden: If you have limited space, propagating flowers helps you get more plants without overcrowding your garden. You can create a vibrant display with ease.
- Preserve Special Varieties: If you have a plant with a particularly striking flower or sentimental value, propagating ensures you’ll have more of that plant in the future.
- Gift Giving: Propagated flowers make thoughtful gifts for friends and family, whether it’s for a birthday, holiday, or just because.
- Sustainability: Propagating flowers is an eco-friendly practice. It reduces the need for new plants, minimizes packaging waste, and lowers your carbon footprint.
The Secret to Easy Flower Propagation
The secret to propagating any flower easily lies in a few simple techniques: selecting the right plant, taking the perfect cutting, and providing the proper conditions for rooting. Understanding these key steps will ensure that your propagation efforts are successful.
1. Choosing the Right Flower for Propagation
Not all flowers can be propagated in the same way. The most common types of flower propagation are:
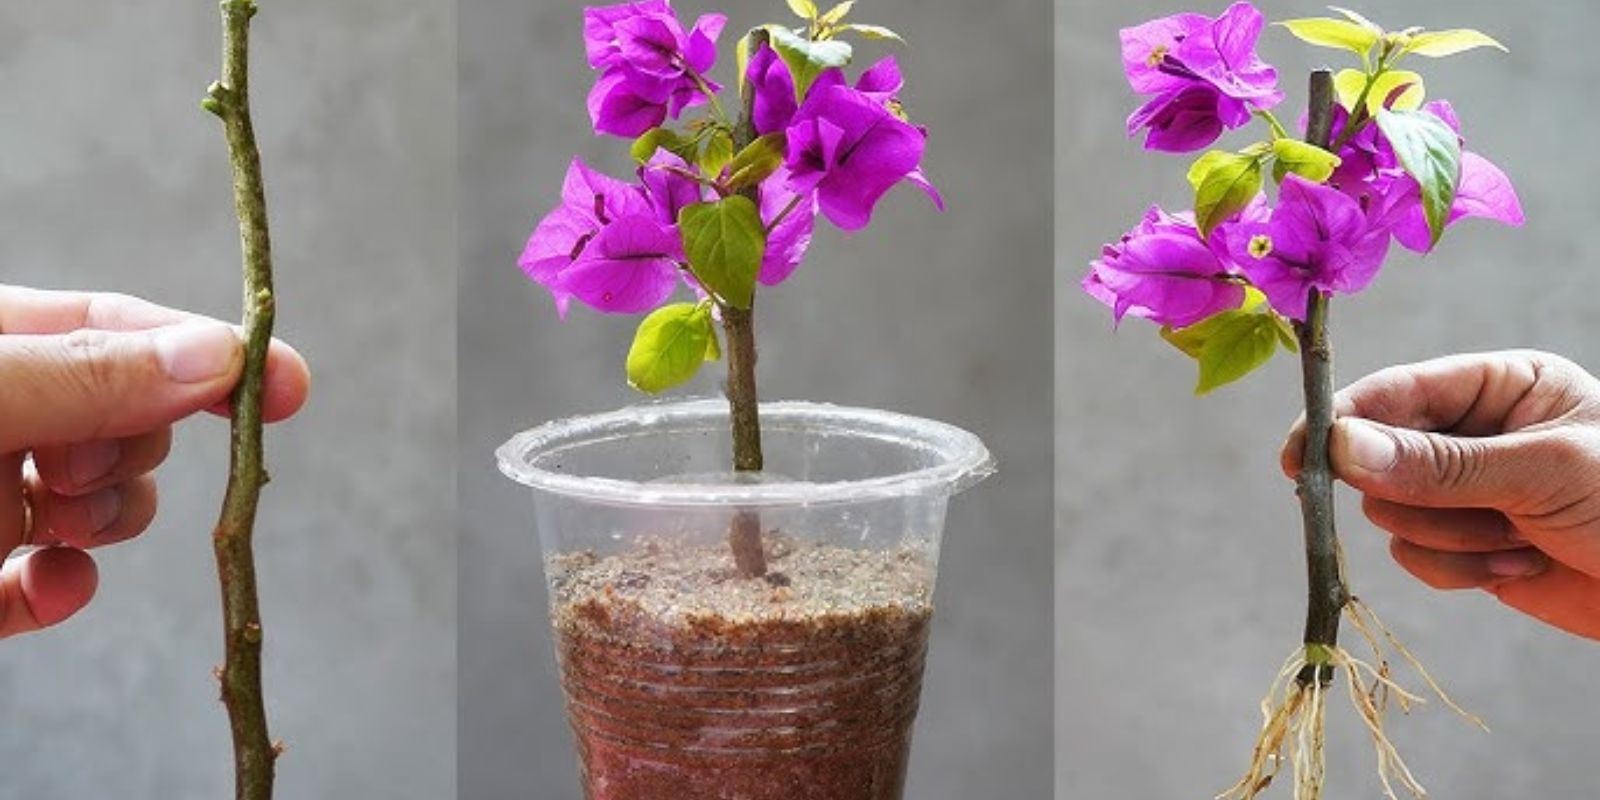
- Stem Cuttings: This is the easiest and most common method for propagating many types of flowers. It involves taking a cutting from a healthy stem and encouraging it to form roots.
- Leaf Cuttings: Some flowers, like African violets, can be propagated from individual leaves. The leaf will grow new roots and eventually develop into a full plant.
- Root Division: Some perennials, like lilies and irises, can be propagated by dividing the roots. This method works best for plants that naturally form clumps.
- Seed Propagation: While not as fast as other methods, growing flowers from seed is another option. Some flowers, such as sunflowers and marigolds, do well from seed.
For this guide, we’ll focus on stem cuttings, as they work for most flowers and are the easiest to manage.
2. Taking the Perfect Cutting
Taking the right cutting is the first step toward successful propagation. Here’s how to do it:
- Choose a Healthy Parent Plant: Select a plant that is healthy, disease-free, and in the prime of its growth cycle. The cutting you take will reflect the health of the parent plant, so choose one that’s vigorous and strong.
- Time It Right: The best time to take cuttings is during the active growing season, typically spring or early summer when plants are growing quickly. However, certain plants may be propagated in late summer or early fall as well. Avoid taking cuttings when the plant is stressed, such as during a heat wave or drought.
- Select a Suitable Stem: Look for a healthy, non-flowering stem. A stem with softwood (young, green growth) or semi-hardwood (partially mature growth) works best. Avoid using woody stems or flowers that have already bloomed, as they are less likely to root.
- Cut the Stem: Use clean, sharp scissors or pruning shears to take the cutting. Ideally, your cutting should be between 4–6 inches long, with at least two or three sets of leaves. Cut just below a node (the area where leaves are attached to the stem), as this is where roots will form.
- Remove Excess Leaves: Trim away the lower leaves of the cutting, leaving just a couple of leaves at the top. This prevents the cutting from rotting in the soil and reduces moisture loss.
3. Using Rooting Hormone
While many cuttings will root without additional help, rooting hormones can significantly improve your chances of success, especially for harder-to-root plants.
- What Is Rooting Hormone?: Rooting hormone is a powder or gel that contains plant growth hormones, usually auxins, that promote root development. It encourages faster and more reliable rooting.
- How to Use Rooting Hormone: After taking your cutting and trimming the leaves, dip the cut end into the rooting hormone. Tap off any excess powder to avoid clumping. Some gardeners choose to use a dampened towel or sponge to moisten the cutting before applying the hormone.
- When Not to Use It: Rooting hormone is most effective for cuttings from hard-to-root plants, but for easier varieties, such as geraniums or begonias, you may not need it.
4. Planting Your Cutting
Once your cutting is ready, it’s time to plant it. Here’s how to ensure successful rooting:
- Choose the Right Medium: For most flower cuttings, use a well-draining, sterile rooting medium such as perlite, vermiculite, or a mix of peat moss and sand. Avoid using regular garden soil, which may harbor pests or diseases.
- Planting the Cutting: Create a small hole in the soil with a pencil or stick and gently insert the cutting. Make sure the cut end is buried deep enough to support the plant but not so deep that it can’t access the air it needs. Firm the soil around the cutting to ensure it stays upright.
- Watering: After planting the cutting, water the soil gently to settle it in place. Keep the soil moist but not soggy, as too much water can cause the cutting to rot.
5. Creating the Ideal Environment for Rooting
For cuttings to successfully root, they need a warm, humid environment. Here’s how to create the perfect conditions:
- Humidity Dome: Place a clear plastic bag or a plastic dome over the cutting to create a mini greenhouse. This will help maintain high humidity, which is crucial for preventing the cutting from drying out. Ensure there is some air circulation to avoid mold or mildew buildup.
- Light: Keep the cutting in a bright location, but avoid direct sunlight, which can overheat the cutting and cause it to wilt. Indirect sunlight is ideal, as it will help the cutting photosynthesize while keeping the temperature stable.
- Temperature: Aim for a warm environment, ideally between 65°F and 75°F (18°C to 24°C). If you live in a cooler climate, consider using a heat mat to maintain warmth under the pot.
6. Checking for Roots
After a few weeks, your cutting should begin to root. To check if roots have developed, gently tug on the cutting. If there’s resistance, it means roots are starting to form.
Once the roots are established, it’s time to transplant the cutting into its own pot. If the cutting was taken from a flowering plant, wait until the new plant is established before exposing it to direct sunlight.
7. Transplanting Your New Plant
Once your cutting has rooted and is ready to be transplanted, follow these steps:
- Choose a Pot: Select a pot that’s slightly larger than the one the cutting was rooted in. Ensure the pot has drainage holes to prevent root rot.
- Planting: Gently remove the cutting from the propagation container and place it in the new pot. Fill the pot with fresh potting mix, ensuring the roots have plenty of room to grow.
- Care: Continue to care for your new plant just like you would a mature plant, watering it regularly and ensuring it gets enough light and nutrients.
Final Thoughts
Flower propagation is not only an incredibly cost-effective way to grow your garden, but it’s also a rewarding hobby that allows you to share your plants with others. By following these simple steps, you can propagate any flower easily and watch your garden flourish with new blooms. Whether you’re a beginner or a seasoned gardener, mastering the art of propagation will help you expand your floral collection and enhance your gardening skills.
Happy propagating! 🌸🌱