
Urban gardening has become a popular trend as city dwellers seek ways to bring greenery into their homes and balconies. However, the challenge of maintaining plants in small spaces, with limited time for gardening, can make it difficult for even the most passionate gardeners. This is where a sustainable container watering system comes into play—a perfect solution to ensure your plants are hydrated efficiently, while reducing the need for constant watering.
A sustainable container watering system utilizes capillary action to provide moisture directly to the plant’s roots, mimicking the natural process of groundwater absorption. This method minimizes evaporation and ensures your plants get the moisture they need, all while conserving water and reducing gardening time.
In this article, we will walk you through the steps to design and build your own self-watering container system that works for your plants, offering a solution for sustainable urban gardening.
The Basics of a Self-Watering Container System
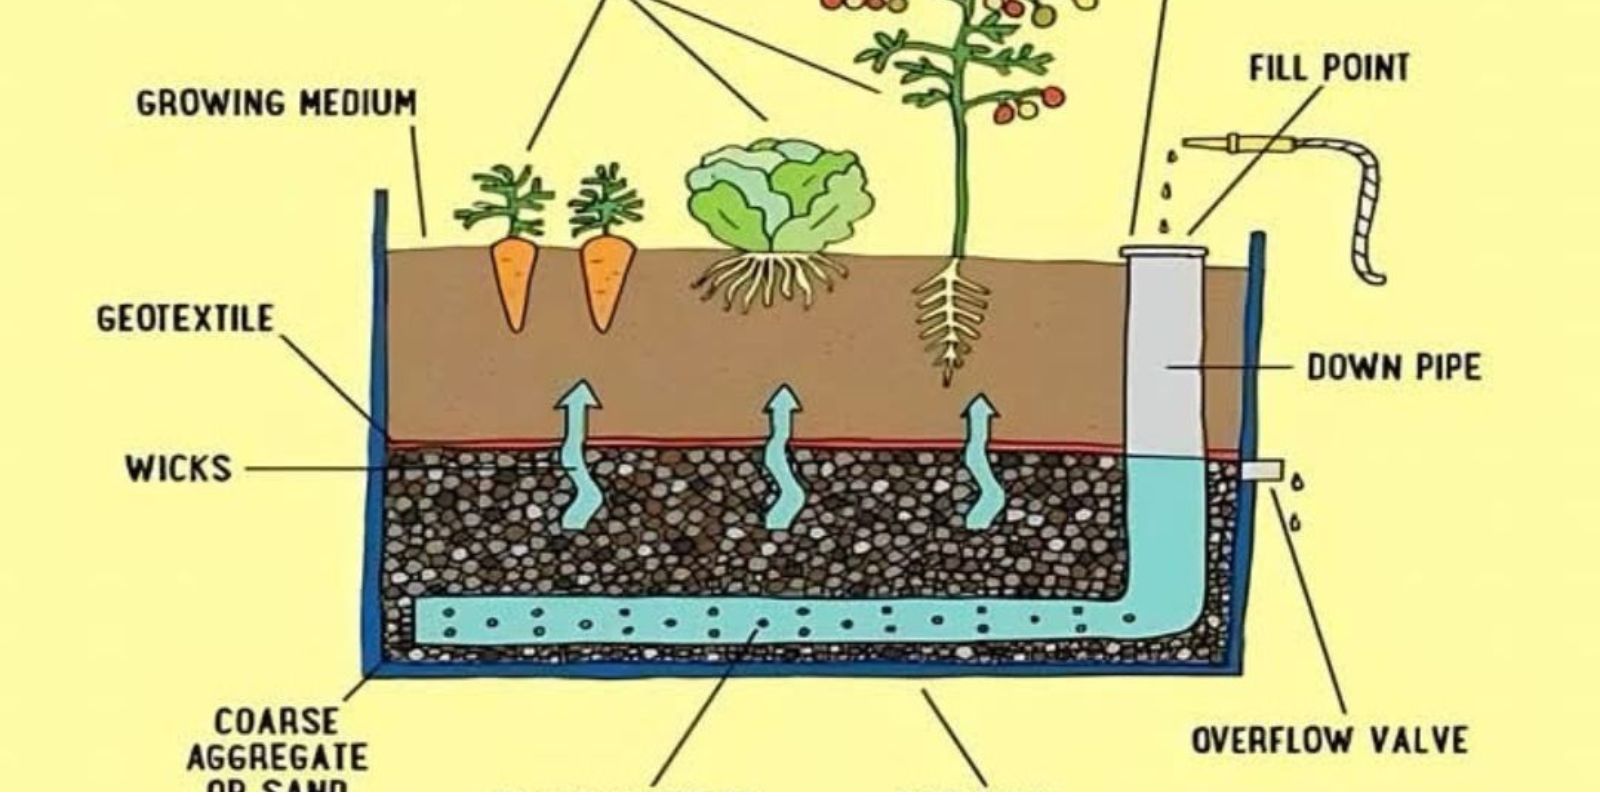
A self-watering container system works by creating a water reservoir at the bottom of the container, and a mechanism that allows the plants to draw up moisture as needed. This is typically achieved through capillary action, where water moves upward from the reservoir through a porous medium into the soil. Essentially, this system ensures that plants can “self-water,” without requiring you to constantly refill the container. The key advantages of this system are:
- Water Conservation: Traditional watering methods often lead to over-watering or evaporation, which wastes a significant amount of water. A self-watering system reduces water wastage by efficiently providing moisture to the roots.
- Minimal Maintenance: Once the system is set up, you won’t need to water your plants daily. The plants will absorb the moisture they need from the reservoir, reducing the frequency of watering.
- Prevention of Overwatering: Since water is only absorbed as the plant needs it, overwatering is avoided, which is one of the most common mistakes in container gardening.
- Time-Saving: It allows you to take a break from daily gardening tasks and gives you more time to enjoy your plants.
Step-by-Step Guide to Building a Self-Watering Container System
Creating a sustainable container watering system is simpler than you might think. With just a few supplies, you can have your very own self-watering system up and running, keeping your plants healthy and hydrated for the long term. Let’s break down the process into simple steps.
1. Choosing the Right Container
The first step in creating a self-watering container system is to select a container that will work for your space and needs. Your container should be deep enough to allow for both soil and a water reservoir. Whether you choose a ceramic pot, a repurposed bucket, or a wooden crate, the container must have a few key features:
- Capacity: It should be large enough to hold the plant’s root system and provide adequate space for water storage.
- Drainage Hole: The container must have an overflow hole located a few inches above the bottom to allow excess water to escape. This ensures that the roots won’t be sitting in stagnant water, which could lead to rot.
Tip: You can find containers specifically designed for self-watering systems at garden centers, or you can repurpose containers you already have at home.
2. Preparing the Container for Water Storage
If your container is not watertight, you’ll need to line it with plastic to create a leak-proof reservoir. This step is crucial to ensure that water does not seep out and that your water reservoir remains intact. Here’s how to do it:
- Line the Container: Use a durable plastic liner to line the bottom and sides of the container. The plastic should extend above the base to allow for water storage.
- Cut a Hole for the Overflow: Once the liner is in place, cut a small hole near the top of the container (a few inches above the base). This will serve as the overflow outlet to prevent water from flooding the container.
3. Creating the Water Reservoir
Next, you’ll need to add a layer of material that will hold water at the bottom of the container. This is the reservoir that will allow water to be absorbed by the plants. The ideal materials for creating a water reservoir are:
- Perlite or Gravel: These lightweight, porous materials allow water to collect at the bottom while providing space for it to move upwards. They also ensure that water remains evenly distributed.
- Geotextile Fabric: To separate the soil from the reservoir, place a piece of geotextile fabric on top of the perlite or gravel. This will keep the soil from mixing with the water storage area.
4. Setting Up the Watering Mechanism
Now it’s time to set up the system that will transport the water from the reservoir to the soil. This is typically done using a cotton wick or felt strips that allow water to travel upwards through capillary action.
- Cotton Wick or Felt Strips: Place the cotton wick or felt strips so that one end is in the water reservoir, and the other end reaches into the soil above. This ensures that moisture is drawn up from the reservoir into the plant’s roots.
Tip: Make sure that the material you use is absorbent and long-lasting to avoid frequent replacement.
5. Adding the Soil and Planting
Once your water reservoir and watering mechanism are in place, it’s time to add soil and plants. Choose a high-quality potting mix that is rich in organic matter, as this will ensure your plants get the nutrients they need.
- Fill the Container: Fill the container with soil, leaving a few inches from the top to prevent spillage when watering.
- Choose Suitable Plants: Select plants that match the container’s size and your climate. Herbs, vegetables, and flowering plants are all great options for a self-watering system.
6. Installing the Overflow Pipe
To ensure that excess water doesn’t sit in the reservoir and cause root rot, you’ll need an overflow pipe or outlet. This will allow excess water to drain out of the system if the reservoir gets too full.
- Install the Pipe: Insert a short piece of PVC pipe or tubing through the pre-drilled overflow hole in the container. This will allow excess water to escape while keeping the plant’s root zone properly hydrated.
7. Mulching and Initial Watering
To help retain moisture and prevent evaporation, cover the surface of the soil with organic mulch. This helps maintain a consistent level of moisture and reduces the need for frequent watering.
- Mulch the Soil: Add a layer of mulch over the soil, such as wood chips, straw, or compost. This will also help prevent weeds from growing and improve the overall health of your plants.
- Water from Above: For the first few weeks, water the plants from above to help the roots establish themselves. Once the roots have grown deep enough, they will be able to access the moisture from the self-watering system.
8. Regular Watering and Maintenance
Once your self-watering system is set up, fill the reservoir from the top until water begins to flow out of the overflow pipe. From then on, your plants will self-water as needed. Check the water reservoir regularly and refill it when necessary to ensure the system stays functional.
9. The Advantages of Self-Watering Systems in Urban Gardens
A self-watering container system is particularly beneficial for urban gardening. In cities where space is limited, and the weather can fluctuate, this system ensures that plants remain hydrated and healthy without requiring constant attention. Here are a few advantages of self-watering systems:
- Water Efficiency: It saves water by reducing evaporation, ensuring that the plants only receive the water they need.
- Minimal Effort: It reduces the time you need to spend on watering, leaving you more time to enjoy your plants and focus on other tasks.
- Healthy Plants: It provides consistent moisture, preventing issues like root rot, under-watering, and over-watering.
Conclusion: Embracing Sustainable Gardening
Creating a sustainable container watering system is an effective and eco-friendly way to ensure that your plants stay hydrated with minimal effort. Whether you are a beginner gardener or an experienced horticulturist, this system offers a simple yet highly efficient solution for urban gardening. By following the steps outlined above, you can build a system that helps conserve water, reduce maintenance, and provide healthy, thriving plants in your home or garden.
As more people turn to urban gardening to enjoy the benefits of fresh herbs, vegetables, and flowers, a self-watering container system is the perfect tool to make the most of your space and resources. So, gather your materials, follow the steps, and transform your urban space into a lush, sustainable oasis!
🌱💧 #SustainableGardening #UrbanGardening #SelfWateringSystem #WaterConservation #ContainerGardening #GreenLiving #EcoFriendlyGardening #GardenSolutions