
Peanuts, often referred to as “groundnuts,” are an essential part of many kitchens and are used in a variety of dishes from snacks to main courses. But did you know that you can grow your own peanuts at home with ease? Growing peanuts at home is an incredibly rewarding experience, and it’s easier than you might think. With a few simple steps, you can cultivate your own peanuts and enjoy fresh, homegrown harvests.
This article will walk you through everything you need to know to grow peanuts at home, whether you have a garden, a backyard, or even just a balcony. You’ll learn the best techniques, tools, and tips for growing peanuts in containers or the ground, as well as how to care for your plants and eventually harvest your crops.
Why Grow Peanuts at Home?
There are several compelling reasons why growing peanuts at home is a great idea:
- Fresh and Delicious: Homegrown peanuts are far fresher and tastier than store-bought varieties. You can enjoy them raw, roasted, or in your favorite recipes.
- Easy to Grow: Peanuts are relatively easy to grow, making them perfect for beginners. They don’t require a lot of specialized care.
- Fun and Educational: Growing peanuts at home can be a fun and educational experience, especially for families with kids or anyone interested in learning about plant growth.
- Cost-Effective: Growing your own peanuts can save you money, especially if you consume a lot of them.
In this guide, we’ll break down the entire process of growing peanuts at home, from seed selection to harvesting your crop.
What You Need to Grow Peanuts at Home
Before you start, there are a few essential tools and materials you’ll need to grow peanuts successfully:
- Peanut Seeds: You can purchase raw, unroasted peanuts with their shells intact from a local store or online. Make sure the peanuts are not roasted or salted, as these will not germinate.
- Soil: Peanuts prefer well-draining, sandy soil that is slightly acidic with a pH of around 6.0 to 6.5. If you don’t have sandy soil in your garden, you can amend the soil with sand or compost.
- Containers: If you don’t have a garden, you can grow peanuts in large pots or containers with drainage holes. Peanuts need space to grow, so choose containers that are at least 12 inches deep.
- Watering Can: A watering can or a hose with a gentle setting will help you water your peanut plants without disturbing the soil.
- Sunlight: Peanuts need full sunlight to grow, so make sure they are placed in a spot that gets at least 6 hours of direct sunlight per day.
Once you’ve gathered your materials, it’s time to get started!
Step 1: Choose the Right Peanuts for Planting
The first step in growing peanuts is selecting the right seeds. It’s important to use raw, unroasted peanuts that are still in their shells. Roasted peanuts are often treated in a way that prevents them from germinating, so avoid using them for planting.
- Peanuts with Shells: Choose peanuts that still have their shells intact. The shells protect the seeds and keep them viable for germination.
- Varieties: There are several varieties of peanuts, including Virginia, Runner, and Spanish. For home gardening, any of these varieties can work, but Spanish peanuts tend to be smaller and better suited for container gardening.
You can buy raw peanuts at a local grocery store, health food store, or online. Make sure they are untreated and not salted or roasted.
Step 2: Soak the Peanuts for Germination
Before planting your peanuts, it’s essential to soak them in water to kickstart the germination process. This helps soften the shell and allows the seed to absorb moisture, making it easier for the seed to sprout.
- Soak Overnight: Place the peanuts in a bowl of warm water and let them soak overnight. This step is essential to encourage germination. After 12-24 hours, remove the peanuts from the water, and they’ll be ready to plant.
Step 3: Prepare the Soil and Containers
Peanuts grow best in well-draining soil that is slightly sandy and loose. If you are planting them directly in the ground, make sure the soil is light and easy for the roots to penetrate.
- For Ground Planting: Choose a sunny spot in your garden with loose, sandy soil. You can mix compost into the soil to improve its fertility.
- For Container Planting: If you’re planting peanuts in containers, use large pots (at least 12 inches deep) with good drainage. Fill the pots with a sandy, well-draining potting mix. You can amend the soil with sand or perlite to improve drainage.
Peanuts need a lot of room to grow, so make sure to plant them in spacious containers or in the ground with enough space between each plant. Space the seeds about 6-8 inches apart to allow room for the plant’s growth.
Step 4: Plant the Peanuts
Once the peanuts have soaked and your soil is ready, it’s time to plant the seeds.
- Planting Depth: Dig a small hole about 2 inches deep and place one soaked peanut in each hole. Cover the peanut lightly with soil, and gently press down to secure it in place.
- Spacing: If you’re planting multiple peanuts, space them about 6-8 inches apart. This spacing allows the plants to grow without overcrowding, ensuring they have plenty of room to spread their roots.
After planting, water the area lightly to settle the soil around the seed. Be careful not to overwater, as peanuts do not like soggy soil.
Step 5: Care for Your Peanut Plants
Peanuts are relatively low-maintenance plants, but they do require some attention during the growing process. Here are a few key care tips:
- Watering: Keep the soil evenly moist, but avoid overwatering. Peanuts do not like to sit in waterlogged soil, as this can cause root rot. Water the plants deeply once a week, ensuring the soil is moist but not soggy.
- Sunlight: Peanuts need plenty of sunlight to grow properly. Make sure your peanut plants receive at least 6 hours of direct sunlight per day. If you’re growing peanuts indoors or on a balcony, place them near a sunny window.
- Fertilizing: Peanuts are not heavy feeders, so they do not require a lot of fertilizer. You can feed them once a month with a balanced, organic fertilizer or compost to provide essential nutrients.
Step 6: Wait for the Harvest
Peanuts typically take about 4 to 5 months to grow to maturity. The plants will flower, and the peanut pods will begin to develop underground. When the plant is ready to harvest, the leaves will begin to yellow, and the plant will start to droop.
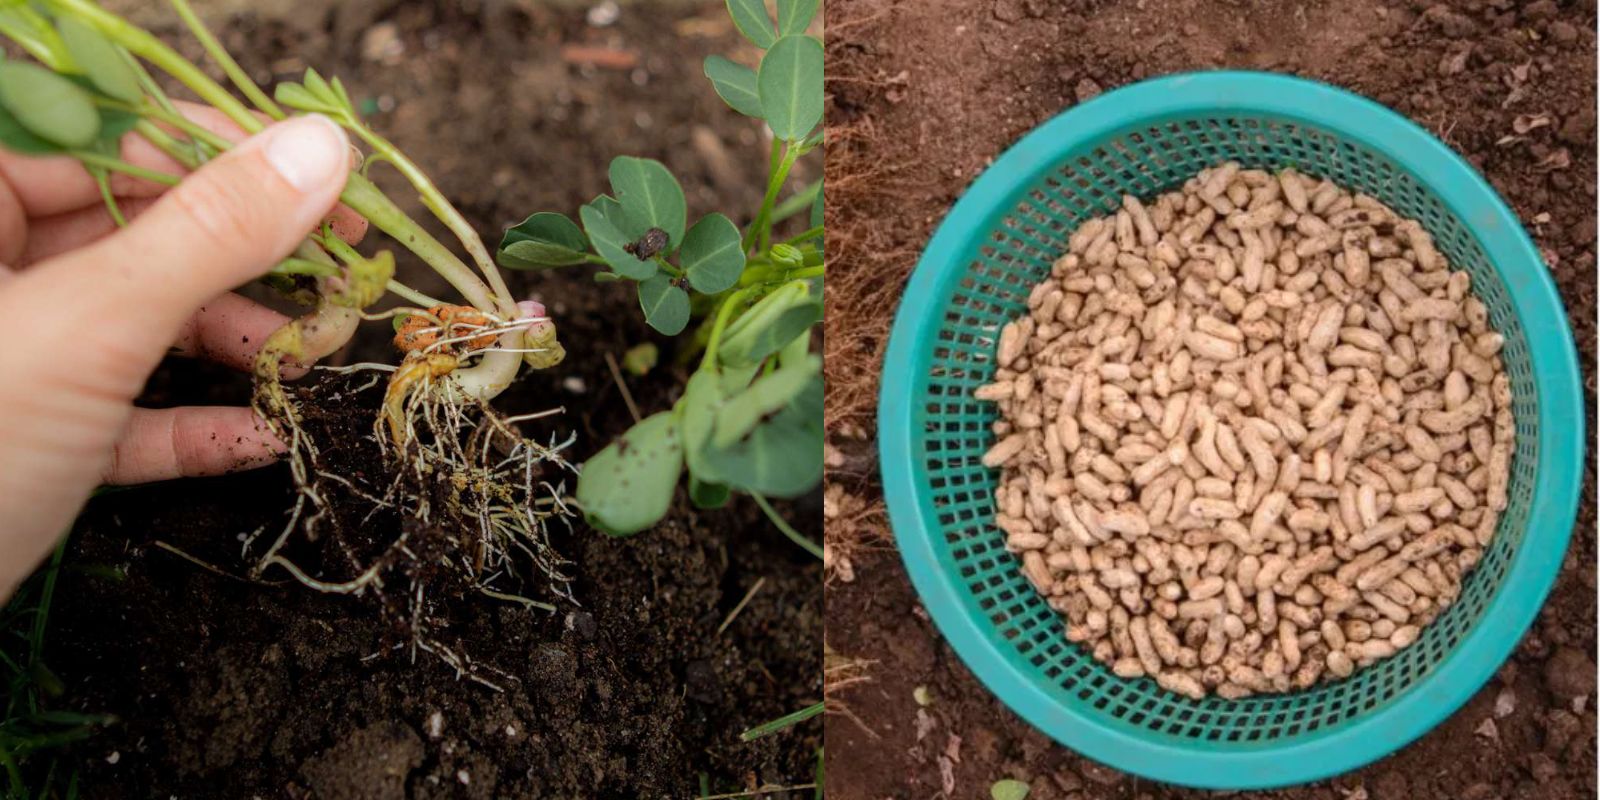
- Harvesting: To harvest the peanuts, carefully dig up the plants using a shovel or garden fork. Gently pull the entire plant out of the soil, and shake off the excess dirt. The peanuts will be attached to the roots in small pods.
After harvesting, let the peanuts dry for a few days before removing them from their pods. You can then store them in a cool, dry place.
Step 7: Enjoy Your Homegrown Peanuts
Once your peanuts are harvested and dried, you can enjoy them in a variety of ways:
- Roasted: Roast them in the oven for a crunchy snack.
- Raw: Eat them raw as a healthy snack or add them to your favorite recipes.
- Peanut Butter: If you’ve harvested a lot of peanuts, you can make homemade peanut butter by blending roasted peanuts with a bit of oil and salt.
Conclusion
Growing peanuts at home is a fun and rewarding gardening project that anyone can try, whether you have a large garden or just a small balcony. By following these simple steps, you can enjoy fresh, homegrown peanuts right from your own backyard. The process is easy to follow, and with patience and proper care, you’ll be harvesting your own peanuts in no time. Happy gardening, and enjoy your delicious homemade peanuts! 🌱