
Grafting fruit trees is an ancient and powerful technique used by gardeners and horticulturists to propagate desirable fruit varieties, enhance disease resistance, and create trees that are more adaptable to specific environments. Whether you’re an experienced gardener or a beginner, grafting offers a way to multiply fruit tree varieties, speed up the fruit-bearing process, and increase the quality of your harvest. If you’ve ever wondered how to graft fruit trees successfully, this detailed guide will walk you through the process, step by step.
Introduction to Grafting Fruit Trees
Grafting is the process of joining two plants together in such a way that they grow as one. The upper part of the grafted tree, called the scion, is from the desired fruit variety, while the lower part, the rootstock, is responsible for anchoring the tree and providing it with nutrients. Grafting is especially valuable for fruit trees, as it allows you to grow trees with specific characteristics such as increased resistance to diseases, better growth habits, or faster fruit production.
This technique has been used for centuries and is a crucial aspect of orchard management and fruit tree propagation. If you’re ready to try grafting fruit trees at home, follow this comprehensive guide to get started.
Benefits of Grafting Fruit Trees
Before diving into the steps of grafting, it’s important to understand why you might want to graft fruit trees in the first place. Here are a few key benefits:
- Preserve Desired Varieties: Grafting allows you to preserve the genetic traits of a specific fruit tree, especially if you have a tree with exceptional fruit quality, taste, or growth habit.
- Disease Resistance: Certain rootstocks are resistant to diseases and pests, making them ideal for grafting. By combining a resistant rootstock with your chosen scion, you create a hardier tree.
- Faster Fruit Production: Grafted trees can bear fruit much faster than trees grown from seeds. While trees from seeds may take years to fruit, grafted trees can produce fruit in as little as 2-3 years.
- Space-Saving: By grafting multiple varieties of fruit on a single tree, you can create a multi-variety tree that saves space in your garden or orchard.
- Better Adaptation to Soil Conditions: Rootstocks can be selected to grow well in specific soil types, giving your grafted tree the best chance of thriving in your local conditions.
Key Terms in Grafting
Before you start grafting, it’s essential to understand some key terminology:
- Scion: The upper part of the graft, usually the fruit-bearing section. It’s the part of the tree that will produce fruit.
- Rootstock: The lower part of the graft, including the roots and lower trunk. It determines the tree’s size, disease resistance, and other traits.
- Cambium: The thin, green layer just beneath the bark. Successful grafting depends on the cambium layers of both the scion and rootstock being aligned.
- Grafting Tape: A special tape used to hold the scion and rootstock together during the healing process.
- Grafting Wax: A wax or sealant used to cover the grafting site to keep moisture in and prevent infection.
Types of Grafting Techniques
Several grafting methods are used for fruit trees, but the most common and easiest for beginners include:
- Whip-and-Tongue Graft: This is the most widely used method for grafting fruit trees. It involves cutting both the rootstock and scion at an angle and making tongue-shaped cuts to interlock the two parts securely.
- Cleft Graft: A technique in which the rootstock is split in half, and the scion is inserted into the cleft. This method works well for larger rootstocks.
- Bud Grafting: In this method, a bud from the scion is inserted under the bark of the rootstock. It’s typically used for apple trees and other trees that can be propagated using buds.
Step-by-Step Guide to Grafting Fruit Trees
Now that you understand the basics, let’s break down the step-by-step process of grafting fruit trees. Follow these steps carefully to ensure a successful graft.
1. Choose the Right Scion and Rootstock
The first step in grafting is selecting the appropriate scion and rootstock. The scion should come from a healthy tree with the desired fruit variety. It’s crucial that both the scion and rootstock are compatible. For example, apple varieties graft well onto apple rootstocks, while peach varieties should be grafted onto peach rootstocks.
The scion should be about the size of a pencil and should be collected during the dormant season when the tree is not actively growing. It’s important to select disease-free, vigorous scions to increase the likelihood of a successful graft.
The rootstock should be selected based on the soil conditions, climate, and desired tree size. Common rootstocks include dwarfing rootstocks for small trees, vigorous rootstocks for large trees, and disease-resistant rootstocks for specific pests or diseases.
2. Prepare the Rootstock
Once you’ve selected your rootstock, the next step is to prepare it for grafting. Use a clean, sharp knife to cut the rootstock at an angle. The cut should be smooth and even. It’s essential that the rootstock is freshly cut, as this will encourage a better union between the scion and rootstock.
3. Prepare the Scion
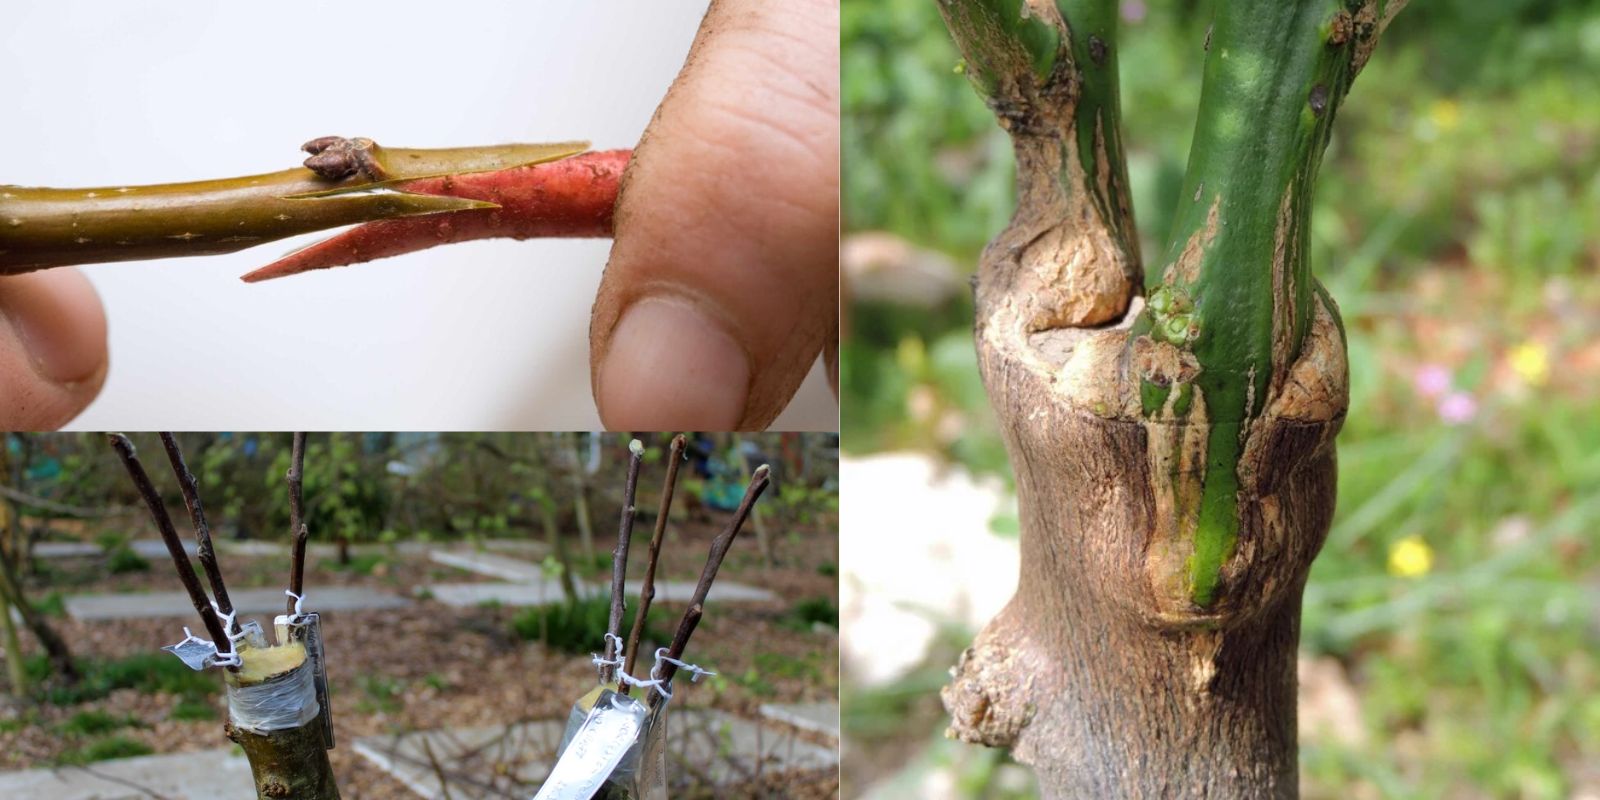
Now it’s time to prepare the scion. Cut the bottom of the scion at an angle that matches the cut you made on the rootstock. The cut should be made at a 45-degree angle to ensure a large surface area for the cambium layers to join.
The scion should be cut to about 3-4 inches long, and it should have at least two buds. Once cut, immediately place the scion in water to prevent it from drying out. Keep it in a cool place until you are ready to graft.
4. Graft the Scion and Rootstock Together
The most crucial part of grafting is aligning the cambium layers of both the scion and rootstock. To do this, carefully make cuts in both the rootstock and scion, ensuring that the cambium layers (the thin green tissue just beneath the bark) are aligned.
For the whip-and-tongue graft, make a vertical cut in the rootstock and a matching cut in the scion. Interlock the two parts by carefully aligning the cambium layers. If you’re using the cleft graft method, split the rootstock down the center and insert the scion into the split.
5. Secure the Graft
Once the scion and rootstock are aligned, use grafting tape or rubber bands to hold them in place. This will help ensure that they remain tightly together while they heal. Make sure to wrap the graft tightly but not too tightly, as it needs to have some room for growth.
6. Seal the Graft
To protect the graft from moisture loss and infection, cover the grafting site with grafting wax or a sealant. This will keep the wound moist and encourage faster healing. Make sure the entire grafting site is covered.
7. Care for the Grafted Tree
After grafting, place the tree in a warm, sheltered spot where it will receive indirect sunlight. Keep the grafted area moist but not too wet, as excess moisture can lead to fungal infections.
Check the graft regularly for signs of success. If the scion starts to bud and grow, this is a sign that the graft has taken. If the graft site begins to dry out or shows signs of infection, remove the tape and apply a fresh layer of grafting wax.
Once the graft has successfully healed and the scion begins to grow, remove the tape. The tree will now be able to grow as a single, healthy plant with the desired fruit variety.
Troubleshooting Common Grafting Issues
While grafting is a rewarding skill, it’s not always foolproof. Here are some common issues you may encounter and how to troubleshoot them:
- Graft Failure: If the graft doesn’t take, it could be due to misalignment of the cambium layers, improper sealing, or poor scion selection. Make sure to align the cambium layers carefully, use fresh scion wood, and seal the graft properly.
- Drying Out: If the graft dries out before it heals, it may be due to insufficient moisture. Keep the graft moist and covered with a sealant to protect it from drying out.
- Disease or Infection: Fungal infections can cause graft failure. Use sterilized tools, and apply grafting wax immediately after the graft is made to protect it from disease.
Conclusion
Grafting fruit trees is a highly effective and rewarding way to grow the fruit varieties you love while improving the overall health and production of your trees. With a bit of patience and practice, you’ll be able to create a thriving fruit tree that bears delicious fruit year after year. By following these steps and troubleshooting common issues, you can master the art of grafting and bring a wide variety of fruits to your home garden or orchard.