
Introduction
Mango trees are a delightful addition to any garden, producing juicy, tropical fruit that is loved worldwide. However, growing mangoes can take time, and starting from seed may not always result in the best fruit quality. Grafting offers a solution for those seeking to grow high-quality mango trees quickly and efficiently. Through grafting, gardeners can combine the best characteristics of two mango trees: a robust rootstock with a superior scion variety. This article will explore the grafting process in detail, offering a simple, step-by-step guide for beginners and experienced gardeners alike. By the end, you’ll be able to graft mango trees and boost the productivity of your garden.
Understanding Grafting and Its Benefits
Grafting is the process of joining two plant parts—usually a rootstock (the root system) and a scion (the upper part of the tree)—so that they grow together as one. When done correctly, this fusion creates a stronger, more productive tree. The rootstock provides a sturdy foundation, while the scion contributes the desired fruiting characteristics, such as flavor, size, and disease resistance.
Why Graft Mango Trees?
- Faster Fruit Production: Mango trees grown from seeds often take 5 to 8 years to produce fruit, whereas grafted mango trees can start fruiting within 2 to 3 years, which is ideal for impatient gardeners.
- Improved Fruit Quality: By grafting a high-quality scion onto a disease-resistant rootstock, gardeners can grow better fruit, ensuring a sweet and abundant harvest.
- Disease Resistance: Rootstocks can be selected for their resistance to specific soil-borne diseases, improving the overall health and longevity of the tree.
- Space Efficiency: Grafted trees tend to be more compact, which is particularly useful for gardeners with limited space.
- Stronger Trees: Grafting helps combine the strengths of different varieties, resulting in a tree that is hardier and more resilient to pests, diseases, and environmental stresses.
What You Need to Get Started
Before you begin grafting mango trees, it’s important to gather the right materials:
- Rootstock: A healthy mango tree with good root development. The rootstock should be compatible with the scion you plan to use.
- Scion: A healthy branch from a desirable mango tree. The scion should have at least two to three buds and be from a variety known for producing quality fruit.
- Sharp Grafting Knife: A clean, sharp knife is essential for making precise cuts.
- Grafting Tape or Elastic Bands: These will be used to secure the graft and hold the scion and rootstock together.
- Grafting Wax (optional): Grafting wax helps seal the cut area and prevents moisture loss and infection.
- Pruning Shears: These are used to remove unwanted growth from the rootstock.
- Plastic Wrap or Bag: This helps keep the graft moist and ensures that it stays protected from drying out.
- Sterilizer: A disinfectant to sterilize your tools before and after grafting to prevent the spread of diseases.
Step-by-Step Guide to Grafting Mango Trees
Step 1: Choosing the Right Rootstock and Scion
The first step to successful grafting is selecting a healthy rootstock and scion. The rootstock should be a robust variety of mango that is compatible with the scion, ideally disease-resistant and hardy in your growing zone. Choose a scion from a mature tree that produces high-quality mangoes. The scion should have several healthy buds and be about the same thickness as the rootstock.
Step 2: Preparing Your Tools and Workspace
Before you begin, it’s crucial to ensure that your tools are sharp, clean, and disinfected. Use a sterilizing solution to wipe down your knife, pruning shears, and any other tools. This helps prevent the spread of bacteria or fungi to your mango tree.
Set up a clean workspace where you can easily access your tools and materials. You’ll need a surface to make your cuts, so having a stable and organized workspace is essential.
Step 3: Cutting the Rootstock and Scion
- Preparing the Rootstock: Choose a healthy mango tree as your rootstock. The rootstock should have a stem about 1/4 to 1/2 inch in diameter. Using a sharp grafting knife, make a clean, angled cut at the top of the rootstock. This cut should be flat and smooth to allow for a strong grafting bond.
- Preparing the Scion: Select a healthy, mature branch (scion) that is about the same thickness as the rootstock. Cut the scion just below a node (where a leaf would grow) to ensure the graft has buds for future growth. Trim the cut edge of the scion to match the cut on the rootstock.
Step 4: Making the Grafting Cut
For the most common method of mango grafting, the cleft graft, follow these steps:
- Cutting the Rootstock: Use your knife to make a vertical slit in the center of the rootstock, about 2 to 3 inches deep.
- Cutting the Scion: Trim the base of the scion into a wedge shape, ensuring the cut surface is smooth and free of jagged edges.
Step 5: Joining the Scion and Rootstock
Carefully insert the wedge-shaped base of the scion into the vertical slit in the rootstock. Ensure that the cambium layers (the green part under the bark) of both the scion and rootstock are in contact with each other. This is the most important step, as the cambium layers must touch for successful grafting.
Once aligned, gently press the scion into the rootstock and secure it in place.
Step 6: Securing the Graft
Use grafting tape or elastic bands to securely bind the grafted area. The tape should be wrapped tightly but not so tight that it damages the graft. You can also use plastic wrap to cover the graft and keep the area moist.
Step 7: Sealing the Graft
To prevent moisture loss and infection, you may want to apply a layer of grafting wax around the grafted area. This helps to seal the cut and protect the graft as it heals.
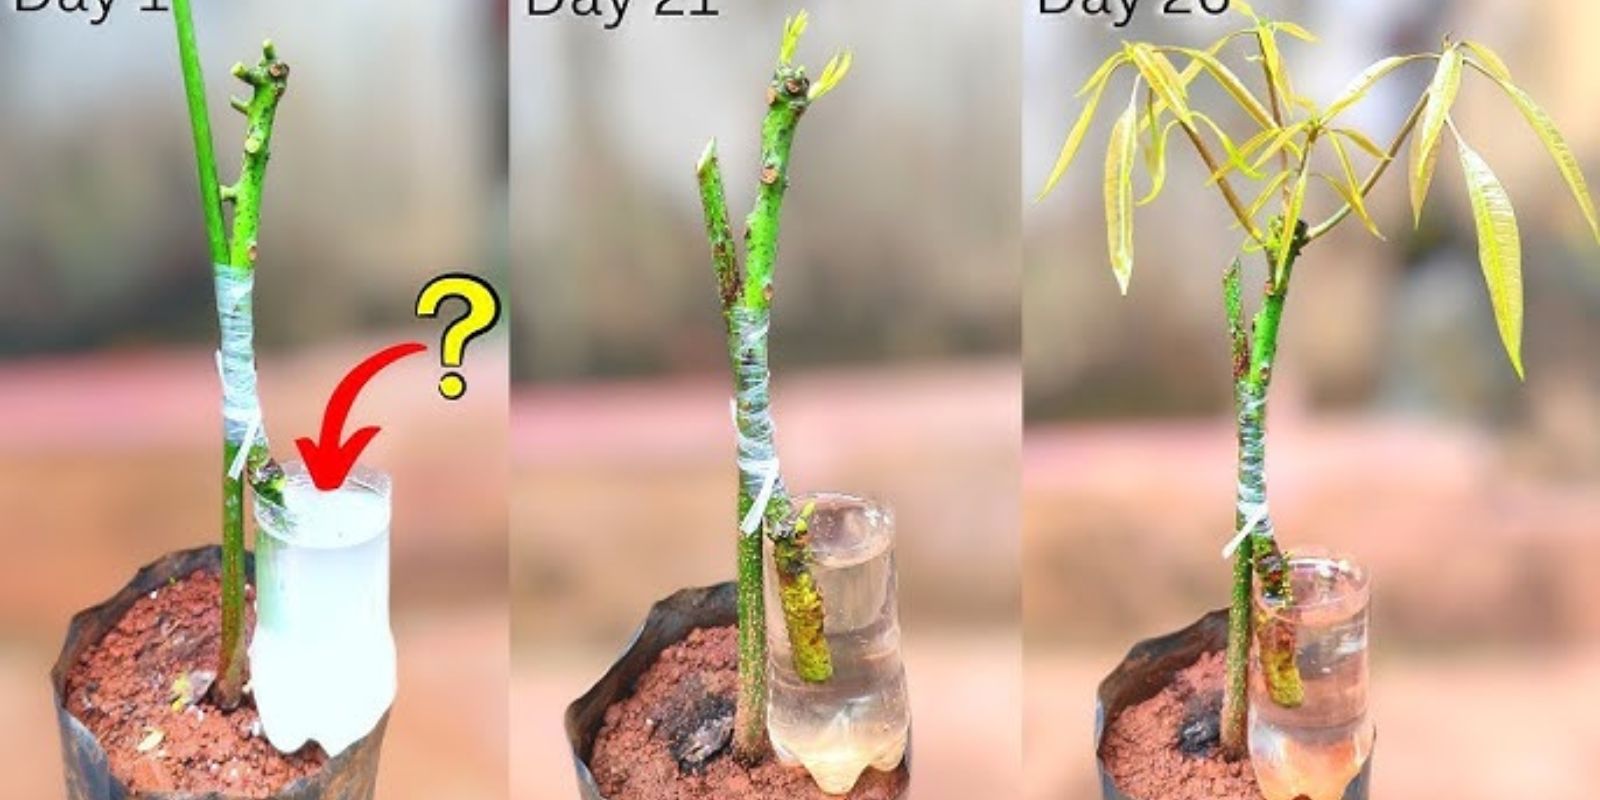
Step 8: Nurturing the Graft
After the graft is completed, keep the mango tree in a shaded, humid environment for several weeks. It’s important to keep the graft area moist but not waterlogged. You can place a plastic bag over the graft or keep it in a humidity dome to maintain moisture.
Check the graft regularly to ensure it’s not drying out or becoming infected. If you notice any new growth on the rootstock, prune it away to allow the scion to take over.
Step 9: Transplanting the Grafted Mango Tree
Once the graft has successfully taken and new growth appears on the scion, you can begin transitioning the tree to full sunlight. Remove the grafting tape and any plastic wrap. Once the graft is strong enough and the tree is well-established, transplant it into the ground or a larger container.
Common Grafting Challenges and Solutions
- Graft Failure: If the graft doesn’t take, it could be due to improper alignment of the cambium layers. Ensure the cuts are clean and precise. You can try grafting again with a new scion.
- Excessive Moisture or Drying: If the grafted area becomes too dry, it may not take. Keep the graft moist but not waterlogged. Too much moisture can lead to fungal infections.
- Pest Damage: Monitor your grafted mango tree for pests. Use natural pest control methods or pesticides as needed to protect the young graft.
Conclusion
Grafting mango trees is a rewarding and effective method for producing high-quality fruit in a shorter time. By following these simple steps, you can graft a mango tree that will bear delicious, tropical fruit year after year. Whether you’re growing mangoes for personal use or commercial purposes, grafting is a powerful tool in any gardener’s arsenal. Happy grafting, and enjoy your fruitful harvest!
Motivation
Are you ready to try grafting mango trees? With just a little practice, you can grow healthy, productive trees in your own backyard! Share your grafting success with us using #MangoGrafting #FruitTreeGrafting #GardeningTips #MangoLovers #GrowYourOwn #GardenGoals #GraftingSuccess