
Garlic is a staple in many kitchens worldwide, known for its unique flavor and health benefits. Whether you’re an experienced gardener or a beginner, learning how to root garlic quickly is a useful skill. Imagine growing your own garlic at home, having an endless supply of fresh cloves right at your fingertips. Not only does it save you money, but it also adds an extra layer of satisfaction knowing that you grew it yourself.
In this article, we’ll share a special trick to root garlic quickly and ensure you have an abundant harvest every year. By following a few simple steps and applying the right techniques, you can start your very own garlic patch and enjoy a continuous supply of this incredible plant.
Why Growing Garlic at Home is Worth It
Before diving into the methods, let’s take a moment to understand why growing garlic at home is such a rewarding experience.
- Cost-Effective: Buying garlic at the store can add up over time, especially if you use it often. Growing your own garlic is incredibly cost-effective and gives you access to fresh, organic cloves right in your backyard.
- Health Benefits: Garlic has a long history of being used for medicinal purposes. Growing it at home allows you to harvest fresh cloves that maintain their full nutritional value. Plus, garlic can help improve immune function, reduce blood pressure, and support heart health.
- Sustainability: By growing your own garlic, you reduce the need for packaging and transportation, making your gardening more eco-friendly and sustainable.
- Easy to Grow: Garlic is surprisingly easy to grow, requiring minimal attention. It thrives in most climates and is suitable for both beginners and experienced gardeners.
Now that we’ve established the benefits, let’s explore how to root garlic quickly and effectively using a special technique.
Special Trick to Root Garlic Quickly
Rooting garlic quickly requires just a little preparation and patience. Here’s a step-by-step guide to getting your garlic cloves to root and grow rapidly:
1. Choose High-Quality Garlic
The first step to success is starting with high-quality garlic. For the best results, choose organic garlic from a reputable source. Organic garlic is free from chemicals and has a higher chance of germinating. Avoid using garlic bought from the supermarket, as it’s often treated with chemicals that prevent it from sprouting.
2. Prepare Your Garlic Cloves
Once you have your garlic bulbs, it’s time to break them into individual cloves. Carefully separate each clove, but keep the papery skin intact. Choose the largest cloves for planting, as they’ll have the best potential for growth.
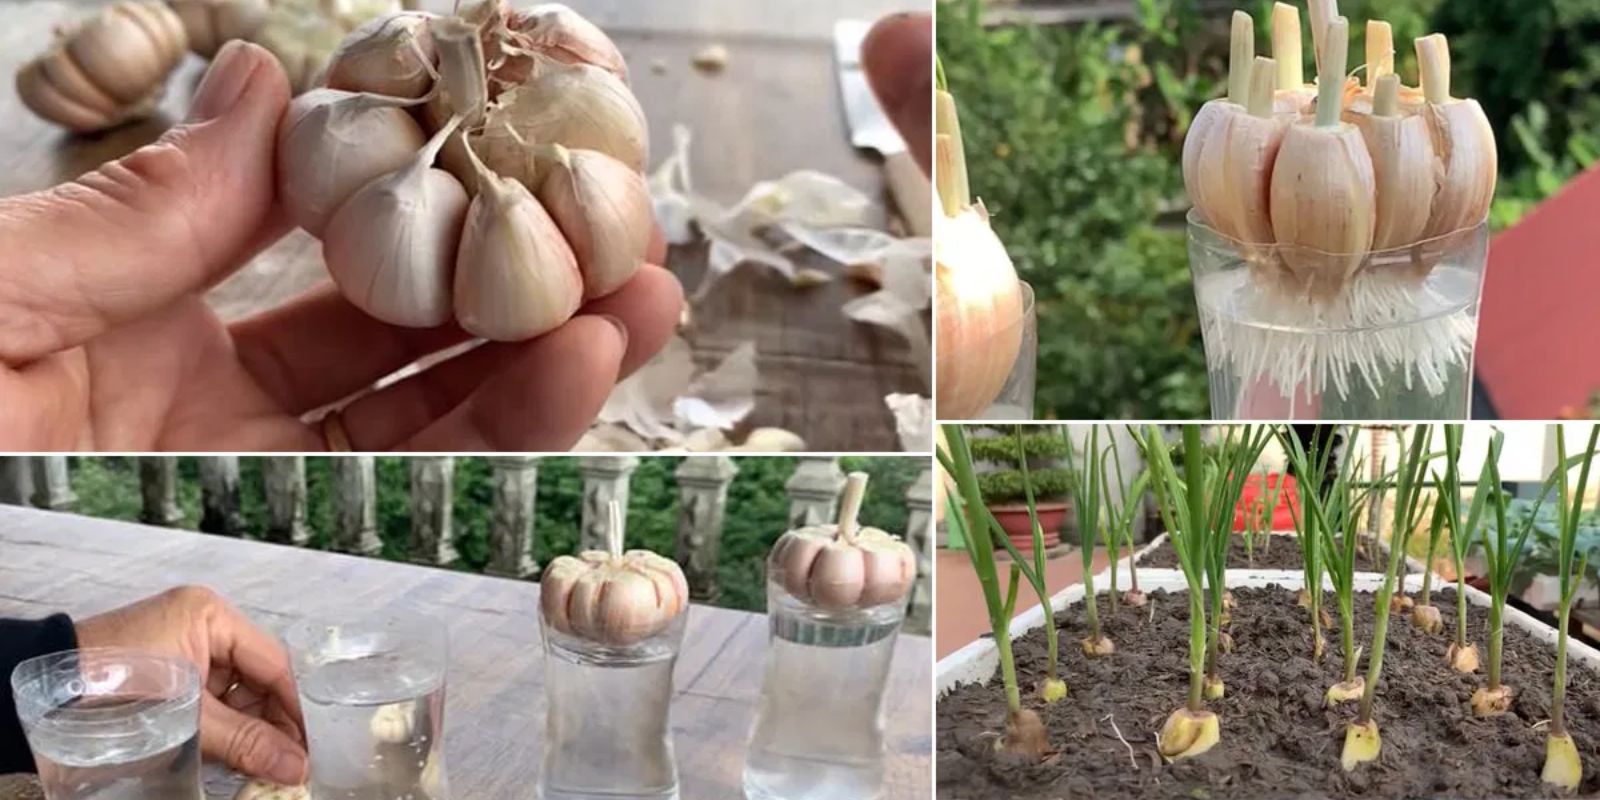
3. Soak the Garlic Cloves
To speed up the rooting process, soak the garlic cloves overnight. This step encourages the cloves to sprout faster. You can soak them in plain water or add a few drops of hydrogen peroxide to the water to help prevent any fungal growth and encourage healthy root development. The hydrogen peroxide helps disinfect the cloves and gives them a gentle boost.
4. Prepare the Soil
Garlic prefers well-drained, loose, and nutrient-rich soil. Prepare your soil by adding organic compost or well-rotted manure to enrich the soil. If you’re planting in containers or raised beds, ensure the soil is loose enough to allow the garlic roots to spread.
Garlic grows best in loamy soil with a slightly acidic pH (around 6 to 7). You can check your soil’s pH with a simple soil test kit to make sure it’s within the ideal range. If needed, amend the soil with lime to raise the pH or sulfur to lower it.
5. Plant the Cloves
Plant the garlic cloves with the pointed end facing up, and the flat end down into the soil. For optimal growth, space the cloves about 4 inches apart. If you’re planting in rows, space the rows about 12 inches apart to allow the garlic bulbs to grow freely.
Plant the cloves 2 inches deep into the soil. If you’re growing garlic in a container or small space, you can also stack multiple layers of cloves, just make sure each clove is properly spaced and deep enough to grow.
6. Watering and Maintaining Moisture
Water the garlic gently after planting to settle the soil around the cloves. Garlic prefers moist, but well-drained soil, so make sure you don’t overwater. It’s essential to maintain consistent moisture, especially during the early stages of growth. Water the garlic whenever the top inch of soil feels dry, but avoid making the soil soggy.
7. Mulch for Protection and Growth
Once your garlic cloves are planted, add a layer of mulch around the base. Mulch helps retain moisture, keeps the soil temperature stable, and prevents weeds from growing. You can use straw, grass clippings, or leaves as mulch. This is particularly helpful in preventing fluctuations in temperature and ensuring the garlic has a steady supply of nutrients.
8. Sunlight and Temperature
Garlic grows best in full sunlight. Ensure your garlic patch receives at least 6 hours of direct sunlight each day. Garlic prefers cooler temperatures, making it perfect for growing in the early spring or fall. In warm climates, garlic can be grown in the cooler months, while in colder areas, garlic can be planted in the fall for harvest the following summer.
9. Fertilization
Garlic doesn’t need heavy fertilization, but it can benefit from a light feeding of organic fertilizer or compost. Apply a balanced fertilizer that is low in nitrogen to avoid promoting excessive leaf growth. You can also feed garlic with liquid seaweed or fish emulsion during the growing season to encourage strong root and bulb development.
10. Patience and Care
Garlic takes time to grow, usually about 6 to 9 months from planting to harvest. During the growing season, check for signs of pests or diseases. While garlic is relatively pest-resistant, it’s important to keep an eye out for aphids, thrips, or fungal infections. If you notice any issues, address them immediately using organic pest control methods.
As your garlic plants begin to grow, keep the area free of weeds and continue to water them regularly. Garlic typically produces long, green shoots, and you may notice flower stalks (scapes) appearing. While scapes are edible and can be harvested, removing them allows the plant to focus more energy on bulb development.
11. Harvesting Your Garlic
Garlic is ready to harvest when the leaves begin to turn yellow and dry out. The bulbs should be fully developed, with firm, plump cloves. To harvest, gently pull the bulbs from the soil by hand or use a digging fork to lift them up carefully.
Once harvested, shake off the excess soil and hang the bulbs to dry in a cool, dark place with good airflow for about 2 to 3 weeks. After they’ve dried, trim the roots and store the garlic in a cool, dry area.
Tips for Unlimited Garlic Supply
To ensure you have an unlimited supply of garlic year after year, save some of your harvested bulbs for planting the following season. Choose the largest and healthiest bulbs, as these will produce the best garlic in the next season. By continually saving your best bulbs, you can establish a cycle of garlic that ensures a constant supply.
Conclusion
Growing garlic is a rewarding and easy gardening task that can save you money, provide fresh organic food, and improve your health. By following the special trick outlined above, you can root garlic quickly, ensuring a bountiful harvest in no time. With a little patience and care, you’ll enjoy a continuous supply of garlic for years to come, all grown right at home!
Happy gardening! 🌱🧄