
Introduction
Water management is a critical aspect of small-scale farming and gardening. Traditional irrigation systems can be costly, inefficient, and wasteful, especially for farmers and gardeners working with limited resources. The Chapin Bucket, a simple yet ingenious solution, has emerged as a game-changer. This low-cost, gravity-fed irrigation system allows for precise watering, reduces water wastage, and even enables the application of liquid fertilizers. In this article, we’ll explore how to set up and use the Chapin Bucket system, its benefits, and its potential to transform small farming and home gardening.
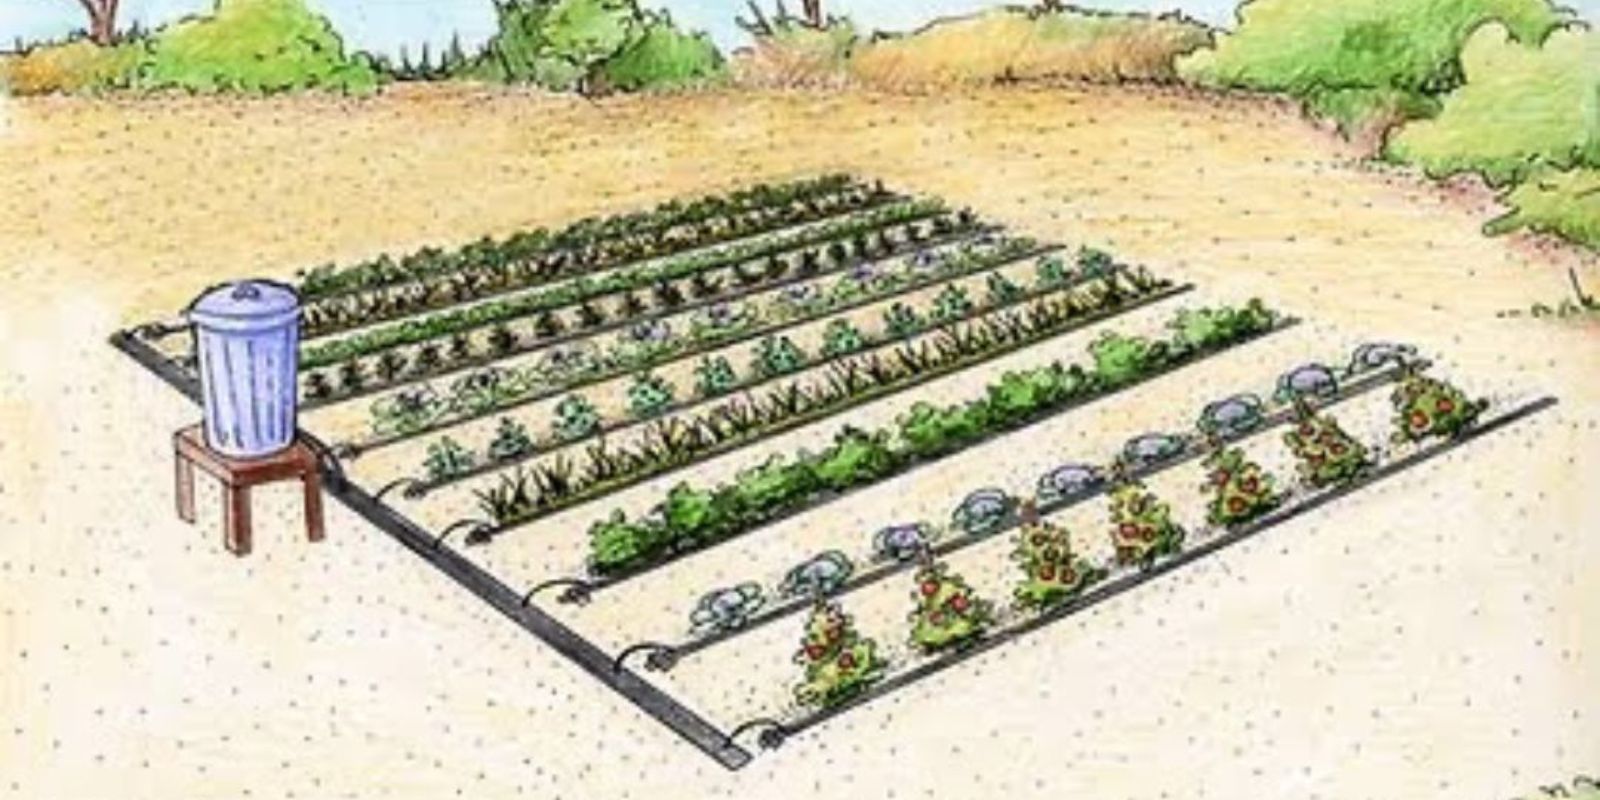
What is the Chapin Bucket System?
The Chapin Bucket system is a DIY irrigation tool designed to deliver water slowly and evenly to plants. It involves a basic 5-gallon bucket fitted with a drip line or soaker hose that allows water to trickle into the soil directly where it’s needed. It’s particularly effective for small farms, raised beds, and container gardens.
This method not only conserves water but also minimizes the risk of overwatering, making it ideal for growing vegetables, herbs, and even flowers.
Setting Up the Chapin Bucket System
Setting up a Chapin Bucket is straightforward and requires minimal materials:
1. Gather Your Supplies
- A 5-gallon bucket with a lid
- A drill with a 1/4-inch drill bit
- A drip irrigation tube or soaker hose
- A valve or clamp to control water flow
- Silicone sealant (optional, for leak prevention)
2. Prepare the Bucket
- Drill a small hole near the bottom of the bucket, approximately 1 inch from the base.
- The hole should be just large enough to fit the drip line snugly.
3. Attach the Drip Line
- Insert one end of the drip irrigation tube or soaker hose into the hole.
- Use silicone sealant to secure the connection and prevent leaks, if necessary.
4. Position the Bucket
- Place the bucket on an elevated surface to ensure proper gravity-fed water flow. A small stand or stack of bricks works well.
- Make sure the bucket is stable to avoid spills.
5. Fill with Water (and Fertilizer, if Needed)
- Fill the bucket with clean water. For nutrient-enriched watering, mix in liquid fertilizer as per the instructions on the fertilizer package.
6. Adjust the Flow
- Use a valve or clamp on the drip line to control the water flow. Adjust to ensure a slow, steady trickle for optimal soil saturation.
7. Monitor and Refill
- Check the bucket regularly to ensure it doesn’t run dry. Refill as needed, especially during hot or dry weather.
Benefits of Using the Chapin Bucket System
1. Water Conservation
Traditional watering methods often result in significant water loss due to evaporation or runoff. The Chapin Bucket system delivers water directly to the root zone, minimizing waste. This is especially valuable in areas with water scarcity or during droughts.
2. Cost-Effective
This system is inexpensive to set up and maintain. A 5-gallon bucket and a few basic components are all that’s needed, making it accessible for farmers and gardeners on a budget.
3. Improved Plant Health
Overwatering or underwatering can lead to poor plant health. The Chapin Bucket ensures a consistent moisture level, promoting healthy root development and robust plant growth.
4. Versatility
The Chapin Bucket system works for a variety of plants and setups, from vegetable gardens and raised beds to potted plants and flower beds. Its scalability makes it suitable for both small and large spaces.
5. Nutrient Delivery
By mixing liquid fertilizer into the water, the Chapin Bucket doubles as a nutrient delivery system. This ensures that plants receive essential nutrients directly at their roots.
6. Ease of Use
Once set up, the system requires minimal effort to operate. Simply fill the bucket, adjust the flow, and let gravity do the rest.
Applications in Small Farming and Gardening
The Chapin Bucket system is ideal for:
- Vegetable Gardens: Use it to water tomatoes, peppers, cucumbers, and other crops that thrive with consistent moisture.
- Herbs and Flowers: Perfect for herbs like basil and mint, as well as ornamental flowers.
- Container Gardening: A great solution for watering potted plants and small container gardens.
- Drip Irrigation Expansion: Multiple buckets can be connected to extend the system for larger plots.
Tips for Success
- Monitor Soil Moisture: Check the soil regularly to ensure it stays moist but not waterlogged.
- Keep the Bucket Clean: Periodically clean the bucket and tubing to prevent clogs or algae buildup.
- Choose the Right Location: Place the bucket where it can irrigate your plants effectively and avoid direct sunlight to reduce evaporation.
- Experiment with Fertilizers: Try different organic or synthetic liquid fertilizers to find what works best for your plants.
The Chapin Bucket’s Role in Sustainable Farming
The simplicity and efficiency of the Chapin Bucket system align with the principles of sustainable farming. By reducing water waste, improving crop yields, and lowering costs, it empowers small-scale farmers to grow more with less. Additionally, its DIY nature encourages innovation and self-reliance, making it a valuable tool for communities worldwide.
Conclusion
The Chapin Bucket system is more than just a watering tool—it’s a revolutionary approach to small-scale irrigation. Its ease of use, affordability, and efficiency make it a must-have for gardeners and farmers alike. Whether you’re nurturing a backyard garden or managing a small farm, this system offers a practical solution to common watering challenges.
💡 Ready to try the Chapin Bucket system? Share your experiences and tips below!