
Orchids are one of the most beloved houseplants, known for their elegant blooms and delicate beauty. However, they can sometimes be tricky to care for, and many gardeners find themselves with a weak or dying orchid. If you’ve ever struggled to keep your orchid healthy or watched it slowly deteriorate, don’t worry—there’s still hope!
With a simple yet powerful water-based method, you can revive your orchid using natural ingredients: rice water and garlic. These two everyday kitchen items contain nutrients and antibacterial properties that help promote healthy root growth and disease prevention.
In this guide, we’ll take you through the step-by-step process of using this magic water trick to restore your orchid’s vitality.
Why Does an Orchid Die?
Before jumping into the revival process, it’s essential to understand why orchids start to decline in the first place. The most common reasons include:
- Overwatering – This is the #1 killer of orchids, leading to root rot.
- Underwatering – Not giving your orchid enough moisture can dry out its roots.
- Poor drainage – Orchids need well-draining soil and air circulation to thrive.
- Lack of nutrients – Without proper feeding, orchids struggle to grow.
- Pests and diseases – Fungal infections and pests can weaken an orchid’s health.
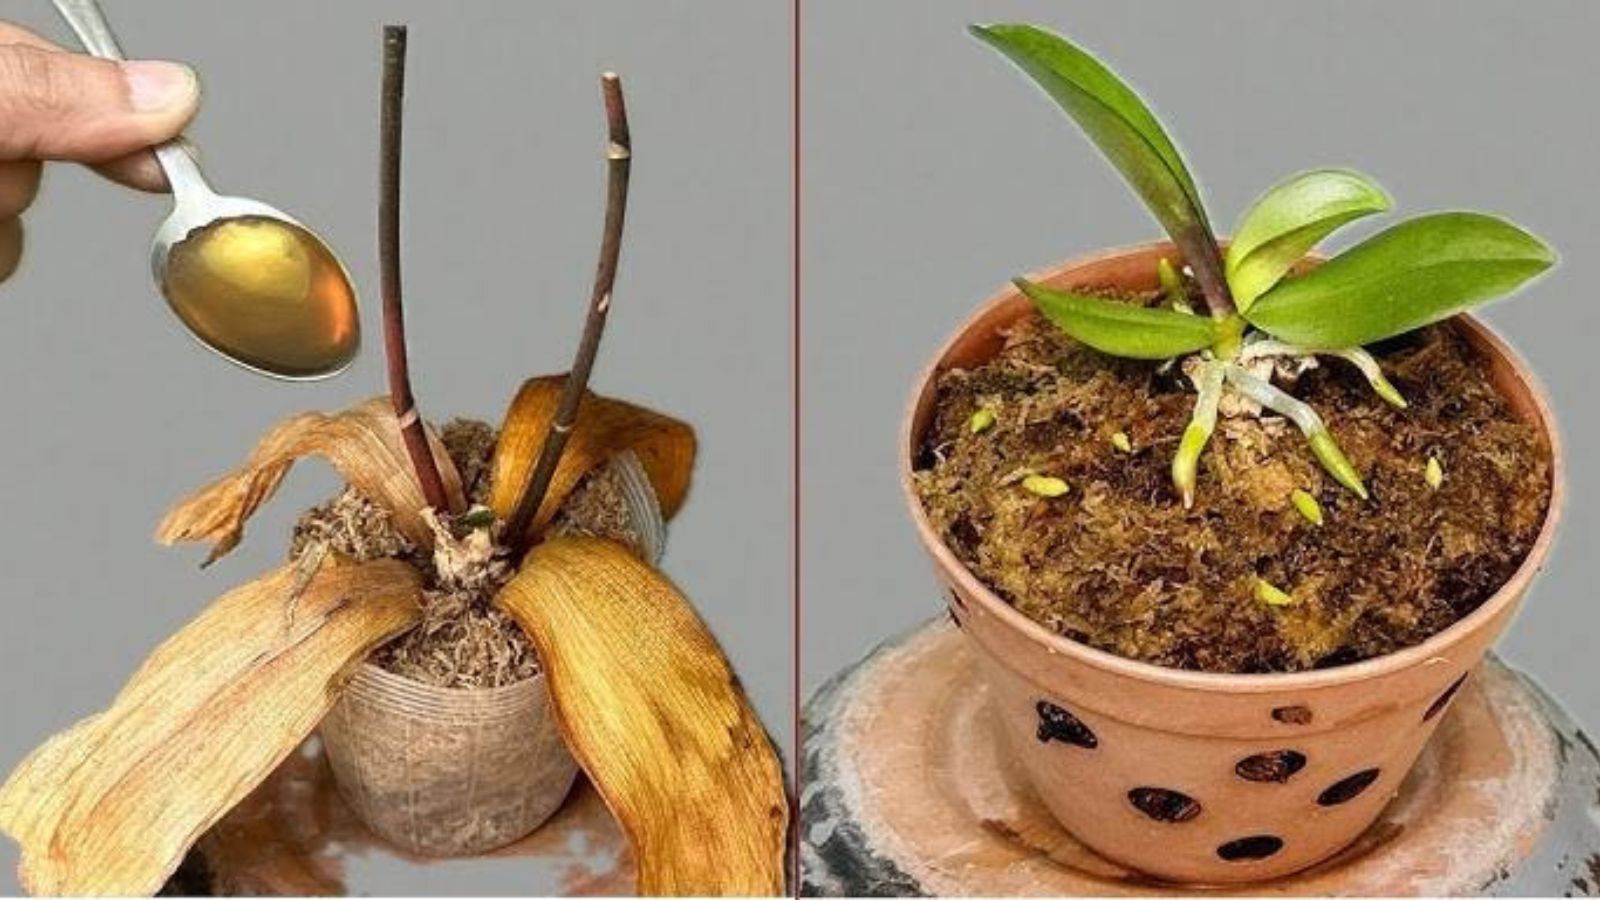
If your orchid has lost most of its roots and leaves but still has a healthy base and at least one leaf, this method can help bring it back to life.
Step-by-Step Guide to Reviving Your Orchid
🌱 Step 1: Preparing the Magic Solution
This special rice water and garlic mixture works as a natural plant booster. Rice water provides essential nutrients like nitrogen, phosphorus, and potassium, while garlic acts as a natural antifungal and antibacterial agent.
1️⃣ Trim the Orchid:
- Start by removing any dead or rotten roots.
- Keep one healthy leaf and a small portion of the base.
2️⃣ Prepare the Rice Water:
- Take 3 tablespoons of uncooked rice and mix it with 1 liter of water.
- Let it sit for at least 3-4 hours to allow the nutrients to infuse into the water.
3️⃣ Add Garlic for Protection:
- Crush one clove of garlic and add it to the rice water.
- Let it steep for about 15-20 minutes before straining the liquid.
💧 Step 2: Applying the Solution
Now that your nutrient-rich mixture is ready, it’s time to treat your orchid.
1️⃣ Clean the Remaining Leaf:
- Dip a cotton pad into the garlic-rice solution.
- Gently wipe the leaf and base of the orchid to remove any dust, pests, or bacteria.
2️⃣ Soak the Orchid Base:
- Place the base of the orchid into a small container.
- Pour in enough of the garlic-rice solution to cover the base (but not the leaf).
- Let it soak for 30 minutes to allow the orchid to absorb the nutrients.
☀️ Step 3: Post-Treatment Care
After soaking, your orchid is now disinfected and hydrated, but it still needs care and patience to recover.
1️⃣ Choose the Right Environment:
- Place the orchid in a bright, well-ventilated space, but avoid direct sunlight.
- Orchids thrive in warm temperatures (18-25°C / 65-77°F).
2️⃣ Maintain Moisture:
- Mist the remaining leaf every three days using filtered water.
- Avoid soaking the plant in water again—just provide gentle humidity.
3️⃣ Monitor for New Growth:
- After 2-3 weeks, check for new root growth.
- Once you see strong, white roots forming, your orchid is on its way to recovery!
Transplanting Your Revived Orchid
Once your orchid has grown new roots, it’s time to transfer it to a proper growing medium.
1️⃣ Choose a Suitable Pot:
- Use a transparent pot with drainage holes to allow light and air to reach the roots.
2️⃣ Select the Right Substrate:
- Orchids thrive in special orchid bark mix (not regular soil).
- You can also use sphagnum moss or coconut husk to retain moisture.
3️⃣ Replant the Orchid:
- Gently place the orchid into the new pot, covering the roots with the substrate.
- Water lightly to help it settle in.
Key Differences Between This Method and Growing from Seeds
Many people grow orchids from seeds, but propagating from a leaf and root base has major advantages:
✅ Faster Growth – Growing from seeds can take years to produce a blooming plant, while this method speeds up recovery.
✅ Preserves Genetics – Unlike seeds, this method ensures the new orchid is an exact clone of the parent plant.
✅ Higher Success Rate – Growing from seeds is difficult, but reviving an orchid from a leaf is much easier with the right care.
Final Tips for a Healthy Orchid
Once your orchid is growing again, follow these best practices to keep it healthy:
🌿 Watering: Water only when the top layer of the potting mix feels dry. Never let the roots sit in water!
💡 Lighting: Orchids love bright, indirect light. Avoid direct sunlight, which can scorch the leaves.
🌡️ Humidity: Orchids need 50-70% humidity to thrive. Use a humidity tray or misting to maintain moisture.
🌱 Fertilizing: Feed with a balanced orchid fertilizer every 2-4 weeks during the growing season.
✂️ Pruning: Remove dead flowers and leaves to encourage new growth.
Give Your Orchid a Second Chance!
Even if your orchid looks like it’s on the verge of dying, don’t lose hope! This magic water trick using rice water and garlic is a simple, natural, and effective way to bring your orchid back to life. With the right care, patience, and consistent watering, you can enjoy healthy roots and beautiful blooms once again.
💬 Have you ever saved an orchid before? Share your experience in the comments below!