
Introduction
Gardening is an ever-evolving blend of tradition, innovation, and discovery. One such intriguing method that has captured the interest of gardeners around the world involves using a tomato slice to help propagate roses. This simple yet surprising technique leverages the natural properties of tomatoes to nurture and grow new rose plants. In this article, we will delve into the step-by-step process of this method, explore the science behind it, and offer tips for achieving the best results.
Why Use a Tomato Slice?
Tomatoes are rich in nutrients and moisture, both of which are crucial for plant growth. When a rose cutting is inserted into a tomato slice, the nutrients and moisture from the tomato help stimulate root development and provide an initial boost to the cutting. This method is not only practical but also eco-friendly, as it uses readily available kitchen scraps to promote plant growth.
Materials Needed
Before you begin, gather the following materials:
- A healthy, fresh tomato
- A sharp, clean knife
- A robust rose cutting
- A pot with well-draining soil
- A small trowel
- Water for irrigation
Step-by-Step Guide
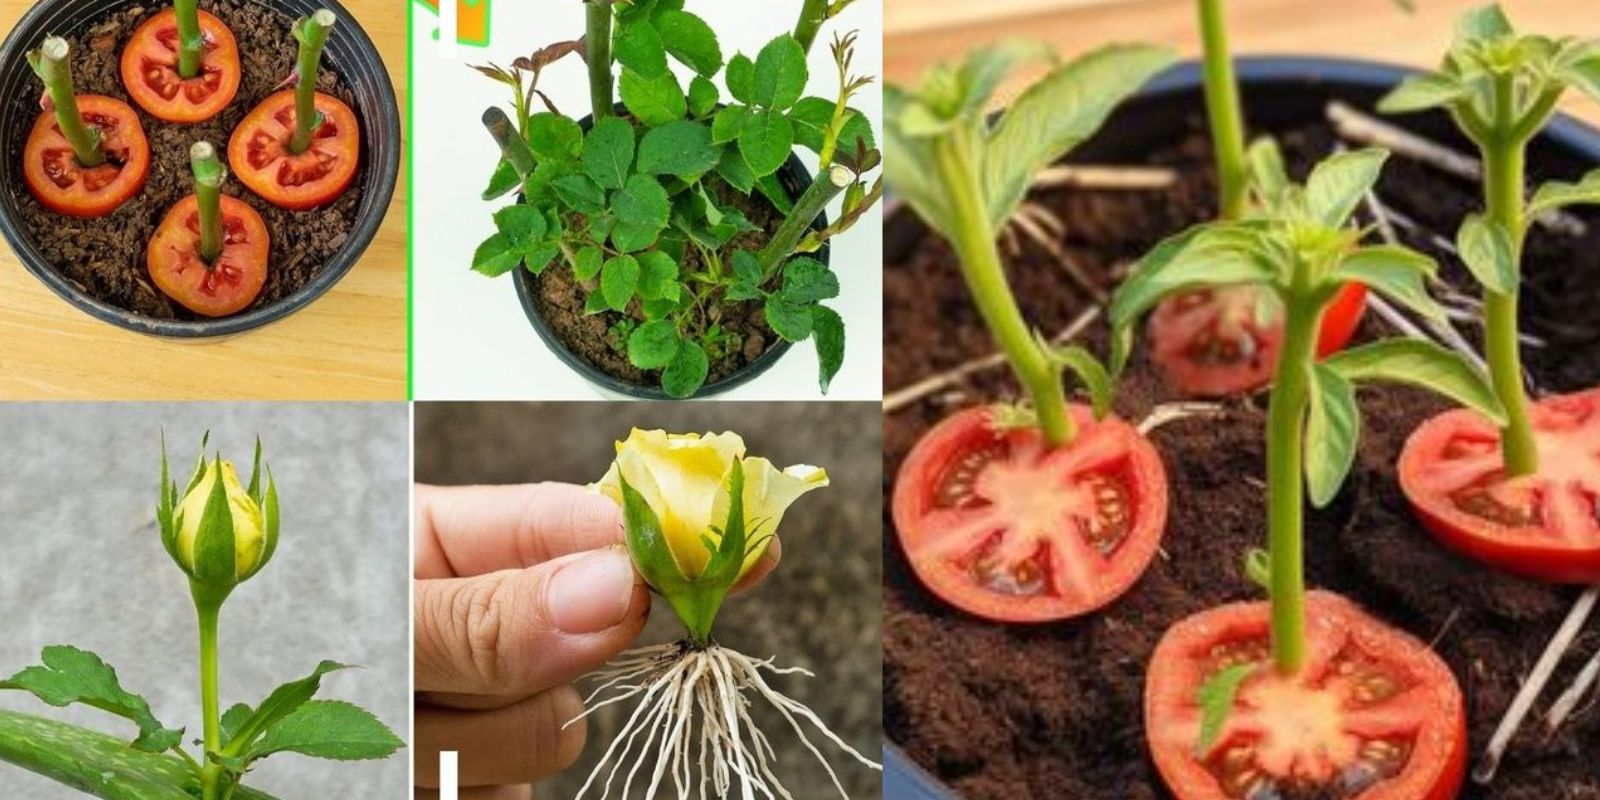
1. Select a Fresh Tomato Slice
Start by choosing a ripe, juicy tomato. The tomato should be free of blemishes and firm enough to hold the rose cutting. Slice the tomato into 1/2-inch thick rounds. These slices will serve as the nutrient-rich base for your rose cutting.
2. Prepare the Rose Cutting
Choose a healthy rose stem that is about 6-8 inches long. Make sure it has at least a few leaves and no flowers. Using a sharp, clean knife or pruning shears, cut the stem at a 45-degree angle just below a node (the point where a leaf attaches to the stem). This angled cut increases the surface area for root development. Remove the leaves from the lower half of the cutting to prevent them from rotting once buried.
3. Insert the Stem into the Tomato Slice
Take one of the tomato slices and carefully insert the cut end of the rose stem into the center of the slice. Ensure that the stem is securely embedded in the tomato, with at least an inch of the stem inside the tomato slice. The moisture and nutrients from the tomato will help support the cutting as it begins to grow roots.
4. Wait a Few Minutes
Allow the rose cutting to sit in the tomato slice for a few minutes. This brief resting period enables the cutting to absorb initial moisture and nutrients from the tomato, which can help kickstart the rooting process.
5. Plant in Soil
Next, prepare a pot with well-draining soil. Use a small trowel to make a hole in the center of the pot. Gently place the tomato slice with the rose cutting into the hole, ensuring that the tomato slice is buried just below the soil surface and the rose cutting is standing upright. Firmly press the soil around the tomato slice and the cutting to provide support.
6. Water Lightly
After planting, water the soil lightly to ensure it is moist but not waterlogged. The initial watering helps settle the soil around the tomato slice and rose cutting. Continue to keep the soil consistently moist but not soggy over the next few weeks.
The Science Behind the Method
The success of this method lies in the natural properties of tomatoes. Tomatoes are rich in vitamins, minerals, and natural sugars, which are essential for plant growth. When a rose cutting is placed in a tomato slice, it absorbs these nutrients, giving it a head start. Additionally, the moist environment provided by the tomato slice helps prevent the cutting from drying out, which is critical during the initial stages of root development.
Tips for Success
- Choose Healthy Cuttings: Ensure that the rose cuttings are taken from a healthy, disease-free plant to increase the chances of successful rooting.
- Maintain Humidity: Cover the pot with a plastic bag or a clear plastic dome to create a humid environment. This helps reduce moisture loss from the cutting.
- Provide Adequate Light: Place the pot in a location with bright, indirect sunlight. Avoid direct sunlight, as it can cause the cutting to dry out.
- Patience is Key: Root development can take several weeks. Be patient and continue to provide consistent care during this period.
- Monitor for Pests and Diseases: Keep an eye on the cutting for any signs of pests or diseases. Remove any affected areas promptly to prevent the spread of infections.
Common Challenges and Solutions
- Wilting Cutting: If the cutting starts to wilt, it may not be getting enough moisture. Ensure the soil is consistently moist and increase humidity around the cutting.
- Mold Growth: High humidity can sometimes lead to mold growth on the tomato slice or the soil surface. If this occurs, remove the moldy parts and improve air circulation around the pot.
- Slow Root Development: Some cuttings may take longer to develop roots. Continue to provide care and avoid disturbing the cutting to allow it to establish roots.
Conclusion
The method of planting a rose in a tomato slice and waiting a few minutes might sound unconventional, but it is a fascinating and effective way to propagate roses. By leveraging the natural nutrients and moisture in tomatoes, this technique offers a simple yet powerful tool for gardeners looking to expand their rose collection.
Gardening is all about experimentation and discovering what works best for your plants. This method is not only a fun and educational experiment but also a potential game-changer for home gardeners. Try it out, observe the results, and share your experiences with fellow gardening enthusiasts. You might just inspire others to explore new and innovative ways to nurture their plants.
Embrace the wonder of gardening and give this amazing technique a try. Your garden will thank you with beautiful, thriving roses that started their journey in a humble tomato slice. Happy gardening!