
Raspberries are a delightful addition to any home garden. Their juicy sweetness and vibrant color make them a favorite among fruit lovers. Propagating raspberries is a rewarding and cost-effective way to expand your garden, and October is the perfect time to do it. This month marks the dormant period for raspberry plants, allowing them to focus on root development without expending energy on producing fruit or new foliage. With a few simple steps and some patience, you can grow your own thriving raspberry plants and enjoy a bountiful harvest next season.
This article will walk you through the process of propagating raspberries from cuttings and provide useful tips to ensure success.
Why Propagate Raspberries in October?
October is an ideal month for propagation because it falls in the dormant season for raspberries. During this time, the plants shift their energy from growing aboveground to strengthening their roots. This makes it easier for new cuttings to establish themselves without the stress of active growth or fruit production.
Additionally, propagating in the fall gives the cuttings time to form strong roots before the following growing season. By spring, these young plants will be ready to sprout healthy shoots and thrive in your garden.
How to Propagate Raspberries: A Step-by-Step Guide
Whether you’re a beginner or an experienced gardener, propagating raspberries from cuttings is simple if you follow these steps:
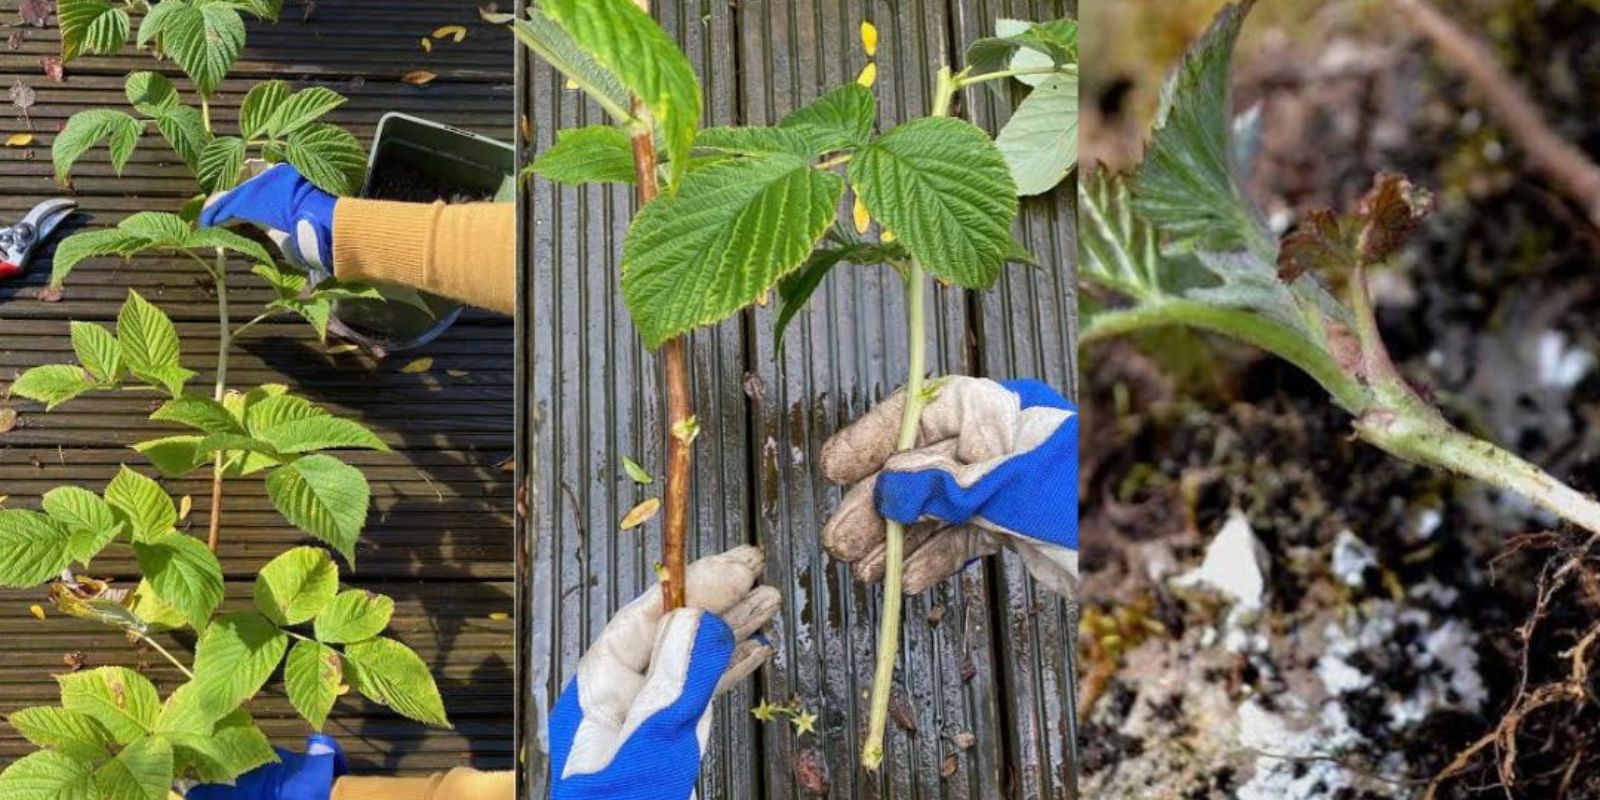
1. Choose Healthy Canes
The key to successful propagation lies in starting with the right material. Select 1-year-old canes that are firm, disease-free, and vigorous. These canes are mature enough to root easily but not so old that they have become woody and brittle.
Look for canes that are:
- About the thickness of a pencil.
- Free from pests or signs of disease, such as discoloration or spots.
- Growing in well-maintained, healthy plants.
Avoid using older, woody canes or new, green shoots, as they may not root as effectively.
2. Cut and Prepare the Cuttings
Once you’ve identified the right canes, it’s time to take your cuttings. Use clean, sharp pruning shears to minimize damage to the plant and prevent the spread of disease.
- Cut 6–8 inch sections from the middle of the cane, making a clean cut just below a node (the point where leaves emerge). The node is where new roots will form.
- Remove the leaves from the lower half of the cutting. This prevents moisture loss and allows the plant to focus on root development.
- Trim the top of the cutting at an angle to distinguish it from the bottom and reduce the risk of planting it upside down.
3. Prepare the Rooting Medium
Raspberry cuttings need a well-draining medium to promote root development while preventing rot. You can use one of the following options:
- Coco Peat: This lightweight, organic medium retains moisture without becoming waterlogged, making it ideal for propagation.
- Potting Soil: A mix of potting soil and sand or perlite provides good drainage while retaining essential nutrients.
Fill a small container or tray with your chosen medium, ensuring it is moist but not soggy.
4. Plant the Cuttings
Insert each cutting into the prepared medium with the bottom end (the one trimmed below a node) buried about 2–3 inches deep. Space the cuttings at least 2 inches apart to allow for airflow and growth.
Gently firm the medium around the cuttings to hold them in place, and water lightly to settle the soil.
5. Place in the Right Environment
The environment plays a critical role in the success of your raspberry cuttings. While raspberries are hardy plants, they still require proper care during the rooting process.
- Light: Place the cuttings in a location with bright, indirect light. Avoid direct sunlight, which can scorch the tender cuttings.
- Temperature: Keep the cuttings in a cool, frost-free area. A temperature range of 60–70°F (15–21°C) is ideal.
- Moisture: Maintain consistent moisture in the rooting medium, but do not let it become waterlogged. Covering the container with a clear plastic bag or dome can help retain humidity, but ensure there is ventilation to prevent mold.
6. Be Patient
Roots typically begin to form within 4–6 weeks. During this time, monitor the cuttings regularly to ensure they remain healthy and the medium stays moist.
You can check for root development by gently tugging on a cutting. If you feel resistance, it means roots have started to form. Once the roots are well-established, you can transplant the cuttings into larger pots or directly into your garden.
Tips for Successful Raspberry Propagation
- Use Rooting Hormone: Dipping the bottom of each cutting in rooting hormone powder before planting can significantly improve the chances of successful rooting.
- Label Your Varieties: If you are propagating multiple raspberry varieties, label each container to avoid confusion later.
- Protect from Frost: If you live in a region with early frosts, keep the cuttings indoors or in a protected area until spring.
- Water Wisely: Overwatering can lead to rot, while underwatering can dry out the cuttings. Strive for a balance by checking the moisture level regularly.
Transplanting Your Raspberry Cuttings
Once your cuttings have developed strong roots, it’s time to transplant them to their permanent home. Raspberries thrive in well-draining soil with plenty of organic matter. Choose a sunny location with good air circulation to prevent diseases.
When planting, space the new raspberry plants about 2–3 feet apart to allow room for growth. Water thoroughly after transplanting, and add a layer of mulch to retain moisture and suppress weeds.
Popular Raspberry Varieties to Propagate
Not all raspberries are created equal. Here are some of the most popular varieties to consider for your garden:
- Heritage: An everbearing variety known for its sweet, firm berries and high yields.
- Caroline: A robust variety with excellent disease resistance and large, flavorful berries.
- Fall Gold: A unique yellow raspberry with a mild, honey-like flavor.
- Latham: A classic summer-bearing variety with a rich, tangy taste.
Each variety has its own growing habits and flavor profile, so choose the one that best suits your needs and climate.
The Benefits of Propagating Raspberries
Propagating raspberries isn’t just an economical way to grow your garden—it also ensures you have healthy, disease-free plants. By taking cuttings from your existing plants or sourcing them from trusted gardeners, you can avoid the risk of introducing pests or diseases from store-bought plants.
Additionally, propagating allows you to expand your favorite varieties or experiment with new ones without breaking the bank. It’s a sustainable way to enjoy a continuous supply of fresh, homegrown raspberries.
Conclusion
October is a golden opportunity to propagate raspberries and set the stage for a productive growing season. With minimal effort, you can grow healthy new plants that will reward you with delicious fruit for years to come. By following these simple steps and tips, you’ll master the art of raspberry propagation and create a thriving garden filled with nature’s sweetest berries.
What are you waiting for? Grab your pruning shears, start propagating, and look forward to a harvest of mouthwatering raspberries next year. Happy gardening!