
Grafting is a fascinating gardening technique that allows you to combine two plants into a single, stronger one. Among the various grafting methods, the chip grafting technique stands out as a simple, yet highly effective method for propagating plants, especially for beginners. This article will walk you through the steps of chip grafting, offering tips and advice to help you succeed in creating new, healthy plants from your existing ones. Whether you’re looking to grow fruit trees, propagate ornamental plants, or improve plant resilience, chip grafting can be a useful tool in your gardening arsenal.
What is Chip Grafting?
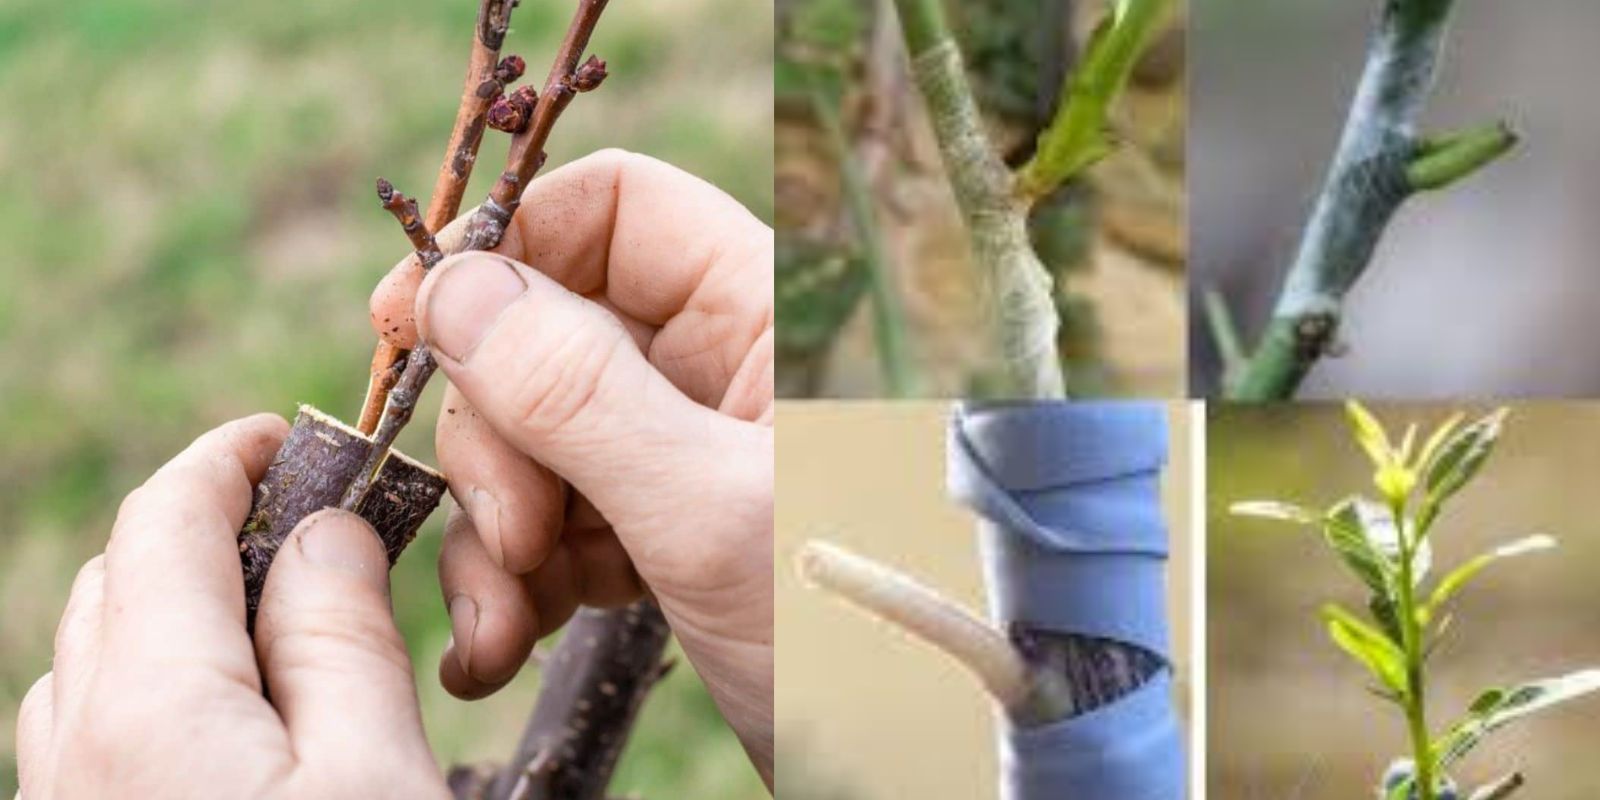
Chip grafting is a method of plant propagation where a small piece (chip) of the scion (the plant you want to propagate) is inserted into a matching cut made on the rootstock (the base plant). This technique is particularly popular for fruit trees, as it allows gardeners to combine the traits of two different varieties. It’s a technique that can be done with minimal tools and is suitable for both beginners and experienced gardeners.
Why Use Chip Grafting?
Chip grafting offers several advantages over other propagation techniques:
- Ease of Learning: Unlike more complicated grafting techniques, chip grafting is straightforward and doesn’t require much experience to begin.
- Compatibility with Small Scions: This method works well with smaller scions that might not be suitable for other grafting methods, such as whip-and-tongue grafting.
- Success Rate: Chip grafting has a relatively high success rate, especially if done correctly, as it allows for a good cambium-to-cambium connection, which is essential for the graft to take.
- Versatility: Chip grafting can be used to propagate a variety of plants, including fruit trees, roses, and other woody plants.
When to Use Chip Grafting?
The best time to perform chip grafting is during the growing season, typically in spring or early summer when the rootstock is actively growing and the scion is still young and flexible. You can also perform this technique in late winter if you’re working with dormant plants. However, it is important to avoid grafting during extreme weather conditions, as this could stress the plants and reduce the chances of successful grafting.
Materials Needed for Chip Grafting:
Before you begin the chip grafting process, gather the following materials:
- A Healthy Rootstock: This is the plant that will serve as the base for your graft. Choose a rootstock that is disease-free and compatible with your scion.
- Scion Wood: Select a healthy, young branch from the plant you wish to propagate. The scion should be about the same size or slightly smaller than the rootstock.
- Sharp Knife or Grafting Tool: You’ll need a sharp knife or grafting tool to make precise cuts on both the rootstock and the scion.
- Grafting Tape or Rubber Bands: These are used to secure the graft and protect it from environmental stress.
- Rooting Hormone (Optional): While not always necessary, rooting hormone can be applied to the cut ends of the scion or rootstock to encourage faster healing and increase the chances of grafting success.
- Clean Cloth or Alcohol (for Sterilization): To keep your tools clean and prevent the spread of disease, sterilize your knife before starting.
Step-by-Step Guide to Chip Grafting
Step 1: Choose the Right Plants
Select the rootstock and scion carefully. For best results, choose a rootstock that is compatible with the scion. This means they should be closely related species, as this increases the likelihood of a successful graft. For example, if you’re grafting a fruit tree, a common combination is an apple tree rootstock with an apple variety scion.
Step 2: Make the Chip Cut on the Rootstock
Use a sharp knife to make a small, rectangular chip on the rootstock. The chip should be shallow, about 1 inch long, and 1/4 inch deep, ensuring that it doesn’t damage the plant beneath the bark. Be sure to cut at a slight angle to maximize the contact area between the scion and the rootstock. It’s essential that the cambium layer (the green layer of tissue just beneath the bark) of the rootstock is exposed, as this is where the scion and rootstock will connect.
Step 3: Prepare the Scion
Select a healthy, disease-free scion from the desired plant. The scion should be about the same diameter as the rootstock to ensure a snug fit. Using a sharp knife, make a matching rectangular chip cut on the scion. Again, the chip should be shallow and the same size as the one on the rootstock. It’s essential that the cambium layer of the scion is intact, as this will help the graft “take.”
Step 4: Align the Scion with the Rootstock
Carefully align the scion with the rootstock so that the cambium layers of both pieces are in contact. This is the critical part of the grafting process – if the cambium layers don’t match up well, the graft will not take.
Step 5: Secure the Graft
Use grafting tape or rubber bands to hold the scion and rootstock together firmly. Be sure that the graft is tight but not overly constricted, as you don’t want to damage the plant tissue. Grafting tape is a popular choice because it sticks well and helps keep moisture around the graft, promoting healing.
Step 6: Protect the Graft
Once the graft is secured, it’s essential to protect it from drying out and environmental stress. You can cover the graft with a plastic bag or wrap to maintain humidity, or you can place the plant in a shaded area where it won’t be exposed to direct sunlight.
Step 7: Monitor the Graft
For the next few weeks, monitor the graft closely. Check for signs of successful union, such as the growth of new leaves or the healing of the graft site. If the graft is successful, the scion will begin to grow, and the rootstock will support it with water and nutrients.
Step 8: Remove the Grafting Tape
Once the graft has fully healed and the scion is growing well, remove the grafting tape or rubber bands. This step should be done slowly and carefully to avoid damaging the plant. If the graft is strong, you can now treat the plant as a mature tree or shrub.
Troubleshooting Common Grafting Problems
While chip grafting is a relatively simple process, there are some issues that gardeners may encounter:
- Graft Failure: If the graft doesn’t take, it could be due to improper alignment of the cambium layers, insufficient contact between the scion and rootstock, or an infection. Always ensure that your cuts are clean and precise.
- Desiccation: If the graft dries out, it could fail to heal. Keep the graft site moist by using a humidity bag or covering it with plastic wrap.
- Pests and Diseases: Like any plant propagation method, grafting is susceptible to pests and diseases. Always sterilize your tools before use to prevent the spread of disease.
Conclusion
Chip grafting is a valuable and straightforward technique for gardeners who want to propagate plants and improve the health and resilience of their gardens. With the proper tools, knowledge, and patience, anyone can successfully graft plants and enjoy the rewards of their hard work. By following this step-by-step guide, you’ll be well on your way to mastering the art of chip grafting, whether you’re growing fruit trees, roses, or other plants. Happy grafting!