
Grafting fruit trees is one of the oldest and most effective methods of plant propagation. It allows gardeners to combine the best characteristics of two different plants: the rootstock and the scion. Rootstock provides the root system, while the scion contributes to the growth of the fruiting portion of the tree. By grafting fruit trees, you can improve their resistance to diseases, adapt them to different soil conditions, and increase the speed at which they begin to bear fruit. In this article, we will take you through a detailed, step-by-step guide on how to successfully graft fruit trees and enjoy a bountiful harvest.
What is Grafting?
Grafting is a horticultural technique in which two plant parts, typically from different plants of the same species, are joined together to grow as one. The rootstock, the lower part of the plant, is selected for its desirable qualities, such as hardiness or resistance to soil-borne diseases. The scion, the upper part, is chosen for its fruiting ability and desired fruit characteristics.
The success of grafting relies heavily on the ability of the cambium layers (the tissue that grows just beneath the bark) of both the rootstock and scion to align and merge. Once the graft has healed, the rootstock provides the necessary nutrients and support for the scion, which will eventually begin producing fruit.
Why Graft Fruit Trees?
There are many reasons why gardeners choose to graft fruit trees instead of planting from seed or cutting:
- Faster Fruit Production: Grafted fruit trees often produce fruit more quickly than trees grown from seed.
- Improved Disease Resistance: By selecting a rootstock that is resistant to certain diseases, you can help your fruit trees survive in less-than-ideal soil conditions.
- Better Adaptability: Some rootstocks are more tolerant of drought, heavy clay soil, or poor soil conditions, allowing you to grow fruit trees in areas that might otherwise be unsuitable.
- Better Fruit Quality: Grafting allows you to choose a scion that will bear higher-quality fruit, while still benefiting from the strong rootstock.
- Space Efficiency: Grafting allows you to grow multiple varieties of fruit on a single tree. This can be especially useful for gardeners with limited space.
Step-by-Step Guide to Grafting Fruit Trees
Before we dive into the specifics of how to graft fruit trees, it’s important to understand that the success of your graft will depend on a few factors: the compatibility of the rootstock and scion, the time of year you graft, and how carefully you follow the process.
Step 1: Select Your Rootstock and Scion
The first step in grafting is selecting the right rootstock and scion. The rootstock is the lower portion of the tree that will grow the roots, while the scion is the upper portion, which will eventually bear fruit. Make sure that both the rootstock and scion come from the same species or variety to ensure compatibility.
When choosing a rootstock, consider factors such as soil conditions, disease resistance, and root structure. The scion should be selected based on its fruiting characteristics, such as flavor, size, and texture.
For beginners, it’s advisable to use rootstock and scion that are compatible in terms of growth rates and disease resistance. Popular choices for apple trees, for example, include M7 and M26 rootstocks, which are dwarfing and produce compact trees with good fruit quality.
Step 2: Prepare Your Tools
Having the right tools is essential for a successful graft. Ensure that your tools are sharp and clean to avoid any infections or damage to the plant tissues. The basic tools you’ll need are:
- A sharp grafting knife: This is essential for making clean cuts. A dull knife can crush the plant tissue and interfere with healing.
- Grafting tape or parafilm: This will be used to bind the scion and rootstock together and protect them from drying out.
- Pruning shears: To remove any unwanted branches or growth from the rootstock.
- A clean cloth or antiseptic: To keep the tools and grafting site sterile.
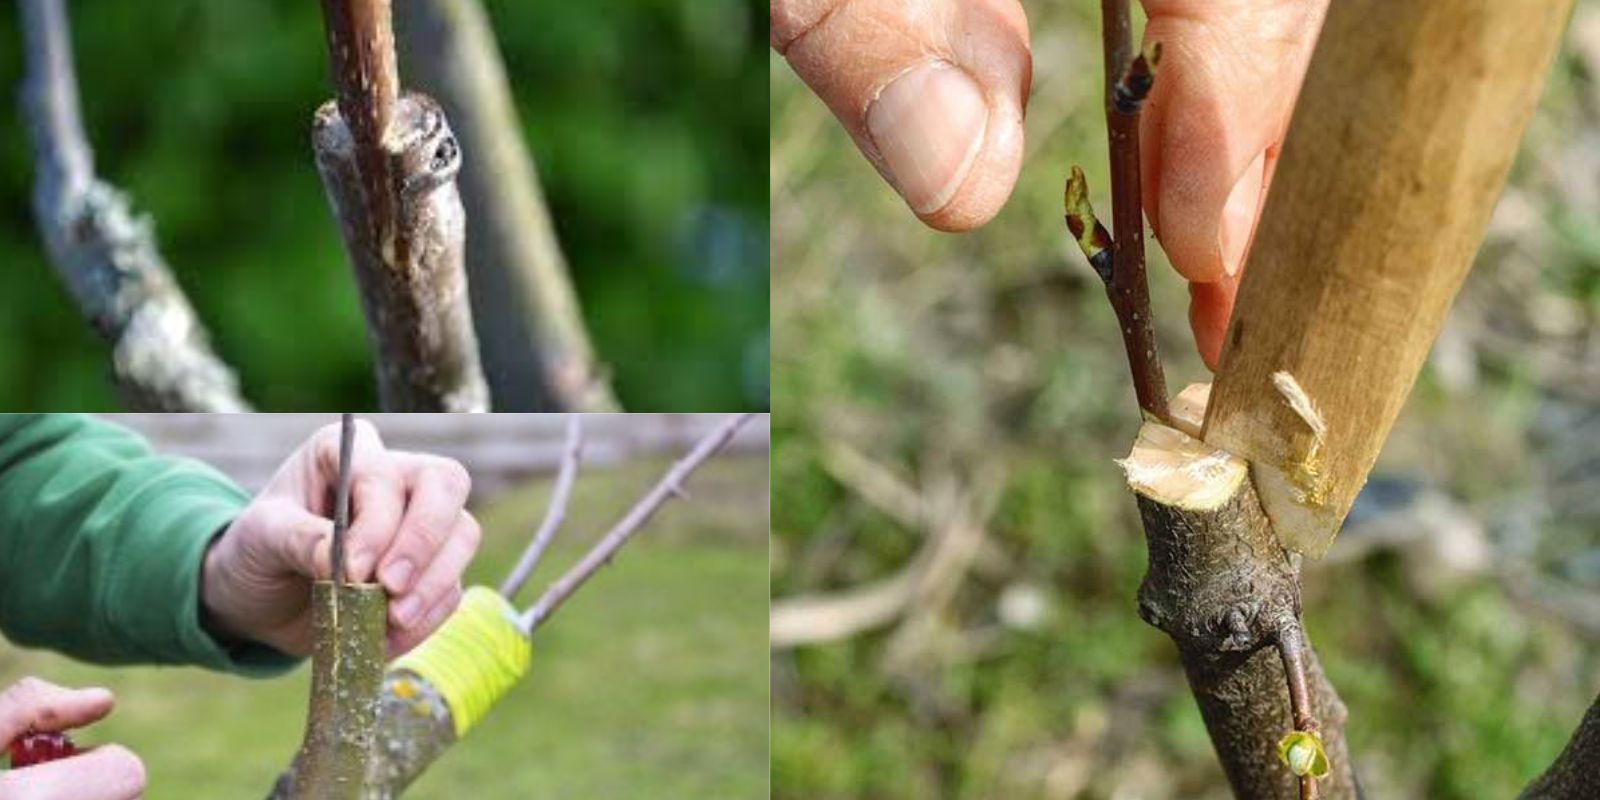
Step 3: Make the Grafting Cuts
The next step in the process is making the cuts. There are several types of grafting techniques, including the cleft graft, whip-and-tongue graft, and bark graft. For simplicity, we’ll focus on the whip-and-tongue graft, which is one of the most commonly used methods for grafting fruit trees.
- Rootstock Cut: Begin by cutting the rootstock at a 45-degree angle using your sharp grafting knife. The cut should be about 1-2 inches long, and the surface should be clean and smooth.
- Scion Cut: Similarly, make a matching 45-degree cut on the scion. It’s important that the scion is about the same diameter as the rootstock, so they fit together well.
- Creating the Tongue: On both the rootstock and the scion, make a small cut down the center of each angled cut. This will create a “tongue” on each piece, which will allow the two pieces to interlock. The tongues should fit together snugly but not be forced.
Step 4: Align the Cambium Layers
The success of the graft depends on the alignment of the cambium layers. The cambium is the layer of tissue just beneath the bark where new cells form. For the graft to take, the cambium layers of both the rootstock and scion must be in contact.
Carefully slide the scion onto the rootstock, ensuring that the cambium layers are aligned. The tongues of both pieces should interlock, holding them in place.
Step 5: Secure the Graft
Once the scion and rootstock are aligned, use grafting tape or parafilm to hold the two pieces together. Wrap the tape tightly around the graft site, ensuring that the scion and rootstock stay in place and are protected from drying out.
You should also use a clean cloth or plastic bag to cover the grafted area to keep it moist and protected from direct sunlight. This will help prevent the graft from drying out during the healing process.
Step 6: Care for the Graft
After completing the graft, it’s important to give it the proper care to ensure that it heals properly. Place the grafted tree in a shaded area where it won’t be exposed to extreme weather conditions.
- Watering: Keep the grafted area moist, but not waterlogged. Over-watering can cause the graft to rot, while under-watering can dry it out.
- Check the Graft Site: After a few weeks, carefully check the graft to see if the scion is starting to grow. If the graft has taken, you should see new growth emerging from the scion.
- Remove Grafting Tape: After a few months, once the graft has healed and the scion is growing well, you can remove the grafting tape. Be sure not to disturb the graft site too much during this time.
Step 7: Transplant the Tree
Once the graft has fully healed and the scion has started growing, it’s time to transplant the tree into a permanent location or larger container. The tree should be placed in a location that receives plenty of sunlight and has well-draining soil. Continue caring for the tree by watering it regularly and providing it with nutrients.
Conclusion
Grafting fruit trees is a rewarding and effective way to propagate trees, improve fruit quality, and overcome challenges such as poor soil or disease susceptibility. By following this step-by-step guide, you can successfully graft fruit trees and enjoy the fruits of your labor sooner.
Whether you’re a beginner or an experienced gardener, grafting offers a unique opportunity to grow diverse fruit varieties, increase your garden’s productivity, and experiment with different grafting techniques. Keep practicing, and soon you’ll be enjoying a beautiful orchard of home-grown fruit trees!
Key Takeaways
- Grafting is a technique that allows gardeners to combine desirable traits from two different plants.
- The rootstock supports the scion, which produces the fruit, and grafting helps grow better, disease-resistant trees.
- The whip-and-tongue graft is one of the most commonly used methods for fruit tree grafting.
- Proper care and patience are essential for the success of grafting fruit trees.
Happy grafting and gardening!