
Bark grafting is an incredibly effective and accessible technique for propagating fruit trees, repairing damaged trees, and even creating new hybrids. While it may seem complex at first, the bark graft method is one of the simplest grafting techniques that can lead to successful tree growth. By mastering bark grafting, you can expand your garden, save money on purchasing new trees, and create customized varieties that meet your needs.
In this article, we will take you through the entire bark grafting process. From selecting the right rootstock and scion to ensuring the graft takes, you will gain the knowledge needed to successfully perform bark grafting in your own garden.
What is Bark Grafting?
Bark grafting is a form of grafting where a scion (the part of the tree you want to propagate) is inserted under the bark of a rootstock tree. The goal is to join the scion to the rootstock so that they grow together and form a single plant. The scion provides the desired fruit or characteristics, while the rootstock offers a robust root system and growth support.
This technique is especially popular for fruit trees like apples, pears, and citrus because it allows for the propagation of desirable varieties that might not grow easily from seed or cuttings. It also serves as a practical solution for damaged trees, as it can help revive or improve tree health by grafting in a new branch or variety.
Why Choose Bark Grafting?
Bark grafting has several advantages, particularly for beginner and intermediate gardeners:
- Simplicity: It is relatively easy to perform, even for those new to grafting. It doesn’t require complicated tools or techniques.
- High Success Rate: When done correctly, bark grafting has a high success rate, making it an ideal method for tree propagation.
- Great for Repairing Trees: If you have a damaged tree, bark grafting can help restore or improve its structure, giving it a second chance.
- Versatility: Bark grafting works well for a wide range of tree species, particularly deciduous trees like apples, plums, and cherries.
- Customization: You can use this technique to create trees that bear specific varieties of fruit, making it an excellent choice for backyard orchardists or home gardeners.
Now that you understand why bark grafting is so beneficial, let’s dive into the step-by-step process of how to perform it.
Step-by-Step Guide to Bark Grafting
1. Choose the Right Rootstock and Scion
Before you begin grafting, it is essential to select a compatible rootstock and scion. Here’s what to look for:
- Rootstock: This is the tree’s root system and trunk, and it should be healthy, vigorous, and suited to your growing conditions. For instance, a dwarf rootstock might be ideal if you want a smaller tree, while a more robust rootstock is necessary for a larger tree.
- Scion: The scion is the desired variety of fruit or other tree characteristics. It should be taken from a tree of the same or similar species as the rootstock to ensure compatibility. It’s important that the scion is healthy and free from disease, and ideally, it should be taken from a recent growth (about one year old).
2. Prepare Your Tools
Grafting requires a few basic tools:
- Sharp Knife or Grafting Tool: For making precise cuts.
- Grafting Tape: To hold the grafted parts together and prevent them from drying out.
- Grafting Rubber Bands: These can be used to help secure the graft union.
- Plastic Wrap or Wax: For covering the graft and ensuring it stays moist.
- Sterilizing Solution: To clean your tools between uses and avoid contamination.
It’s important to use sharp tools to make clean cuts, as jagged or rough cuts can harm the tree and reduce the chances of successful grafting.
3. Timing is Key
Bark grafting is best performed during the spring or early summer when the tree is actively growing. The bark should be “slipping,” meaning it is easily separated from the wood underneath. This usually happens when the sap is flowing freely, making it easier for the scion to establish a connection with the rootstock.
Timing can vary depending on your location, so it’s essential to watch for the right moment when the bark peels away easily without much resistance.
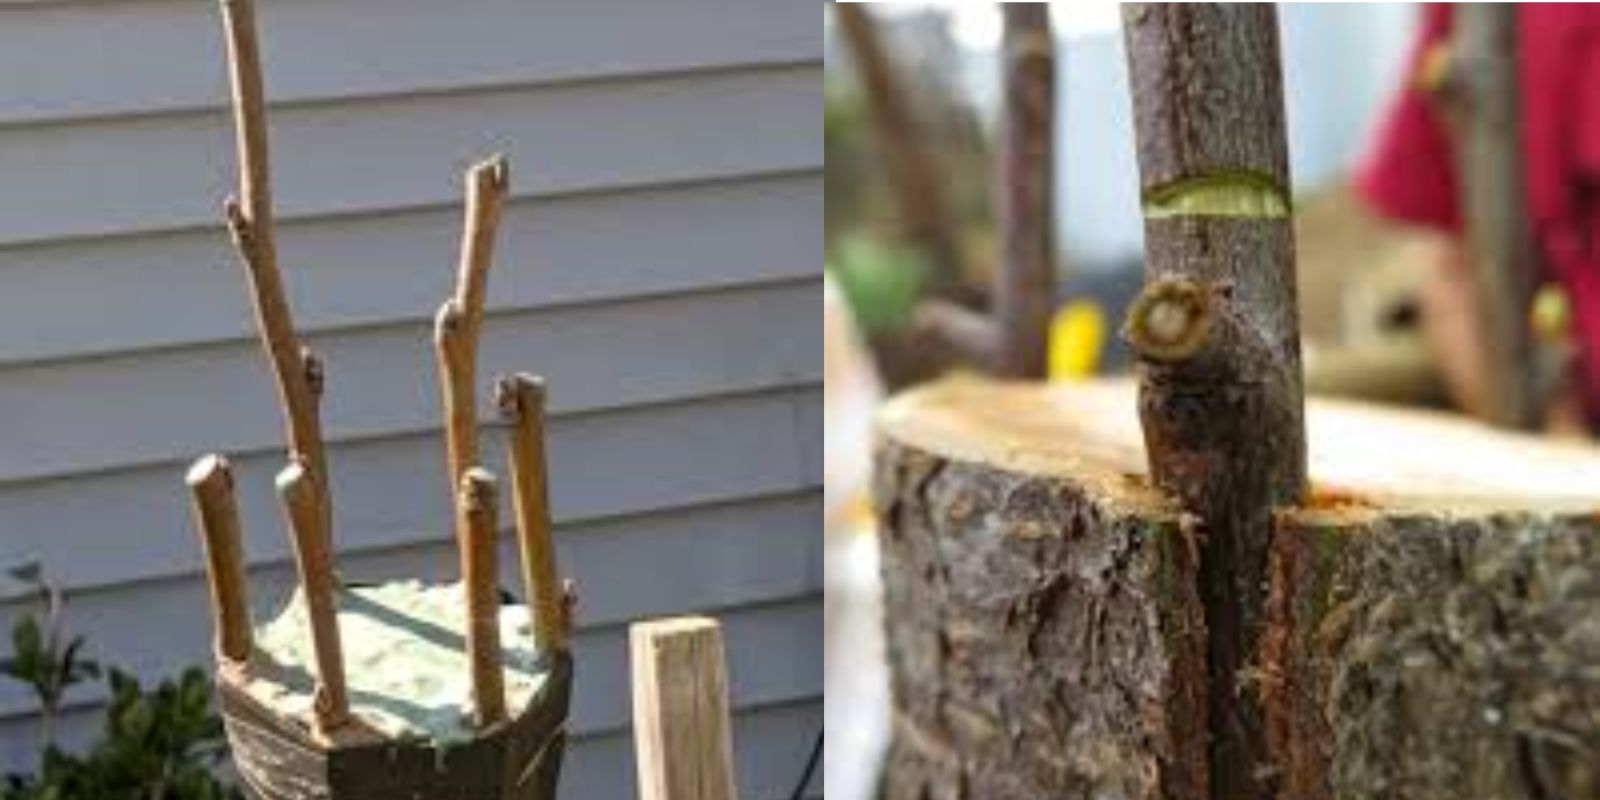
4. Make the Rootstock Incision
Once you’ve selected your rootstock and scion, it’s time to prepare the rootstock for grafting:
- Select a Branch: Choose a branch on the rootstock that is about the same diameter as the scion. This will ensure that the graft union is strong and has the best chance of success.
- Make a Vertical Cut: Use your sharp knife to make a vertical cut down the bark of the rootstock. The cut should be about 3-4 inches long and should go deep enough to lift the bark flap but not into the wood beneath.
- Lift the Bark: Gently peel the bark back from the wood, creating a flap that you can tuck the scion under. Be careful not to tear the bark too much, as this could affect the graft’s success.
5. Prepare the Scion
While the rootstock is being prepared, you should also get the scion ready:
- Cut the Scion: Use your knife to cut a scion that is about 4-6 inches long and has at least 2-3 buds on it. The bottom of the scion should be cut at a slant or angle, so it fits neatly under the bark of the rootstock.
- Match the Cambium Layers: The key to successful grafting is ensuring that the cambium layers (the thin layer of tissue just beneath the bark) of both the rootstock and scion are aligned. This is where the new vascular tissues will form, connecting the rootstock and scion.
6. Insert the Scion into the Rootstock
Now it’s time to insert the scion into the rootstock:
- Position the Scion: Gently lift the bark flap on the rootstock and slide the angled end of the scion underneath. Make sure the cambium layers are aligned, as this is critical for the graft to take.
- Secure the Graft: Once the scion is in place, carefully secure the bark flap back down over the scion. Use grafting tape or rubber bands to hold the graft in place. Be sure not to tie it too tightly, as this can strangle the tree. The graft should be held securely but not constricted.
7. Wrap and Protect the Graft
To help the graft heal and take, you’ll need to cover it:
- Wrap the Graft: Use plastic wrap or wax to cover the graft area, ensuring that the graft remains moist and protected from the elements. This step is crucial, especially if the weather is hot or dry.
- Protect from Sunlight: If you are grafting in a sunny area, use additional shading to protect the graft from direct sunlight. Too much sun can dry out the graft before it has time to take.
8. Wait for the Graft to Heal
Once the graft is wrapped and protected, be patient. The graft will take several weeks to heal, and you should check on it regularly. During this time, ensure that the graft stays moist and shielded from extreme weather conditions.
9. Monitor the Graft Union
After a few weeks, you should start seeing new growth from the scion, which is a sign that the graft has taken. If there is no growth after a few months, it might indicate that the graft has failed. In this case, you can try again with a new scion.
Once the graft is successful, you can remove the protective wrapping, but continue to monitor the graft union for any signs of stress or infection.
Troubleshooting Common Grafting Problems
While bark grafting is relatively straightforward, there are a few common issues that gardeners might encounter:
- Graft Failure: If the scion does not successfully fuse with the rootstock, it could be due to poor alignment of the cambium layers or an issue with the grafting technique. In this case, retry the process with a fresh scion and rootstock.
- Drying Out: If the graft dries out, it won’t heal. Make sure to keep the graft moist and covered until new growth is visible.
- Infection: Fungal infections can sometimes affect the graft site. Sterilizing your tools and using grafting wax or sealant can help prevent infections.
Conclusion
Bark grafting is a fantastic way to propagate trees and restore damaged ones, giving you the ability to grow your own fruit trees or create hybrid varieties. By following the steps outlined in this article, you can successfully graft trees in your own garden, ensuring that you have a thriving and diverse landscape for years to come.
Remember, patience and precision are key to successful grafting, so take your time and enjoy the process. Before long, you’ll have a flourishing garden filled with the trees you’ve propagated and nurtured yourself.
Happy grafting, and may your tree-growing endeavors be fruitful!