
Grape vines have been cherished for centuries, not just for their luscious fruit but also for their versatility and resilience. One of the most effective ways to elevate your vineyard’s potential is by grafting—a technique that allows you to combine the best characteristics of different grape varieties. Whether you’re a hobbyist gardener or an aspiring winemaker, grafting grape vines can improve plant health, increase yields, and even introduce unique flavors to your harvest.
In this article, we’ll explore the art and science of grape vine grafting, from understanding its importance to mastering the step-by-step process for success.
Why Graft Grape Vines?
Grafting is the process of joining the rootstock of one plant (known for its disease resistance and adaptability) with the scion of another (selected for its desirable fruit qualities). Here’s why it’s worth considering:
- Disease Resistance: Many rootstocks are bred to resist common grapevine diseases, such as phylloxera and nematodes.
- Flavor Diversity: You can grow multiple varieties of grapes on the same vine, allowing for creative winemaking or table grape options.
- Adaptation to Local Conditions: By choosing a rootstock suited to your soil and climate, you ensure the scion thrives.
- Prolonged Vine Life: Grafted vines often live longer and remain productive for decades.
When to Graft Grape Vines
Timing is crucial for successful grafting. The best time to graft grapevines is late winter to early spring, just before the sap begins to flow. This ensures the plant is coming out of dormancy, making it more likely to accept the graft.
Types of Grafting Methods for Grape Vines
There are several grafting methods used for grapevines. The most common include:
- Whip and Tongue Graft: Ideal for smaller vines, this method involves matching angled cuts to create a strong bond.
- Cleft Graft: Perfect for older or thicker rootstocks, this technique involves splitting the rootstock and inserting the scion.
- Budding: This involves grafting a single bud from the scion onto the rootstock, often used for specific varieties.
We’ll focus on the whip and tongue method, which is beginner-friendly and highly effective.
How to Graft Grape Vines: Step-by-Step Guide
Step 1: Gather Materials
You’ll need the following tools and materials:
- Healthy rootstock and scion cuttings
- Sharp grafting knife or pruning shears
- Grafting tape or rubber bands
- Grafting wax
- Clean cloth and disinfectant
Step 2: Choose the Right Plants
- Select a rootstock that thrives in your soil and climate. It should have strong, disease-resistant properties.
- Choose a scion from a variety known for its fruit quality, productivity, and flavor.
Step 3: Prepare the Rootstock
- Prune the rootstock to a manageable height.
- Make a slanted cut (approximately 1–2 inches long) at the top of the rootstock using a sharp grafting knife.
Step 4: Prepare the Scion
- Cut the scion into a similar length as the rootstock. Ensure it has at least 2–3 healthy buds.
- Make a matching slanted cut at the base of the scion to create a snug fit.
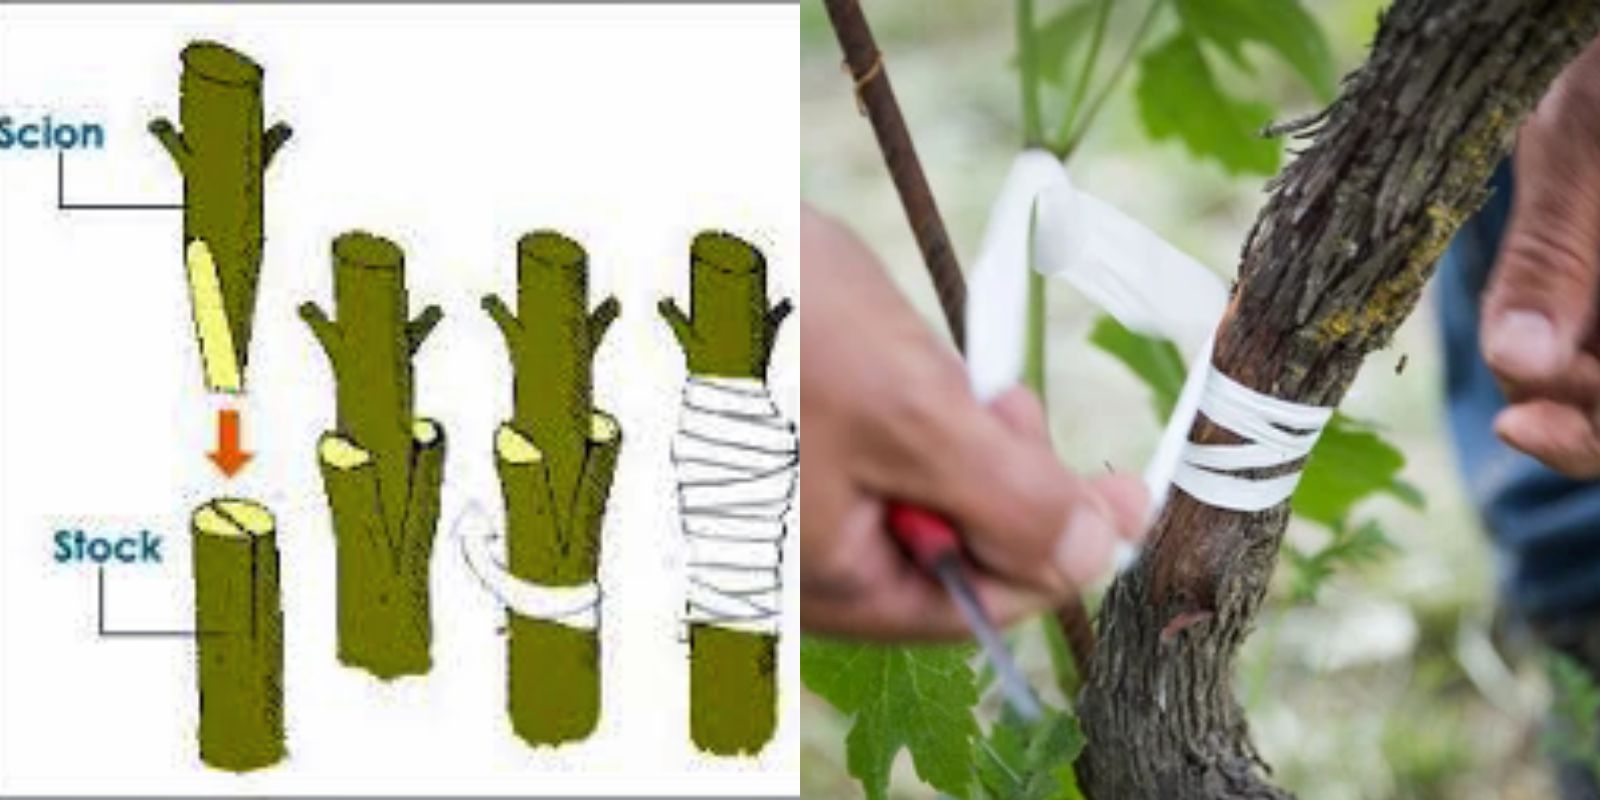
Step 5: Join the Rootstock and Scion
- Place the cut surfaces of the scion and rootstock together, aligning their cambium layers (the green tissue beneath the bark).
- For a stronger bond, you can make a small “tongue” cut on both the scion and rootstock, allowing them to interlock.
Step 6: Secure the Graft
- Wrap the graft tightly with grafting tape or rubber bands to hold it in place.
- Ensure the union is sealed completely to prevent air and moisture from entering.
Step 7: Seal the Graft
- Apply grafting wax over the entire graft area to protect it from drying out and prevent infections.
- Cover the scion’s exposed tip with wax for added moisture retention.
Step 8: Plant and Care
- Plant the grafted vine in well-draining soil with access to sunlight.
- Water regularly but avoid overwatering, as the new graft is sensitive to excess moisture.
- Mulch around the base to retain soil moisture and regulate temperature.
Post-Grafting Care
- Monitor Growth: Watch for signs of successful grafting, such as bud swelling and new leaf emergence.
- Remove Suckers: Remove any shoots growing from the rootstock below the graft to direct energy to the scion.
- Support the Vine: Install a sturdy trellis or stake to support the vine’s growth.
- Fertilize Lightly: Apply a balanced fertilizer to encourage healthy growth without overwhelming the young graft.
Common Mistakes to Avoid
- Misaligned Cambium: Ensure the cambium layers of the rootstock and scion are perfectly aligned.
- Poor Sealing: Inadequate sealing can lead to drying or infection. Always use grafting wax generously.
- Choosing the Wrong Season: Grafting outside the dormancy period reduces success rates.
Benefits of Grafting Grape Vines
Grafting is more than just a gardening skill—it’s a way to enhance your vineyard’s potential and experiment with new possibilities. By grafting, you can:
- Revive old vines with fresh, productive scions.
- Experiment with unique grape varieties without planting additional vines.
- Protect your vineyard from soil-borne pests and diseases.
Conclusion
Grafting grapevines is a rewarding practice that brings together the best of horticultural science and gardening creativity. With patience and precision, you can create robust vines tailored to your environment and taste preferences. Whether you’re growing table grapes for snacking or wine grapes for crafting a signature vintage, grafting opens up a world of possibilities.
So, why not give it a try? The next time you stroll through your garden or vineyard, envision the new varieties you could create with just a little effort and the right techniques.
What variety would you graft first? Let us know in the comments! 🌱🍇
#GrapeGrafting #VineyardGoals #GardenHacks #PlantPropagation #GrowYourOwn