
Grafting is one of the oldest and most effective horticultural techniques used to propagate fruit trees, enhance fruit quality, and increase tree resilience. By combining two different plants into a single tree, grafting allows gardeners to harness the best traits of both. Whether you’re a beginner gardener or an experienced horticulturist, learning the art of grafting can elevate your garden and provide better yields. This comprehensive guide will take you step by step through the process of grafting fruit trees, helping you to grow strong, healthy trees that produce abundant fruit.
What is Grafting?
Grafting involves joining a piece of a desired fruit tree, called the scion, with a rootstock (the base of another tree). The scion is typically a branch or twig that contains the buds for the desired variety of fruit, while the rootstock provides the roots and the lower trunk. The goal is for the scion and rootstock to fuse together and grow as a single plant, combining the rootstock’s disease resistance, hardiness, or growth characteristics with the scion’s superior fruit quality.
This method can be applied to many fruit trees, including apple, pear, plum, peach, and citrus. By grafting, you can combine different varieties of fruits on one tree, improve the tree’s ability to adapt to various environmental conditions, and even save space in small gardens.
Materials You Will Need for Grafting Fruit Trees
Before you begin grafting, gather the necessary materials to ensure a smooth process. The right tools are essential for a successful graft, as sharp and clean cuts are crucial for the graft union to heal properly.
- Sharp Grafting Knife: A high-quality, sharp knife is essential for making clean, precise cuts on both the rootstock and the scion. Avoid dull blades, as they can damage the plant tissues.
- Grafting Tape or Bands: These are used to hold the rootstock and scion together while they fuse. You can use special grafting tape, or if unavailable, you can substitute with elastic bands or other materials.
- Rootstock and Scion Wood: Choose healthy, disease-free rootstock and scion wood that are compatible in size and type. The rootstock should be vigorous and disease-resistant, while the scion should come from a tree that produces high-quality fruit.
- Pruning Shears: These are useful for cutting away any excess growth or twigs from the rootstock and scion.
- Isopropyl Alcohol: This is used for sterilizing tools to prevent the transfer of diseases.
- Grafting Sealant or Wax: Once the graft is made, use a grafting sealant or wax to cover the exposed cuts and prevent moisture loss, infections, and desiccation.
Step-by-Step Guide to Grafting Fruit Trees
Now that you have the materials, it’s time to learn how to graft your fruit trees. Follow these steps carefully to ensure the grafting process is successful.
1. Choose the Right Time to Graft
The best time to graft fruit trees is late winter or early spring, just before the buds begin to swell. This timing ensures that the rootstock and scion are in their dormant phase, making it easier for the graft union to form. Grafting during this period also promotes better healing, as both the rootstock and scion are actively growing when the weather warms up.
2. Prepare Your Tools
Sanitize your tools with isopropyl alcohol to prevent the spread of diseases. Clean, sharp tools ensure precise cuts and a smooth grafting process. This is an essential step to avoid complications later on.
3. Select the Rootstock and Scion
Choose a compatible rootstock and scion for the type of tree you wish to graft. The rootstock should be a strong, disease-resistant tree that suits the growing conditions of your region. It should also have a similar diameter to the scion to ensure proper alignment. The scion, on the other hand, should come from a healthy, productive tree with desirable fruit quality.
Make sure that the rootstock and scion are of similar diameter and that the buds of the scion are fully developed and healthy. If the scion is too small or the rootstock too large, it will be difficult to achieve a good graft.
4. Make the Cuts
There are several grafting methods, but the cleft graft and whip-and-tongue graft are the most common for beginners. Here is how to make the cuts:
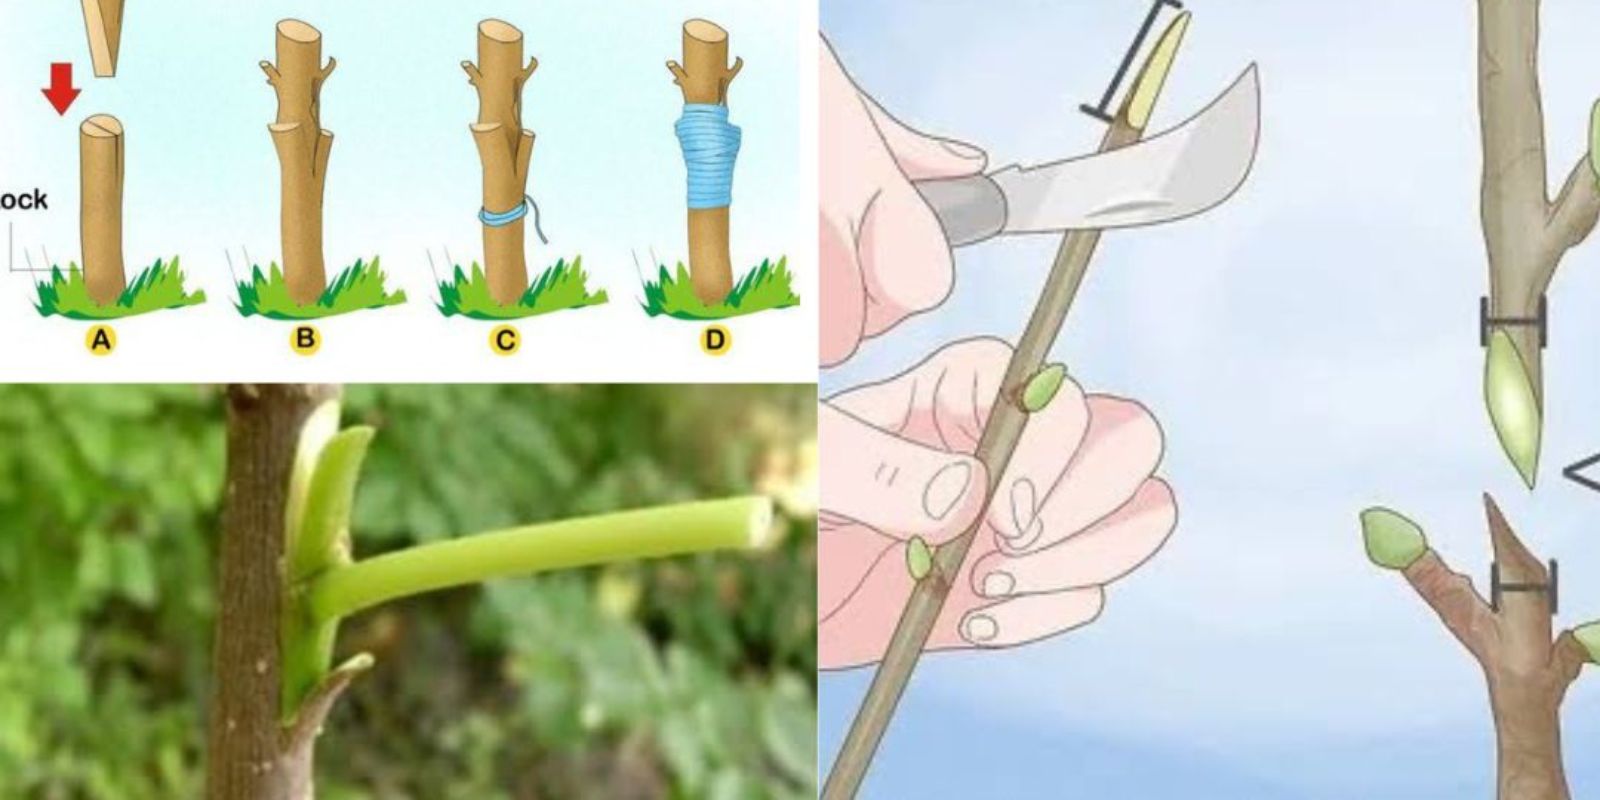
- Cleft Grafting: Make a vertical cut down the middle of the rootstock. Then, split the rootstock into two equal halves. On the scion, make a slanted cut on both ends so that it can be inserted into the split rootstock.
- Whip-and-Tongue Grafting: Both the rootstock and scion are cut at an angle, and a small tongue is created on both pieces. The two pieces are then joined, with the tongues interlocking for a secure fit.
Ensure that the cambium layers of both the rootstock and scion align perfectly. The cambium is the thin, green layer just beneath the bark responsible for nutrient and water transportation. A good union between these cambium layers is key to successful grafting.
5. Join the Scion and Rootstock
Carefully align the scion and rootstock, ensuring that the cambium layers of both parts are in contact. You can secure them with grafting tape or bands, but make sure that they are not too tight, as this can impede growth. The goal is to keep the two pieces together while allowing for some flexibility.
Once the scion and rootstock are aligned, use grafting tape or bands to wrap them tightly. This will hold the two parts in place as they heal and fuse together.
6. Seal the Graft
After the graft is complete, it’s time to protect it. Apply a grafting sealant or wax to cover the cuts. This helps to prevent moisture loss, infection, and pest damage. Ensure that the sealant is applied evenly over the exposed areas to create a protective barrier.
You may also want to wrap the entire graft with a plastic bag or tape to keep it moist and warm. This will help the graft heal and reduce the risk of drying out.
7. Post-Graft Care
Once the graft is made and sealed, it’s important to monitor the graft union closely to ensure it heals properly. Here are some key care tips:
- Watering: Keep the grafted tree well-watered but avoid overwatering. The rootstock should establish a strong root system, and the grafted scion will require adequate hydration to grow.
- Sunlight: Place the tree in a location with indirect sunlight until the graft heals and starts to grow. Direct sunlight can cause stress and drying during the healing phase.
- Pruning: After a few weeks, check the graft to ensure that it is healing. If any new shoots appear below the graft union on the rootstock, prune them off to redirect energy to the graft.
8. Monitoring and Maintenance
Over the next few months, check the graft regularly for signs of success. New shoots or buds from the scion are a positive indication that the graft has taken hold. Once the scion starts to grow, you can remove the grafting tape or bands to prevent them from constricting the tree.
Continue to care for the tree by providing water, sunlight, and nutrients. After a few months, the grafted tree will be well-established and ready for further growth.
Tips for Successful Grafting
- Practice Different Grafting Techniques: Experiment with various grafting techniques to improve your skills. The more you practice, the better you’ll become at understanding the nuances of grafting.
- Use Healthy, Disease-Free Material: The success of the graft depends on the quality of the rootstock and scion. Always use clean, healthy, and disease-free wood to ensure a high success rate.
- Be Patient: Grafting takes time, and the union may take weeks or even months to fully heal. Don’t rush the process and give your tree the time it needs to grow.
Benefits of Grafting Fruit Trees
Grafting offers numerous advantages for gardeners:
- Enhanced Fruit Quality: By grafting a high-quality scion onto a hardy rootstock, you can improve the fruit quality of your tree.
- Disease Resistance: Grafting can help you choose rootstocks that are resistant to pests and diseases, improving the overall health of your tree.
- Increased Growth Speed: Grafted trees tend to grow faster and produce fruit earlier than those grown from seeds.
- Space-Saving: By grafting multiple varieties onto a single tree, you can grow a diverse range of fruits in a smaller space.
Conclusion
Grafting is a powerful tool in a gardener’s arsenal. With the right materials, tools, and techniques, you can successfully graft fruit trees to produce high-quality fruit, increase tree resilience, and even create multi-variety trees. By following the steps outlined in this guide, you can become a proficient fruit tree grafter and reap the benefits of your hard work for years to come.
Take the plunge into grafting, and transform your garden into a thriving orchard of healthy, productive fruit trees!