Gardening is an art that combines patience, passion, and technique. One of the most exciting and cost-effective ways to expand your garden is by propagating plants from cuttings. This process involves taking a piece of a mature plant and encouraging it to grow roots, creating a brand-new plant. Whether you’re a novice gardener or an experienced green thumb, mastering propagation can help you grow a lush and diverse garden without spending a fortune. In this article, we’ll dive into the steps, tips, and tricks for successful plant propagation.
Why Propagate Plants from Cuttings?
Propagation is not only an economical way to grow your garden but also allows you to replicate plants you love, maintain heirloom varieties, and experiment with new species. Here are a few reasons why propagation is so beneficial:
- Cost Savings: Skip expensive nursery plants and grow your favorites for free.
- Plant Cloning: Ensure consistency in plant traits by replicating the exact genetic makeup of the parent plant.
- Sustainability: Reduce waste by reusing plant materials instead of discarding pruned branches.
- Gift Potential: Share your love for gardening by gifting propagated plants to friends and family.
Step-by-Step Guide to Propagating Plants from Cuttings
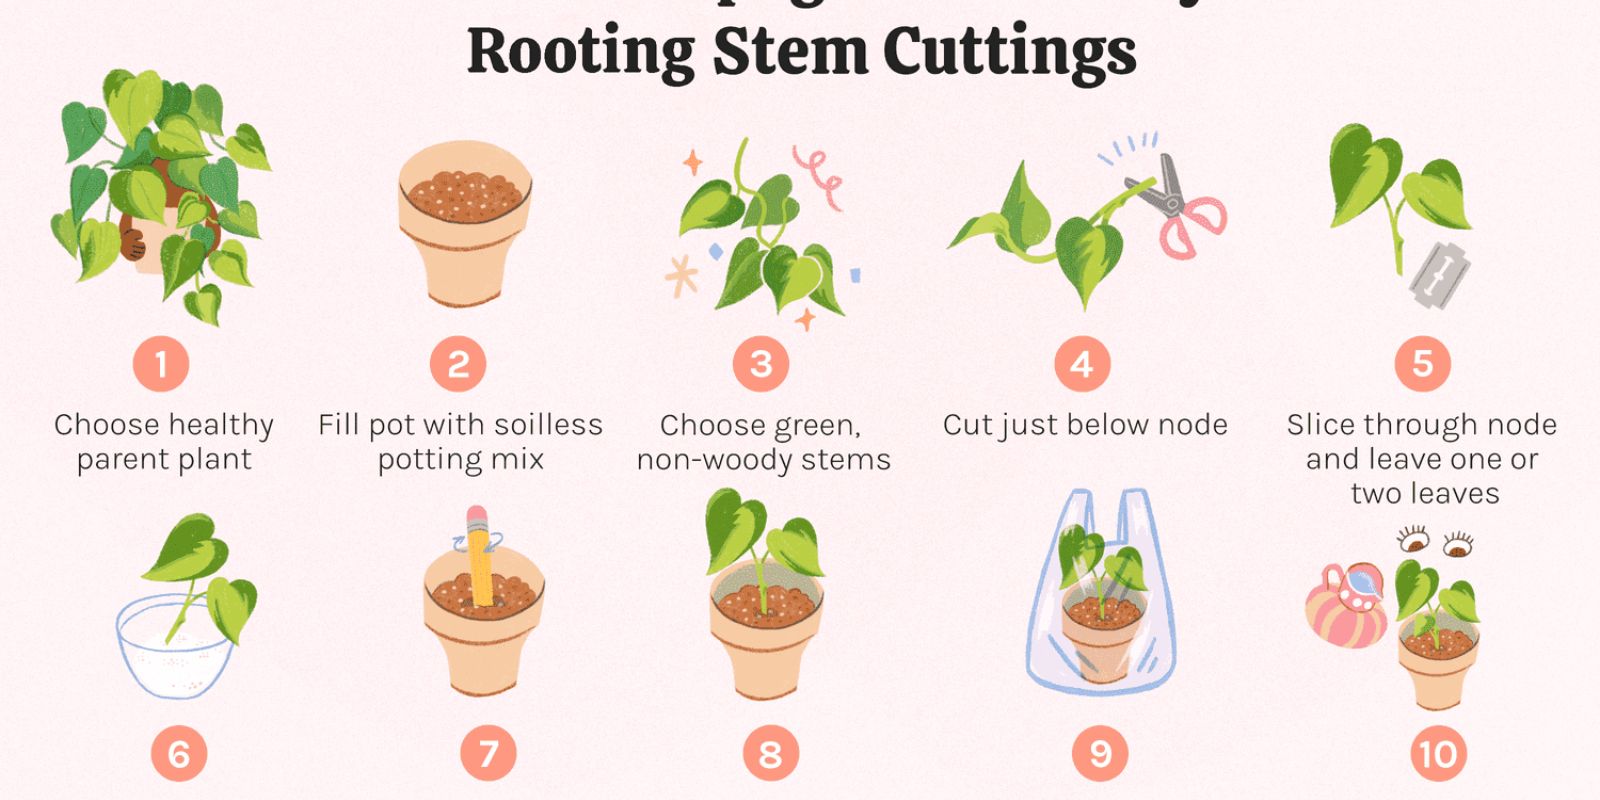
1. Choose the Right Parent Plant
The first step in propagation is selecting a healthy and vigorous parent plant. Look for plants free from pests, diseases, or damage. The stronger the parent plant, the better the chances your cutting will thrive.
2. Select the Cutting
Cuttings can be taken from stems, roots, or leaves, depending on the plant species. For most plants, stem cuttings work best.
- Use clean, sharp scissors or pruners to avoid crushing the stem.
- Cut a 4–6 inch stem just below a node (the area where leaves attach to the stem).
Pro Tip: Morning is the best time to take cuttings as plants are hydrated and less stressed.
3. Prepare the Cutting
- Remove leaves from the bottom half of the cutting to reduce water loss and focus energy on root development.
- For plants like roses or hydrangeas, cutting the bottom of the stem at a 45-degree angle increases the surface area for water absorption.
4. Optional: Use Rooting Hormone
Dipping the cut end of the stem into a rooting hormone powder or gel can speed up the rooting process. While this step isn’t essential, it increases success rates, especially for woody plants.
5. Plant the Cutting
Insert the prepared cutting into a growing medium. Options include:
- Moist Soil: A mix of potting soil, perlite, and peat moss provides good drainage and moisture retention.
- Water: Some plants, like pothos and philodendrons, root well in water. Use a clear container to observe root growth.
- Coco Peat or Sand: Ideal for succulents and cacti, as these mediums prevent overwatering.
Make sure at least one node is buried in the growing medium.
6. Create a Humid Environment
To promote rooting, keep humidity levels high around the cutting.
- Cover the cutting with a plastic bag or use a propagation dome to trap moisture.
- Ensure good airflow to prevent mold or mildew.
Place the cutting in bright, indirect light to encourage growth while avoiding leaf scorch.
7. Patience and Care
Rooting time varies by plant species and conditions, typically taking 1–4 weeks. During this period:
- Keep the growing medium consistently moist but not waterlogged.
- Check for roots by gently tugging the cutting; resistance indicates roots are forming.
8. Transplanting the New Plant
Once the cutting has developed a strong root system, it’s time to transplant it.
- Move the rooted cutting to a larger pot or directly into the garden.
- Gradually acclimate it to its new environment by exposing it to more sunlight and airflow over a few days.
Tips for Successful Propagation
- Understand the Plant’s Needs: Research the specific requirements of the plant you’re propagating. Some prefer water propagation, while others do better in soil.
- Season Matters: Spring and early summer are ideal for most cuttings as plants are actively growing.
- Sterilize Tools: Always clean your scissors or pruners to prevent transferring diseases between plants.
- Monitor Temperature: Keep the temperature between 65–75°F (18–24°C) for optimal root growth.
- Don’t Overwater: Soggy soil can cause rot. Choose a well-draining medium and water sparingly.
Common Plants to Propagate from Cuttings
Propagation works well for a wide variety of plants. Here are some popular options:
- Herbs: Basil, rosemary, mint, and oregano are easy to grow from cuttings.
- Flowers: Geraniums, roses, and hydrangeas are great candidates for propagation.
- Houseplants: Pothos, snake plants, and succulents root quickly and thrive in various conditions.
- Shrubs and Trees: Willow, ficus, and certain fruit trees can also be propagated successfully.
Troubleshooting Propagation Issues
- Cuttings Not Rooting:
- Check if the medium is too wet or dry.
- Ensure the cutting is from a healthy parent plant.
- Leaves Wilting or Yellowing:
- This may indicate overwatering or insufficient humidity. Adjust the conditions accordingly.
- Mold Growth:
- Improve ventilation and remove any decaying plant material.
Why You Should Start Propagating Today
Plant propagation isn’t just a gardening skill; it’s an empowering way to grow your connection with nature. By mastering this technique, you can expand your garden with minimal cost, preserve beloved plant varieties, and share the joy of gardening with others. Whether you’re propagating herbs for the kitchen or adding vibrant flowers to your landscape, the possibilities are endless.
💬 What’s your favorite plant to propagate? Share your tips, photos, or success stories in the comments below!
🌱 #PlantPropagation #GardeningTips #GreenThumb #GardenHacks #GrowYourOwnGarden #EcoFriendlyGardening

