
Orchids are among the most beloved houseplants, celebrated for their elegant beauty and unique blooms. However, many orchid enthusiasts struggle with getting their plants to rebloom or propagate successfully. If you’re looking for a way to boost your orchid’s growth and achieve multiple shoots from a single stem, you’ve come to the right place. In this article, we’ll explore a natural and effective method that can help your orchid thrive while minimizing costs and maximizing results.
This simple yet powerful technique involves leveraging the nutritional properties of garlic to stimulate new growth. Follow these steps, and with a little patience and care, you’ll soon enjoy healthier orchids with abundant blooms.
Why Use This Technique?
Traditional orchid propagation can involve complex methods like keiki pastes or specialized tools. However, this garlic-based nutrient solution offers a more natural and affordable alternative. Garlic is packed with compounds like allicin, which are known for their antifungal and antibacterial properties. Additionally, it provides essential nutrients that promote plant health and stimulate new growth.
By using this method, you can give your orchid the boost it needs to produce multiple shoots from a single stem, ensuring more blooms and a fuller plant.
Step-by-Step Guide to Propagating Orchids Using Garlic
1. Prepare the Stem
The first step is to select the right orchid and prepare its stem for treatment:
- Choose an orchid that has already bloomed at least once. This ensures that the plant is mature enough to handle propagation.
- Using clean, sterilized scissors or pruning shears, cut the stem perpendicularly (a straight cut). Make the cut just above a node to encourage new growth.
- Sterilize the scissors with rubbing alcohol before and after cutting to prevent the spread of disease.
2. Create a Natural Nutrient Solution
This nutrient solution is the heart of the process:
- Take one large clove of garlic and chop it finely. Garlic contains natural compounds that promote growth and protect against pathogens.
- Place the chopped garlic in a container with one cup of water. Stir the mixture thoroughly to release the garlic’s nutrients into the water.
- Cover the container and let it sit in a dark place for seven days. This maceration process enhances the potency of the solution.
3. Treat the Stem with the Garlic Solution
Once your garlic solution is ready, it’s time to treat the orchid stem:
- Strain the garlic mixture to separate the liquid from the solids. You should now have a concentrated nutrient solution.
- Dip the freshly cut end of the orchid stem into the garlic solution. Allow it to soak for 10–15 minutes to ensure the stem absorbs the nutrients.
4. Transplant the Treated Stem
After treating the stem, it’s time to plant it in a suitable growing medium:
- Use a pot filled with nutrient-rich orchid soil or a mix of bark and sphagnum moss, ensuring good drainage. Orchids dislike soggy roots, so proper drainage is crucial.
- Plant the treated stem firmly into the soil, making sure the node is slightly above the surface.
- Place the pot in a location that receives indirect sunlight and maintains high humidity levels. A humid environment mimics the orchid’s natural habitat and encourages growth.
5. Care for the Transplanted Stem
Proper care is essential for the stem to develop new shoots and thrive:
- Watering: Keep the growing medium slightly moist but not waterlogged. Overwatering can lead to root rot.
- Humidity: Increase humidity around the plant using a humidity tray or by misting it regularly.
- Light: Provide bright, indirect sunlight. Avoid placing the pot in direct sunlight, as this can scorch the leaves and damage the plant.
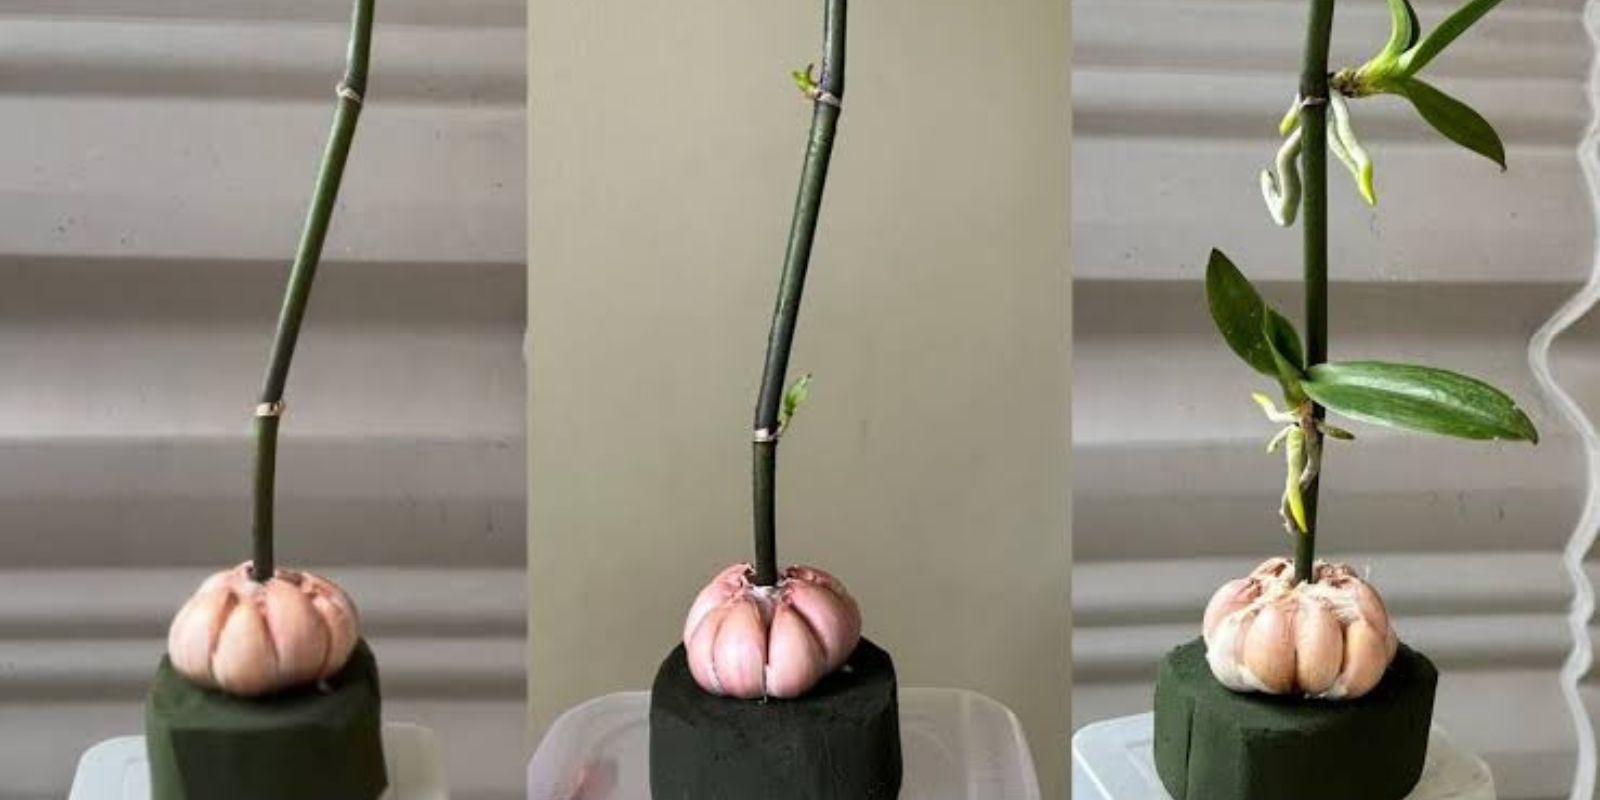
6. Monitor for Results
With consistent care, you should start seeing results in a few weeks:
- New shoots may emerge from the treated stem, signaling that the plant is responding positively to the nutrient boost.
- Continue regular orchid care practices, including fertilization every two weeks during the growing season and periodic pruning of dead or yellowing leaves.
Additional Tips for Success
To maximize the effectiveness of this method and ensure your orchid thrives, keep the following tips in mind:
- Choose Healthy Plants: Always start with a healthy orchid. Weak or diseased plants may struggle to respond to the treatment.
- Sterilize Everything: Prevent infections by sterilizing all tools and containers used in the process.
- Be Patient: Orchids are slow-growing plants. It may take several weeks to months before you see significant progress.
- Supplement with Orchid Fertilizer: While the garlic solution provides a nutrient boost, adding a balanced orchid fertilizer can further support growth.
Benefits of This Method
- Cost-Effective: This technique eliminates the need for expensive growth hormones or propagation kits.
- Natural and Safe: By using a natural ingredient like garlic, you minimize the risk of exposing your plants to harmful chemicals.
- Improved Growth: The nutrient-rich solution stimulates new shoot development and enhances overall plant health.
- Easy to Implement: This method requires minimal equipment and can be done by beginners and experienced gardeners alike.
Common Challenges and Solutions
While this method is highly effective, you may encounter a few challenges along the way. Here’s how to address them:
- Slow Results: If your orchid isn’t showing signs of new growth, ensure it’s receiving adequate light, humidity, and nutrients.
- Root Rot: Avoid overwatering and ensure the pot has proper drainage to prevent root rot.
- Pest Infestations: Check regularly for pests like aphids or scale insects. Treat infestations promptly with insecticidal soap or neem oil.
Conclusion
Propagating orchids doesn’t have to be a daunting task. With this natural garlic-based method, you can boost your orchid’s growth and enjoy multiple shoots from a single stem. This technique not only saves money but also promotes healthier plants by avoiding synthetic chemicals.
By following the steps outlined in this article, you can transform your orchid care routine and experience the joy of seeing new shoots and vibrant blooms. Patience and consistent care are key, but the results are well worth the effort.
Have you tried this method or have your own tips for propagating orchids? Share your experience in the comments below! Let’s grow together. 🌸
#OrchidCare #GardeningTips #PlantPropagation #NaturalGardening #OrchidLovers #Houseplants #BloomBoostingTips #SustainableGardening