Marigolds, with their vibrant hues and cheerful blooms, are among the easiest and most rewarding flowers to grow. Not only do they brighten up your garden, but they also repel pests, attract pollinators, and are incredibly simple to propagate from seeds. If you’re looking for a cost-effective and sustainable way to cultivate marigolds, learning how to collect and grow seeds is the perfect place to start. In this guide, we’ll walk you through every step, from seed collection to planting, ensuring your garden thrives with these delightful blooms year after year.
Why Grow Marigolds from Seeds?
Growing marigolds from seeds has many benefits:
- Cost-effective: No need to buy new plants each season.
- Sustainability: Reduce waste by reusing seeds.
- Adaptability: Seeds collected from your plants are already acclimated to your local conditions.
- Simplicity: Marigold seeds are easy to collect and cultivate, making them perfect for beginners.
Step 1: Collecting Marigold Seeds
The first step in growing your own marigolds is collecting seeds from existing plants. Here’s how:
- Wait for Flowers to Dry: Allow the flowers to fully mature and dry on the plant. This ensures the seeds are ripe and ready for collection.
- Remove Dried Flower Heads: Once the blooms are dry and brittle, gently pluck the flower heads from the plant.
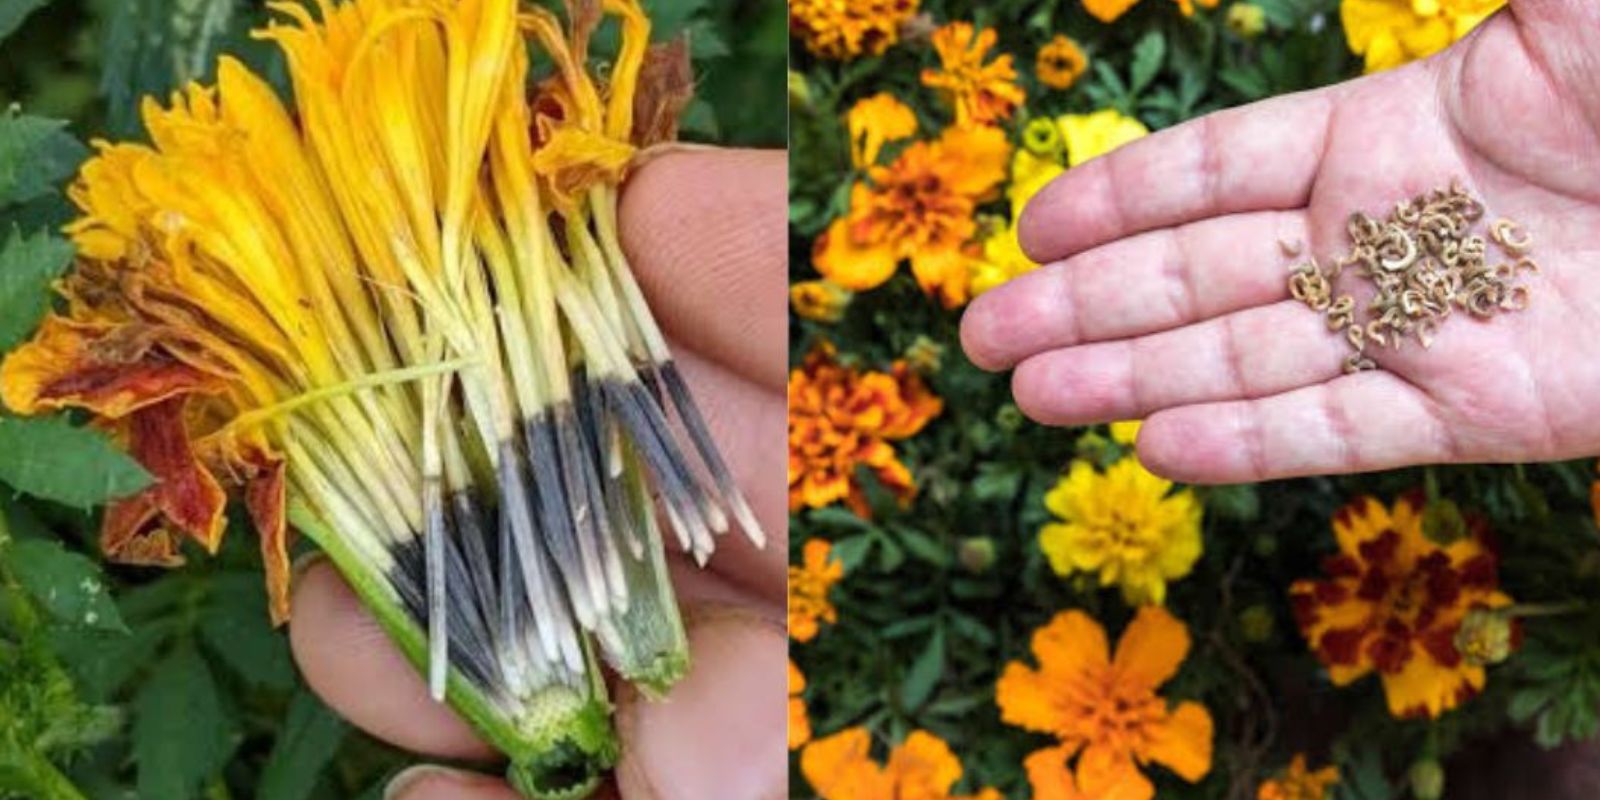
- Extract the Seeds: Carefully open the dried heads to reveal elongated, thin seeds. These seeds are usually dark at one end and light at the other.
- Inspect for Quality: Discard any damaged or moldy seeds, keeping only the healthiest ones.
Step 2: Drying and Storing Seeds
Proper drying and storage are essential to ensure the viability of your seeds:
- Air Dry the Seeds: Spread the seeds out on a dry, well-ventilated surface, such as a paper towel or a mesh screen. Let them dry for a few days.
- Avoid Moisture: Ensure the seeds are completely dry to prevent mold or rot during storage.
- Store Safely: Place the dried seeds in a labeled envelope or airtight container. Store them in a cool, dry place away from sunlight.
Step 3: Planting Marigold Seeds
Once you’ve collected and stored your seeds, it’s time to plant them. Marigold seeds can be sown directly in the garden or started in pots. Follow these steps for best results:
- Choose the Right Location: Marigolds thrive in full sun, so select a sunny spot in your garden or a bright windowsill for indoor planting.
- Prepare the Soil: Use well-draining soil enriched with organic matter. For pots, choose a potting mix suitable for flowers.
- Sow the Seeds:
- Create shallow furrows in the soil.
- Scatter the seeds evenly, leaving some space between them.
- Lightly cover the seeds with a thin layer of soil (about 1/4 inch).
- Water Gently: Water the soil gently to keep it moist but not soggy. Avoid overwatering as it can rot the seeds.
Step 4: Caring for Your Marigold Plants
Marigolds are low-maintenance plants, but proper care ensures healthy growth and abundant blooms:
- Irrigation: Water regularly, especially during germination, but let the soil dry slightly between waterings.
- Sunlight: Ensure the plants receive at least 6-8 hours of direct sunlight daily.
- Fertilization: Use a balanced fertilizer every 4-6 weeks to promote growth and flowering. Avoid over-fertilizing, as it may result in more foliage than flowers.
- Pest Control: Marigolds are natural pest repellents but occasionally attract slugs or aphids. Check regularly and use organic pest control methods if needed.
- Deadheading: Remove spent blooms to encourage continuous flowering throughout the season.
Step 5: Propagating More Plants
Marigolds can also be propagated through self-seeding or by saving seeds for the next planting season:
- Allow Some Blooms to Mature: Leave a few flowers to dry naturally on the plant for self-seeding.
- Collect Seeds Annually: Follow the collection and storage steps to ensure you have seeds ready for the next season.
Common Challenges and How to Overcome Them
While marigolds are easy to grow, you may encounter a few issues:
- Overwatering: Marigolds dislike overly wet soil. Ensure proper drainage and avoid waterlogged conditions.
- Poor Germination: Use fresh seeds and plant them in warm soil for better results.
- Pests and Diseases: Keep an eye out for pests like aphids and diseases like powdery mildew. Treat promptly with organic solutions.
Creative Uses for Marigolds
Beyond their ornamental value, marigolds have many practical uses:
- Companion Planting: Marigolds deter pests like nematodes, making them great companions for vegetables like tomatoes and cucumbers.
- Edible Blooms: The petals of some marigold varieties are edible and can be used to garnish salads or teas.
- Natural Dye: Marigold flowers can be used to create yellow and orange natural dyes.
FAQs About Growing Marigolds from Seeds
Q: When is the best time to plant marigold seeds?
A: Plant marigold seeds in early spring, after the last frost, for a summer bloom. In warmer climates, you can also plant them in late summer for a fall display.
Q: Can I grow marigolds indoors?
A: Yes, marigolds can be grown indoors in pots as long as they receive ample sunlight or are placed under grow lights.
Q: How long do marigold seeds take to germinate?
A: Marigold seeds typically germinate within 5-7 days under optimal conditions.
Why You’ll Love Growing Marigolds
Marigolds are not only stunning but also incredibly practical. They add vibrant colors to your garden, improve soil health, and repel pests naturally. Plus, the joy of growing them from seeds enhances your connection to nature and provides a sense of accomplishment.
Ready to try growing marigolds from seeds? Share your gardening stories and tips with us!

