
Lemons are a staple in many kitchens, valued for their vibrant flavor and numerous culinary uses. Whether you use them for cooking, baking, or simply for refreshing drinks, having a fresh supply of lemons at home is a luxury. But why spend money on store-bought lemons when you can grow your own lemon tree from the comfort of your home? This guide will teach you how to grow your own citrus tree on a budget, with simple steps that anyone can follow. By propagating lemon trees from cuttings, you can enjoy homegrown lemons without breaking the bank.
Why Grow Your Own Lemon Tree?
Growing your own lemon tree has numerous benefits. For starters, it’s cost-effective. While it may take some time for your tree to mature and produce fruit, the initial investment is minimal. You also have the satisfaction of watching your tree grow from a small cutting into a full-fledged lemon-bearing plant. Additionally, growing your own lemons means you’re always one step away from fresh, organic citrus, free of chemicals and pesticides.
Growing lemons from cuttings is one of the most affordable and rewarding ways to start your own citrus tree. You don’t need a large garden or years of experience—just a little time, care, and attention to detail. With the right techniques, you can have a thriving lemon tree in no time.
Materials Needed
Before you begin, gather the necessary materials to ensure the best chances of success. Here’s what you’ll need:
- Healthy lemon tree cuttings (6-8 inches long)
- Tissue paper
- Plastic bags (small to medium-sized)
- A container for transplanting
- Well-draining soil (preferably potting mix for indoor plants)
- A sharp knife or pruning shears
- A warm, bright location (but not direct sunlight)
These materials are easy to find, and most can be found around your home or purchased for a very low cost. Now, let’s walk through the process of propagating your lemon tree.
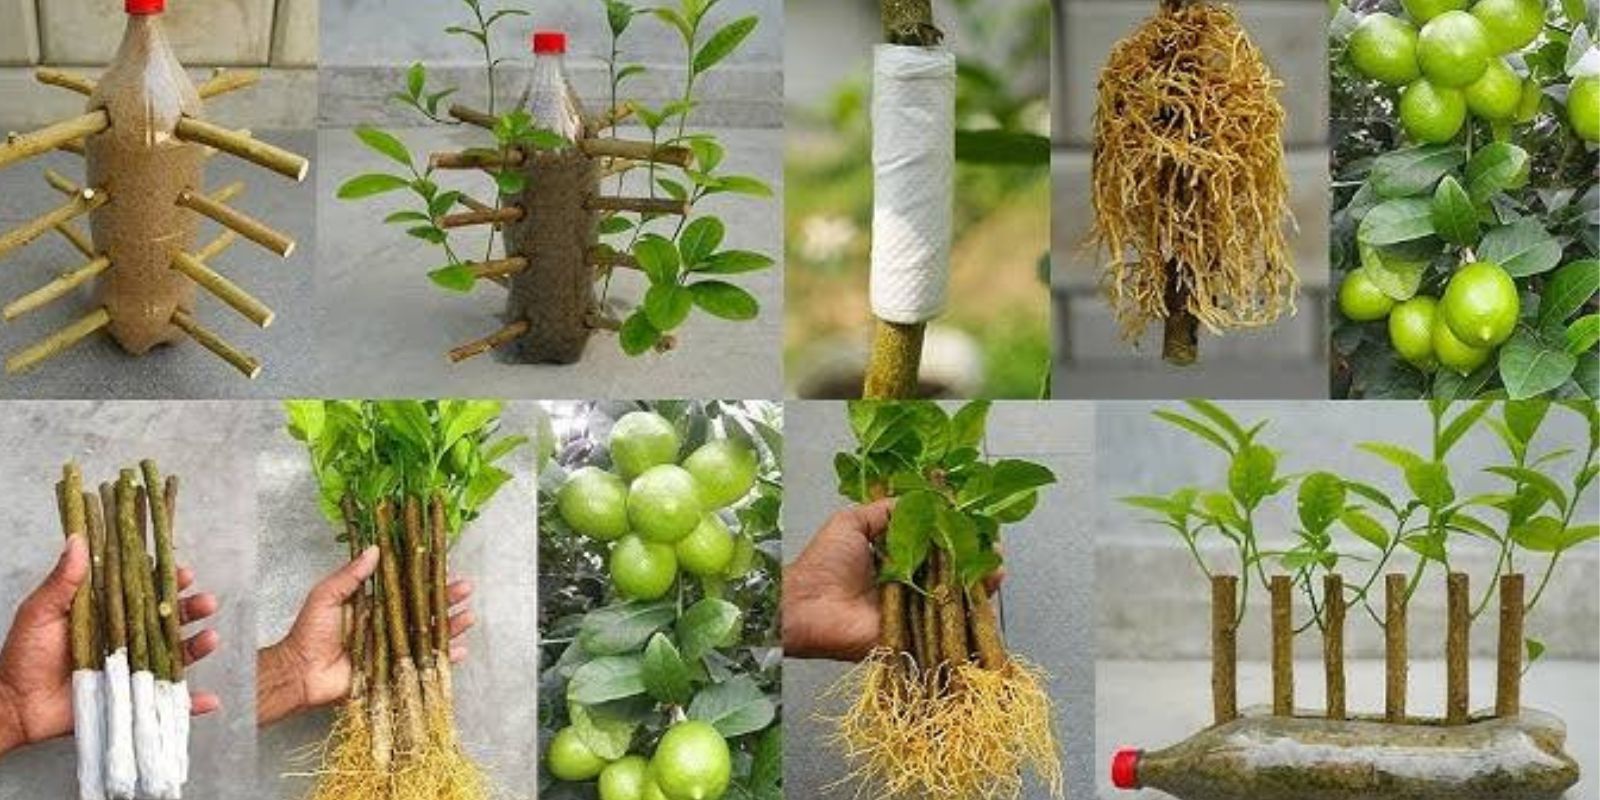
Step 1: Gather Lemon Tree Cuttings
The first step in propagating a lemon tree is selecting healthy cuttings. Choose a lemon tree with vibrant green leaves, free from disease or pests. Cuttings should be approximately 6-8 inches long and should come from a mature tree that has reached at least 2-3 years old. Make sure the cutting has at least two or three healthy leaves.
Use a sharp knife or pruning shears to make a clean cut just below a node, which is the point where leaves grow from the stem. This will help ensure that the cutting has a better chance of rooting.
Step 2: Prepare the Cuttings
Once you’ve gathered your cuttings, it’s time to prepare them for propagation. Start by removing any excess leaves from the bottom half of the cutting, leaving just a few leaves at the top. This helps to minimize water loss and encourages the cutting to focus on root development rather than supporting the leaves.
At this point, it’s a good idea to trim the stem at a 45-degree angle, which helps with the uptake of water and nutrients. You can also dip the end of the cutting in rooting hormone if you’d like to give it a boost (this step is optional but can help speed up the process).
Step 3: Wrap the Cuttings with Tissue Paper
To keep the cutting moist and provide the right environment for root development, you’ll need to wrap it in tissue paper. Moisten the tissue paper with water, ensuring it’s damp but not soaked. Carefully wrap the tissue around the base of the cutting, making sure it covers the exposed part of the stem.
Tissue paper helps to retain moisture and protect the cutting, ensuring that the cutting remains hydrated and in optimal conditions to root.
Step 4: Create a Humid Environment
Now that your cutting is wrapped, place it in a small plastic bag. The plastic bag acts as a greenhouse, trapping moisture and heat to create a humid environment. This is crucial for root development, as high humidity encourages the cutting to form roots faster.
Make sure the bag isn’t too tight around the cutting; there should still be room for air to circulate. Seal the bag loosely and place it in a warm, bright spot, but away from direct sunlight. Avoid placing the cutting in a spot that is too hot or too cold, as this can stress the cutting.
Step 5: Monitor Growth
Over the next few weeks, you’ll want to check your cuttings regularly. Open the plastic bag to allow for fresh air and to check for any signs of mold or rot. If the tissue paper appears dry, re-moisten it, but avoid making it too soggy. You want to maintain a balance of moisture—too much water can cause the cutting to rot, while too little will prevent roots from forming.
At this stage, be patient. Rooting can take anywhere from two to eight weeks, depending on environmental factors like temperature and humidity. You’ll start to notice small white roots growing at the base of the cutting. Once you see strong root growth, it’s time to transplant the cutting into a pot.
Step 6: Transplanting the Cutting
Once your cutting has developed a robust root system, it’s time to transplant it into a pot. Choose a pot that’s large enough to accommodate the roots but not so large that the plant becomes overwhelmed. A 6-8 inch pot is a good starting size.
Fill the pot with well-draining soil, such as a good-quality potting mix designed for indoor plants. Gently place the cutting into the pot, spreading the roots evenly in the soil. Cover the roots with soil, making sure the graft union (the point where the cutting was taken) is just above the soil line.
Water the newly planted cutting thoroughly to settle the soil around the roots. Make sure the pot has good drainage to prevent waterlogging, which can cause the roots to rot.
Step 7: Care for the New Lemon Tree
Once the cutting is transplanted, continue to care for it as it grows into a healthy lemon tree. Keep the plant in a bright location with indirect sunlight, as direct sunlight can scorch the young plant. Ensure that it gets 8-10 hours of light per day.
Water the plant regularly, but make sure the soil is allowed to dry out between waterings. Overwatering can lead to root rot, so always check the moisture level before watering. A good rule of thumb is to water the plant deeply once a week, but this can vary depending on the climate and the size of the plant.
Fertilize the tree once it starts to show signs of new growth. Use a balanced fertilizer that is appropriate for citrus trees, and follow the manufacturer’s instructions for application.
Conclusion: Successfully Grow Lemon Trees
Growing a lemon tree from a cutting is an enjoyable and affordable way to bring fresh citrus into your life. By following the steps outlined in this guide, you’ll be able to propagate a healthy lemon tree that will eventually bear delicious, homegrown lemons.
Starting from a cutting not only saves you money but also gives you the satisfaction of nurturing a plant from the very beginning. With a little patience and proper care, your lemon tree will reward you with fresh fruit for years to come.
Whether you want a decorative tree for your home or a productive fruit-bearing plant, growing lemons from cuttings is a rewarding and fun project for gardeners of all skill levels. So why wait? Get started today, and enjoy the fruits of your labor!