
For any gardener, one of the biggest challenges is ensuring that plants get enough water, especially during long periods of absence, vacations, or dry spells. Watering your plants regularly can be a time-consuming task, and for some, it can even get expensive. But what if we told you that you could keep your plants hydrated for a whole month without spending a dime? Sounds too good to be true? Well, it’s not!
In this article, we’ll explore how to set up cost-free, sustainable ways to water your plants for an entire month. From reusing common household items to creating self-watering systems, these methods will save you both time and money, all while ensuring that your plants stay healthy and thriving. Whether you have indoor houseplants, outdoor flower beds, or vegetable gardens, these techniques are adaptable for various types of plants. Let’s dive in!
1. Reuse Plastic Bottles for Self-Watering Systems
One of the most cost-effective ways to water your plants for an extended period is by repurposing plastic bottles. These bottles can be transformed into simple self-watering devices that provide a slow, consistent water supply to your plants. Here’s how:
Step-by-Step Instructions:
- Clean the Bottles: Start by collecting empty plastic bottles. Clean them thoroughly to remove any residue or contaminants.
- Make Holes in the Caps: Using a small nail or a drill, carefully make tiny holes in the caps of the bottles. The size of the holes should be small enough to allow the water to drip out slowly.
- Fill with Water: Fill the bottles with water, and screw the caps back on tightly.
- Bury the Bottles in the Soil: Dig small holes next to your plant’s roots and bury the plastic bottles upside down. The water will slowly seep through the holes, providing moisture to the plant roots over time.
This method is particularly effective for plants that need consistent hydration over an extended period, such as tomatoes, peppers, and herbs. The beauty of this system is that it doesn’t require any maintenance once set up, and it ensures that your plants receive a steady water supply.
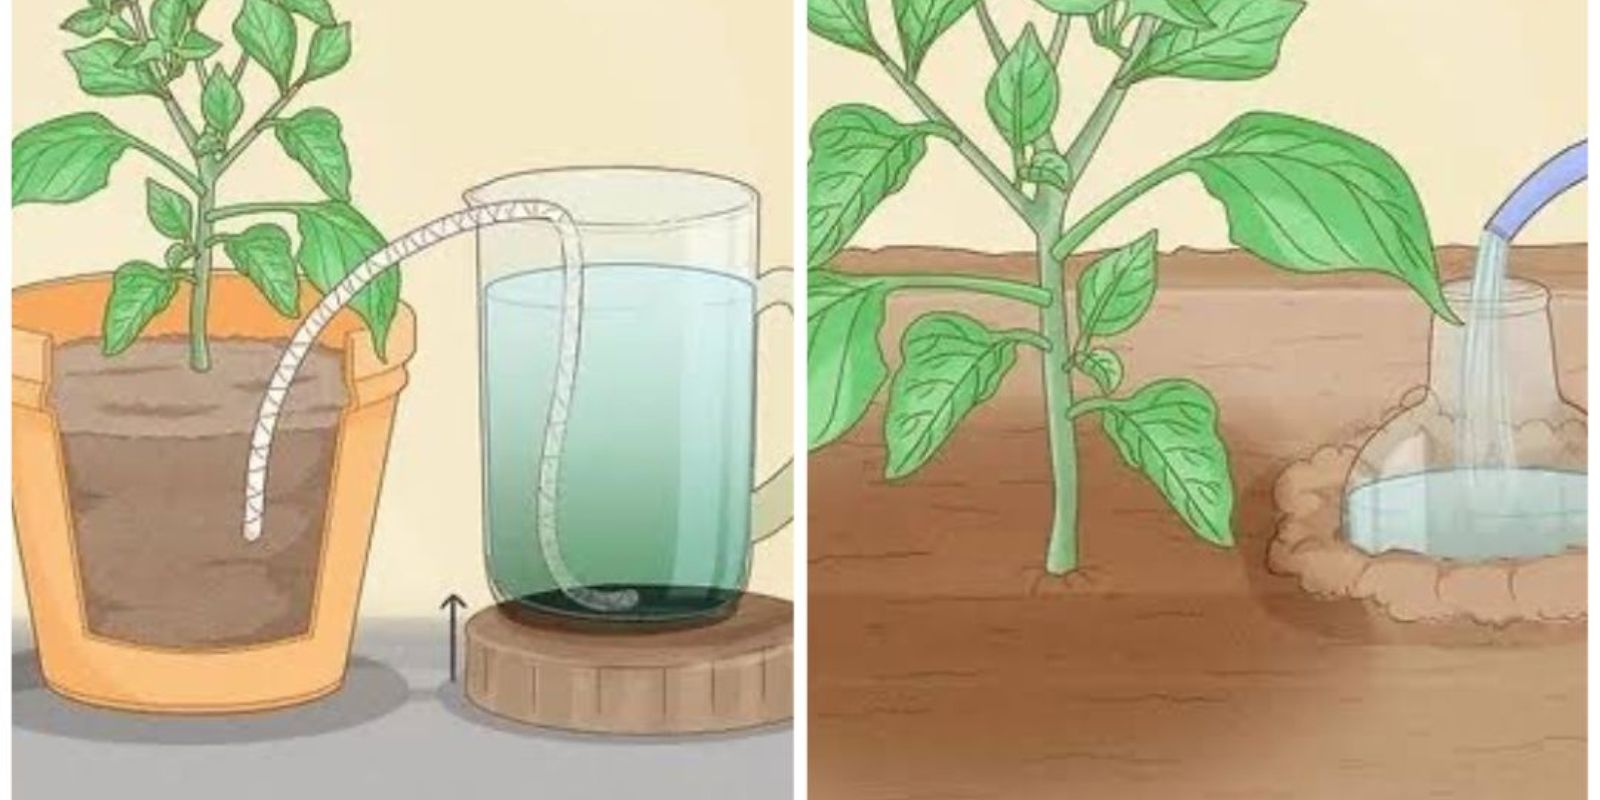
2. Create a DIY Wick System
If you’re looking for an easy, low-cost solution to water your plants, a wick system might be the answer. A wick system uses absorbent materials, like cotton strings or cloth, to draw water from a container and deliver it to the plant’s roots. This system works on the principle of capillary action, where water moves upward through the wick and into the soil.
Step-by-Step Instructions:
- Gather Materials: You’ll need a water container (like a bucket, bottle, or basin), a cotton string, or an old piece of cloth.
- Prepare the Wick: Cut a length of cotton string or cloth long enough to reach from the water container to the base of the plant. The wick should be able to sit in the water container and extend to the soil.
- Set Up the Wick: Place one end of the wick in the water container and the other end in the soil, near the plant’s roots. You can secure the string in place by burying it slightly in the soil to ensure it stays in place.
- Fill the Water Container: Fill the container with water, and the wick will slowly draw water into the soil, keeping it moist.
This system works well for small to medium-sized plants and can even be used indoors. It’s an excellent choice for houseplants or small garden beds that require minimal water but consistent moisture.
3. Use Clay Pot Irrigation for Slow and Steady Watering
Clay pot irrigation, also known as “ollas,” is a traditional method that is still widely used today. Clay pots are porous, meaning they slowly release moisture into the soil, keeping plants hydrated over long periods. It’s a natural, sustainable, and low-maintenance way to water your plants.
Step-by-Step Instructions:
- Gather Clay Pots: You’ll need an unglazed clay pot (which is more porous than glazed versions). These can be found at most gardening stores or reused from old planters.
- Prepare the Pot: If your pot has a hole in the bottom, you can seal it with a bit of clay or use it as is. The idea is to bury the pot in the soil up to the rim, allowing the porous material to release water slowly.
- Bury the Pot in the Soil: Dig a hole in the soil where you want to plant your flowers, vegetables, or herbs. Place the pot in the hole and bury it so the top is flush with the soil surface.
- Fill the Pot with Water: Pour water directly into the clay pot. Over time, the water will seep through the walls of the pot and into the surrounding soil, keeping the plants hydrated.
This method is incredibly effective for areas with high temperatures or during dry spells, as the moisture from the pot is delivered directly to the plant roots. Clay pot irrigation is perfect for gardens or containers that require consistent watering, without the need for frequent attention.
4. Create a Simple Rainwater Collection System
Rainwater harvesting is an age-old technique that many gardeners are rediscovering. By collecting rainwater, you can reduce your reliance on tap water and create an eco-friendly, cost-free water supply for your plants. With a few simple materials, you can set up a rainwater collection system that captures and stores rainwater for future use.
Step-by-Step Instructions:
- Install Gutters and Downspouts: Attach gutters to the edge of your roof to collect rainwater. Use a downspout to direct the water into a large container, such as a barrel or large bin.
- Place a Mesh Cover on the Container: To prevent debris like leaves and dirt from contaminating the rainwater, place a fine mesh or screen over the top of the container. This will allow rainwater to flow into the container while keeping the water clean.
- Store the Collected Water: Once you have collected enough rainwater, use it to water your plants. You can use watering cans or even connect a hose to the container for easy access.
- Use Watering System for Plants: Whenever the rainwater container is full, you can use it to water your garden, allowing you to hydrate your plants without tapping into your regular water supply.
Rainwater is naturally soft and free of chlorine, making it an ideal choice for watering plants. By setting up a rainwater collection system, you can keep your garden hydrated during dry spells or in areas with limited access to potable water.
5. Use Mulching to Retain Moisture in the Soil
Mulching is an easy yet effective way to conserve water and reduce the need for frequent watering. By covering the soil around your plants with a layer of organic material, you can help the soil retain moisture and protect it from drying out too quickly. Mulch also improves soil health by adding organic matter and preventing weed growth.
Step-by-Step Instructions:
- Choose the Right Mulch: You can use a variety of materials for mulch, such as grass clippings, shredded leaves, straw, or wood chips. Choose a material that is readily available in your area.
- Apply Mulch Around Plants: Spread a 2-3 inch layer of mulch around the base of your plants. Be sure to leave some space around the stem to avoid moisture buildup.
- Maintain the Mulch: Over time, the mulch may break down or decompose. Replenish the mulch as needed to maintain a thick, protective layer.
Mulching helps to insulate the soil, keeping it cool during hot weather and preventing water from evaporating quickly. This is especially useful in the summer months or for plants that require consistent moisture.
6. Take Advantage of Self-Watering Planters
Self-watering planters are another great solution for keeping your plants hydrated without much effort. These planters come with a built-in reservoir that allows water to be stored and absorbed by the plant roots over time. Once filled, the water supply lasts for a longer period, reducing the need for frequent watering.
Step-by-Step Instructions:
- Purchase or DIY a Self-Watering Planter: If you don’t already have a self-watering planter, you can either buy one or make your own using a container with a reservoir at the bottom.
- Fill the Reservoir with Water: Fill the planter’s water reservoir with water. The water will be absorbed through a wick or a similar system into the plant’s roots.
- Monitor the Water Level: Check the water reservoir occasionally to ensure that it stays filled. When the water runs low, simply refill it.
Self-watering planters are ideal for small indoor plants, herbs, and container gardens. They are perfect for busy gardeners or those who want to ensure their plants stay hydrated during dry spells.
Conclusion
Keeping your plants hydrated for an entire month without spending money is not only possible but also incredibly simple! By reusing household items like plastic bottles, creating a DIY wick system, or taking advantage of natural methods like rainwater collection and mulching, you can ensure your plants receive the hydration they need without putting a dent in your wallet.
These methods not only save money but are also environmentally friendly and sustainable. So, whether you have a garden full of vegetables, beautiful flowers, or just a few houseplants, these easy, low-cost watering systems will keep your plants thriving all month long.
With a little creativity, you can transform your garden into a self-sustaining oasis that thrives with minimal effort. Try these methods today and let us know how they work for you—your plants will thank you!