
Rooting fig cuttings can be a rewarding and cost-effective way to propagate new fig trees. Not only is it an enjoyable process for gardeners, but it also ensures that you can expand your collection of fig trees without spending money on new ones. By using a simple technique and a few essential tools, you can achieve up to 80% success in rooting your fig cuttings.
In this article, we will walk you through everything you need to know about rooting fig cuttings, from choosing the right cutting to ensuring optimal growth. By the end of this guide, you’ll be ready to propagate your own fig trees like a pro.
Why Propagate Fig Trees from Cuttings?
Before diving into the methods, let’s talk about why fig trees are so popular for propagation. Fig trees are highly desirable for their delicious fruit and ornamental beauty. Propagating fig trees from cuttings is an efficient and reliable method of growing new trees. It also allows you to maintain the characteristics of the parent tree, ensuring that the new plants are genetically identical.
Unlike growing fig trees from seeds, which can take longer and result in unpredictable variations, propagating from cuttings gives you more control over the growth process and the final product.
What You’ll Need to Root Fig Cuttings Successfully
To begin rooting fig cuttings, you’ll need a few essential tools and materials:
- Healthy Fig Tree Cutting: A young, healthy branch of a fig tree that is about 6–8 inches long with several nodes (the small bumps from which leaves and roots emerge).
- Sharp Pruning Shears or Knife: To make clean cuts that will encourage root growth.
- Rooting Hormone: A powder or gel that promotes root development and increases your chances of success.
- Well-Draining Potting Mix: A mix of perlite and peat or a commercial seed-starting mix works best for fig cuttings.
- Plant Pots: Small containers to house the cuttings as they develop roots.
- Plastic Bag or Plastic Dome: To create a humid environment and prevent the cutting from drying out.
- Water: To keep the cutting hydrated.
Step-by-Step Guide to Rooting Fig Cuttings
Now that you have everything you need, let’s go step by step through the process of rooting fig cuttings.
1. Choose the Right Cutting
The first step is to choose a healthy fig branch to take the cutting from. You want a branch that is mature, but not too old, as younger wood tends to root more easily. Ideally, the cutting should be about 6–8 inches long and contain 2–3 leaf nodes.
- Select a branch with no visible signs of disease, pests, or damage.
- Avoid cutting too many branches from the same tree to ensure the plant’s overall health.
- Make sure to choose a healthy, vigorous variety of fig tree, as some varieties root better than others.
2. Prepare the Cutting
Once you’ve chosen your cutting, it’s time to prepare it for rooting. Here’s how to do it:
- Make the Cut: Using sharp pruning shears or a clean knife, make a clean cut just below a leaf node. The cut should be at a 45-degree angle to increase the surface area for root development.
- Remove Leaves: Trim off any leaves from the bottom half of the cutting to prevent them from rotting in the soil and to direct the cutting’s energy into root development.
- Cut the Top: You can leave a couple of leaves on the top of the cutting, but if they are too large, you may want to trim them to reduce water loss.
3. Use Rooting Hormone
Using rooting hormone is one of the keys to successful fig cutting propagation. While not absolutely necessary, rooting hormone can significantly increase your chances of success and help the cutting establish roots more quickly.
- Dip the Cutting: After preparing the cutting, dip the bottom end of the cutting into rooting hormone. You can use either powdered or gel rooting hormone.
- Tap off Excess: Be sure to tap off any excess powder to avoid clogging the roots or inhibiting the rooting process.
4. Plant the Cutting
Next, it’s time to plant the cutting in a pot filled with well-draining potting mix. A mixture of perlite and peat or a high-quality seed-starting mix works well for fig cuttings.
- Make a Hole: Using your finger or a pencil, make a hole in the soil large enough to accommodate the cutting’s bottom end. Be careful not to damage the cutting by forcing it into the soil.
- Insert the Cutting: Place the cutting into the hole and gently pack the soil around it to ensure it’s standing upright.
- Water the Cutting: Water the soil gently to settle it around the cutting. Be sure not to overwater, as this can lead to rot. The soil should be moist, not soggy.
5. Create a Humid Environment
Fig cuttings need a high-humidity environment to root successfully. This can be achieved by covering the cutting with a plastic bag or placing it under a plastic dome. This helps retain moisture and prevents the cutting from drying out.
- Cover the Cutting: Place a clear plastic bag or plastic dome over the pot to maintain humidity. If you use a plastic bag, make sure it doesn’t touch the leaves or cutting. You can use stakes or sticks to prop up the bag and create space.
- Place in a Warm Location: Put the cutting in a warm spot with indirect sunlight, but not direct sunlight, which can overheat the cutting and dry it out.
- Ventilate Regularly: Open the bag or dome every few days to allow fresh air in and prevent mold from forming. If condensation collects inside the plastic cover, wipe it off to prevent water from dripping onto the cutting.
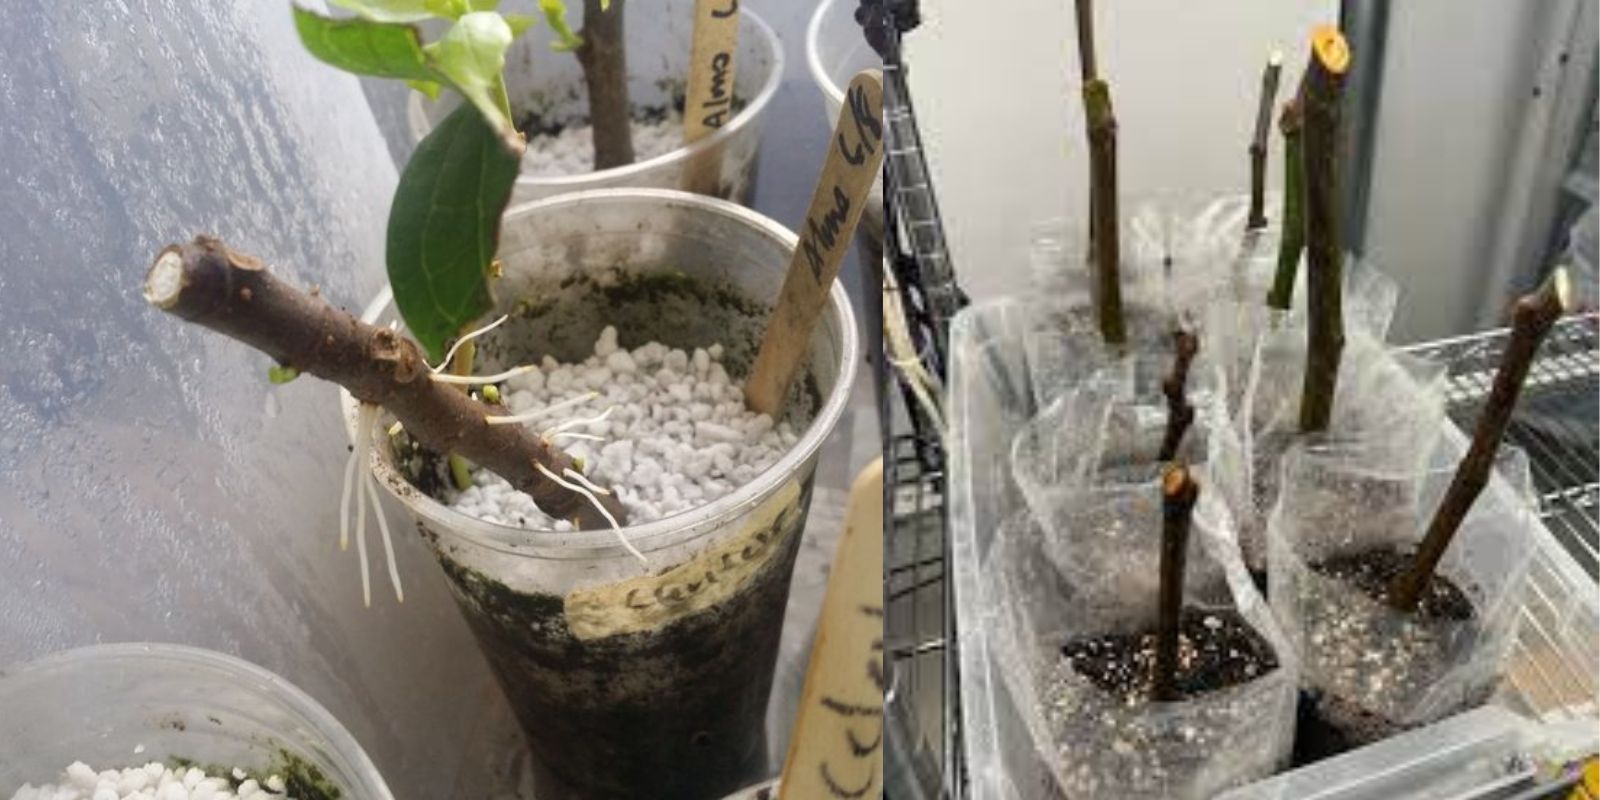
6. Wait for Root Development
Now comes the waiting game. It can take anywhere from 4 to 6 weeks for fig cuttings to develop roots. During this time, be sure to keep the soil consistently moist (but not waterlogged) and maintain the humid environment.
- Check for Roots: After 4-6 weeks, gently tug on the cutting to see if you feel resistance. If there is resistance, this indicates that the cutting has developed roots. You can also check by carefully removing the cutting from the soil and inspecting the roots.
- Be Patient: Rooting may take longer depending on the variety of fig and environmental conditions. If the cutting hasn’t rooted yet, give it more time. Be patient, and don’t rush the process.
7. Transplant the Cutting
Once the fig cutting has rooted successfully, it’s time to transplant it into a larger pot or directly into the ground (depending on your location and climate).
- Transplant Carefully: When transplanting, gently remove the cutting from the pot and place it in a new container filled with well-draining soil.
- Gradually Acclimate: If you plan to move the cutting outside, gradually acclimate it to outdoor conditions by placing it outside for a few hours each day and slowly increasing the time it spends outside.
Troubleshooting Common Problems
While rooting fig cuttings is generally a straightforward process, there are a few common issues that gardeners encounter. Here’s how to troubleshoot some common problems:
- Cuttings Rotting: If your cuttings are rotting, it could be due to excessive moisture or poor drainage. Ensure the soil is well-draining and that you are not overwatering the cutting.
- No Root Growth: If no roots are developing, it could be because the cutting is too old or not healthy enough. Try again with a fresh, younger cutting.
- Leaves Turning Yellow: Yellowing leaves can be a sign of poor environmental conditions, such as too much direct sunlight or not enough humidity. Keep the cutting in a warmer, more humid environment.
Conclusion
Rooting fig cuttings can be an incredibly rewarding and successful process when done correctly. With the right tools, preparation, and patience, you can achieve up to 80% success in rooting your fig cuttings and enjoy the satisfaction of growing your own fig trees. Whether you’re expanding your garden or simply experimenting with propagation, this technique will help you enjoy healthy, thriving fig trees for years to come.
By following these simple steps, you’ll be able to propagate fig trees with confidence, and soon, you’ll have a collection of beautiful, fruit-bearing trees to enjoy.
Happy gardening, and don’t forget to share your fig tree propagation experiences! 🌱 #FigTree #PropagationSuccess #GardeningTips #GreenThumb #PlantLovers #RootingCuttings #FigTreeGrowth #SustainableGardening