
Plant propagation is one of the most rewarding activities a gardener can engage in, allowing them to expand their garden collection without the need to purchase new plants. While there are many techniques for propagating plants, one of the most effective and successful methods for certain plants—especially trees and shrubs—is air layering. This technique can be used to propagate a wide range of woody plants, including fruit trees, magnolias, and even some tropical species, and it is often the best way to propagate plants that are difficult to root from cuttings.
In this article, we’ll take a deep dive into how to propagate plants by air layering, providing you with everything you need to know to successfully master this technique. Whether you’re looking to multiply your favorite tree, shrub, or woody vine, this method is a game-changer. By following the simple steps outlined here, you’ll be able to propagate plants and produce healthy, rooted specimens ready to transplant into your garden.
What is Air Layering?
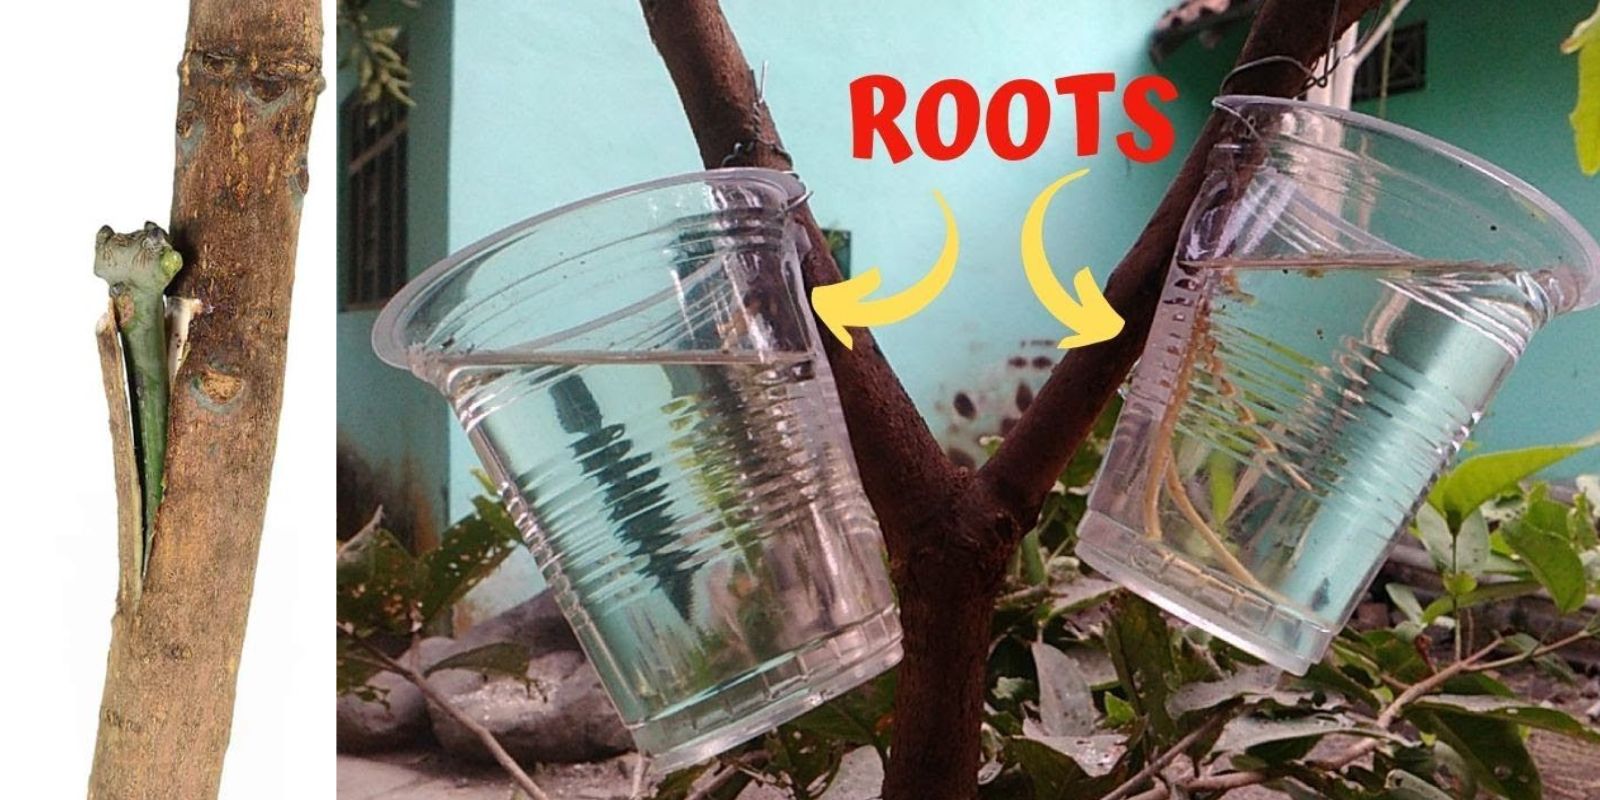
Air layering is a method of plant propagation where a stem or branch of a plant is encouraged to form roots while it is still attached to the parent plant. This process involves making a wound on the stem, applying a rooting medium like sphagnum moss, and covering the area to keep it moist. The plant then grows roots at the site of the injury, allowing you to cut the stem free and transplant it as a new, fully-rooted plant.
Unlike other propagation methods, such as stem cuttings, air layering allows you to propagate plants with woody stems that might not root easily through traditional methods. It’s an ideal technique for large plants like trees and shrubs, and it is a great solution when cuttings would be too large to root or take too long to establish roots.
Why Choose Air Layering?
Air layering offers several advantages over other propagation methods, making it a great choice for certain plants. Here are a few reasons why air layering might be the right choice for your plant propagation needs:
- Higher Success Rate: Air layering has a high success rate compared to other methods like cuttings, especially for woody plants that have difficulty rooting.
- No Need to Remove the Cutting: Because the stem stays attached to the parent plant during the process, it can continue to receive nutrients and water, which can help the new roots establish.
- Ideal for Large Plants: Air layering is particularly effective for propagating large plants or trees that cannot be easily propagated through cuttings.
- Faster Results: Air layering generally leads to quicker root development, allowing you to propagate plants in a matter of weeks instead of months.
When Should You Use Air Layering?
Air layering is most commonly used for plants with woody stems that don’t root easily from cuttings, such as:
- Fruit Trees: Apple, pear, peach, fig, and citrus trees.
- Flowering Shrubs: Camellia, magnolia, azalea, and hydrangea.
- Vines: Grape vines, wisteria, and ivy.
- Tropical Plants: Ficus, rubber tree (Ficus elastica), and dracaena.
In general, the best time to perform air layering is during the plant’s active growing season, which is typically in spring or early summer. This is when the plant’s growth hormones are at their highest, giving the process a higher chance of success. However, you can also perform air layering in late summer for some plants, especially in warmer climates.
Materials You’ll Need
Before you begin air layering, make sure you have the following materials on hand:
- Sharp Pruning Shears or Knife: To make a clean cut on the stem.
- Sphagnum Moss: This will be used to pack around the stem to encourage root growth.
- Plastic Wrap or Aluminum Foil: To cover the moss and keep it moist. Clear plastic wrap is ideal because it allows you to see the roots as they develop.
- Rooting Hormone (Optional): This is not strictly necessary, but using a rooting hormone can help speed up the process by encouraging root development.
- Twist Ties or String: To secure the plastic wrap or foil in place.
- Plastic Bag (Optional): To cover the entire section for added humidity.
Now that you have everything ready, let’s break down the process of air layering step by step.
Step-by-Step Guide to Air Layering
Step 1: Choose the Right Stem
Select a healthy, mature stem from the parent plant. The best stems for air layering are those that are about 1-2 years old and are free from disease or damage. Choose a stem that is flexible enough to be bent without breaking, and make sure the plant is healthy and actively growing.
Step 2: Make a Small Cut or Girdle
Once you’ve selected your stem, make a shallow cut about 1/3 of the way through the stem. This cut, known as a “girdle,” should be just below a leaf node (the area where a leaf attaches to the stem). You can either scrape away the bark or make a ring around the stem, exposing the cambium layer. The cambium is the tissue responsible for growth and is where roots will eventually develop.
Step 3: Apply Rooting Hormone (Optional)
If you’d like to speed up the process, you can dip the cut or exposed area in rooting hormone. This isn’t necessary, but it can give your air layering project an added boost by stimulating root growth.
Step 4: Pack the Area with Moist Sphagnum Moss
Next, take a generous amount of sphagnum moss and soak it in water. Wring out any excess moisture, then pack the moss around the exposed part of the stem. Ensure the moss covers the entire wound and remains moist throughout the rooting process.
Step 5: Wrap with Plastic or Aluminum Foil
Once the moss is in place, wrap the entire section of moss with clear plastic wrap or aluminum foil. This will help retain moisture and create a humid environment that’s essential for root development. Secure the wrap at both ends with twist ties or string, making sure it’s tight enough to prevent moisture from escaping but not so tight that it damages the stem.
Step 6: Wait for Roots to Develop
This is the hardest part—waiting! Over the next few weeks, check the moss periodically to ensure it remains moist. If it begins to dry out, add water to keep it hydrated. In about 4-6 weeks, you should start to see roots forming inside the moss. At this point, the plant will have developed enough roots to be transplanted.
Step 7: Cut and Transplant the New Plant
Once you see a good amount of root growth, it’s time to cut the stem free from the parent plant. Use sharp pruning shears to carefully cut just below the rooted area. Remove the plastic wrap and moss, then transplant the rooted stem into a new pot with fresh potting soil. Water the new plant thoroughly and continue to care for it as you would any new plant.
Tips for Successful Air Layering
- Keep the Moss Moist: Ensure the sphagnum moss remains damp but not waterlogged. A dry moss environment will not lead to successful root formation.
- Provide Adequate Humidity: If you’re working in a dry climate, you can place a plastic bag over the entire area to help maintain high humidity.
- Choose a Healthy Plant: Make sure the parent plant is free from diseases and pests. Air layering can sometimes exacerbate problems if the plant is not in optimal health.
- Use the Right Tools: Always use sharp pruning tools to make clean cuts, which will help the plant heal and root more effectively.
- Patience is Key: Root development can take several weeks to months depending on the plant, so patience is crucial. Check on your plant periodically, but avoid disturbing it too often.
Common Mistakes to Avoid
- Cutting Too Deep: When making the cut, don’t cut too deep into the stem. The wound should expose the cambium layer but not cut all the way through the stem.
- Letting the Moss Dry Out: One of the most common reasons air layering fails is that the moss dries out. Ensure it stays consistently moist throughout the process.
- Using Non-Rooting Plants: Not all plants are suitable for air layering. Avoid using plants that are not known to root well via this method, such as those with very thick or woody stems.
Final Thoughts
Air layering is a powerful and rewarding propagation technique that can be used to grow new plants from woody species that are otherwise difficult to propagate. By following the steps outlined in this guide, you’ll be able to successfully propagate plants with high success rates. Whether you’re looking to multiply your fruit trees or propagate rare shrubs, air layering is a method every gardener should have in their repertoire.
With patience, care, and the right materials, you can create new, healthy plants that will thrive for years to come. So, go ahead—give air layering a try, and expand your garden like never before!