
Orchids are among the most beautiful and delicate plants that can grace any home or garden. Known for their striking flowers and unique shapes, they are often a favorite among plant enthusiasts. However, orchids can be tricky to propagate. The traditional methods of orchid propagation, such as division or tissue culture, can be complex and require specific conditions. But there is a simpler and more innovative way to propagate orchids that many gardeners are now using—through the humble potato!
In this article, we’ll explore this unusual method for propagating orchids, why it works, and how you can try it in your own garden or home.
Why Use a Potato for Orchid Propagation?
Potatoes, often overlooked in the world of gardening, actually have several properties that make them perfect for propagating orchids. Here’s why:
- Moisture Retention: Potatoes are naturally full of water, and they provide the necessary moisture to help new orchid roots grow. This is especially important for orchids, which thrive in humid conditions.
- Nutrient-Rich: Potatoes are full of nutrients that orchids need to stimulate new growth. The starch and vitamins in the potato offer the orchid cutting a conducive environment for rooting and establishment.
- Accessibility: Potatoes are readily available and inexpensive, unlike some specialized mediums that can be costly or hard to find for beginners.
- Simplicity: This method is straightforward and easy to follow, even for novice gardeners. You don’t need expensive rooting hormones or complex tools. Just a potato, a sharp knife, and your orchid cutting!
Now, let’s break down the step-by-step process of propagating orchids using a potato.
Step-by-Step Guide to Propagating Orchids with a Potato
1. Select the Right Orchid Cutting
The first step in propagating orchids with a potato is to select a healthy stem from your existing orchid plant. You want to look for a stem that is mature, but not too old or too young, with a healthy node. The node is the key to orchid propagation as it contains the growth points that will form new roots and shoots.
Use a sharp, clean knife or pruning shears to cut the stem. Make sure that the cutting is about 4-6 inches long, and has at least one or two nodes.
2. Prepare the Potato
Next, you need a potato that is large enough to hold the orchid cutting. A medium-sized potato works best. You don’t need anything fancy—just a regular grocery store potato will do.
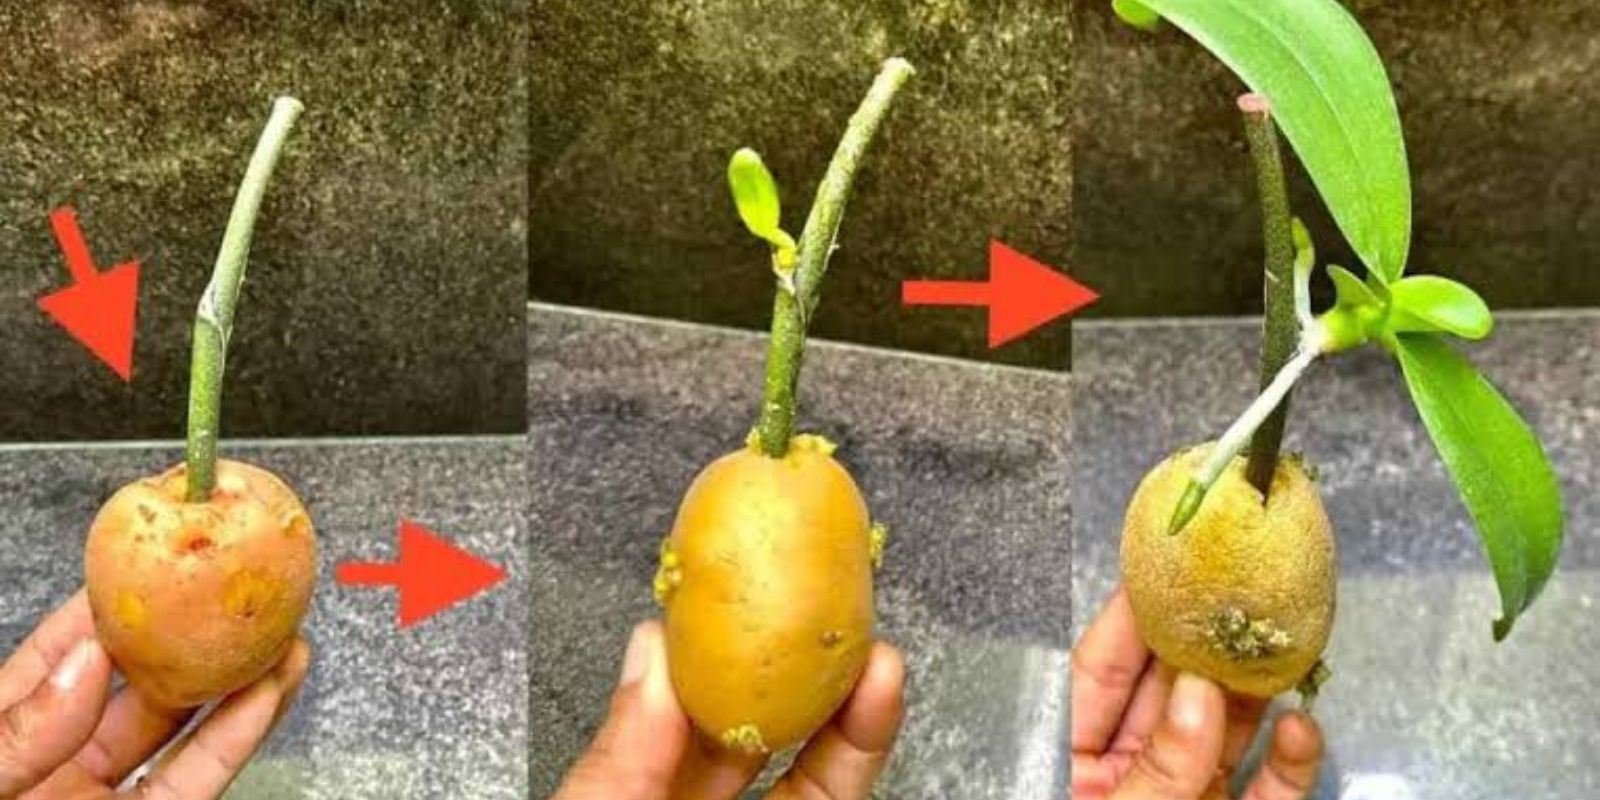
Wash the potato thoroughly to remove any dirt and debris. Once cleaned, use a sharp knife to create a small hole or pocket in the center of the potato, large enough to fit the orchid cutting comfortably. Be sure the hole is deep enough to hold the orchid’s node securely but shallow enough to not bury it completely. The goal is to have the node in contact with the potato, as this is where the roots will form.
3. Insert the Orchid Cutting into the Potato
Once the hole is prepared, insert the orchid cutting into the potato. Position the cutting so that the node is inside the hole and is in direct contact with the potato. The rest of the stem should be sticking out, and the orchid’s leaves should remain above the surface of the potato, not touching the soil or water.
4. Place the Potato and Orchid Cutting in a Suitable Environment
Now that your orchid cutting is nestled in the potato, it’s time to provide the right environment for it to take root. Orchids prefer warm, humid conditions, so you’ll need to place the potato and cutting in a spot that mimics these conditions.
Choose a location with bright, indirect sunlight. Avoid direct sunlight, as it can overheat the cutting and potato, potentially drying them out. A north-facing windowsill or a place with filtered light is ideal.
To maintain humidity, you can cover the cutting and potato with a plastic bag or a humidity dome. This helps keep moisture around the cutting, encouraging root growth. If you don’t have a humidity dome, you can place a shallow tray of water nearby to increase the ambient moisture.
5. Maintain Proper Moisture Levels
One of the most important aspects of propagating orchids is ensuring that the cutting stays moist. The potato naturally retains water, but it’s still essential to monitor the moisture levels regularly. Check the cutting every few days to make sure the potato hasn’t dried out.
If the potato feels dry, you can lightly mist the cutting with water to increase moisture around the cutting. However, make sure the cutting isn’t sitting in standing water, as this could lead to rotting.
6. Wait for Roots to Develop
In about one to two weeks, you should begin to notice roots forming at the node of the orchid cutting. These roots will eventually grow into the potato itself, making it an ideal environment for the plant to establish itself.
Patience is key during this step. Some orchid varieties may take longer to root, so it’s important to remain patient and continue to monitor the cutting for any signs of growth.
7. Transplant to a Pot or Orchid Medium
Once the roots have developed and are strong enough to support the plant, it’s time to transplant the orchid into its final growing medium. Gently remove the orchid cutting from the potato, being careful not to damage the newly-formed roots.
Choose a well-draining potting mix specifically formulated for orchids, such as a mix containing bark, perlite, and sphagnum moss. Orchid roots need plenty of air and water drainage, so make sure the pot has good drainage holes.
Place the orchid in the new pot, and cover the roots with the orchid mix, making sure the node remains above the soil level. Water the orchid lightly and continue to place it in a location with indirect sunlight. Keep the humidity levels high to help the plant transition.
Tips for Successful Orchid Propagation with Potatoes
- Choose Healthy Cuttings: Ensure your orchid cutting is healthy and free from pests or diseases. This increases the chances of successful propagation.
- Avoid Overwatering: Overwatering can cause the cutting to rot. Always ensure that the potato and the orchid cutting are in a moist, but not soggy, environment.
- Be Patient: Orchid propagation can take time, so don’t be discouraged if you don’t see roots immediately. Continue to care for the cutting, and give it time to establish itself.
Benefits of Propagating Orchids with Potatoes
- Simplicity: This is a straightforward, easy-to-follow method that doesn’t require specialized tools or knowledge.
- Cost-Effective: Using a potato is an inexpensive way to propagate orchids, making it ideal for gardeners on a budget.
- Sustainability: It’s a great way to recycle an everyday kitchen item and use it to grow a beautiful new plant.
- Success Rate: This method can lead to a high success rate for orchid propagation, as the potato offers moisture, nutrients, and a stable environment for the cutting.
Conclusion
If you’ve been wanting to propagate orchids but felt intimidated by traditional methods, using a potato is a simple, effective solution that anyone can try. This gardening hack not only makes use of a common kitchen item but also provides your orchid cutting with the necessary conditions to root and thrive. With a little patience and care, you can expand your orchid collection effortlessly. So, give it a try and watch your orchids flourish!
#OrchidPropagation #GardeningTips #PlantLovers #HouseplantGoals #OrchidCare #SustainableGardening #PlantHacks #EasyGardening