
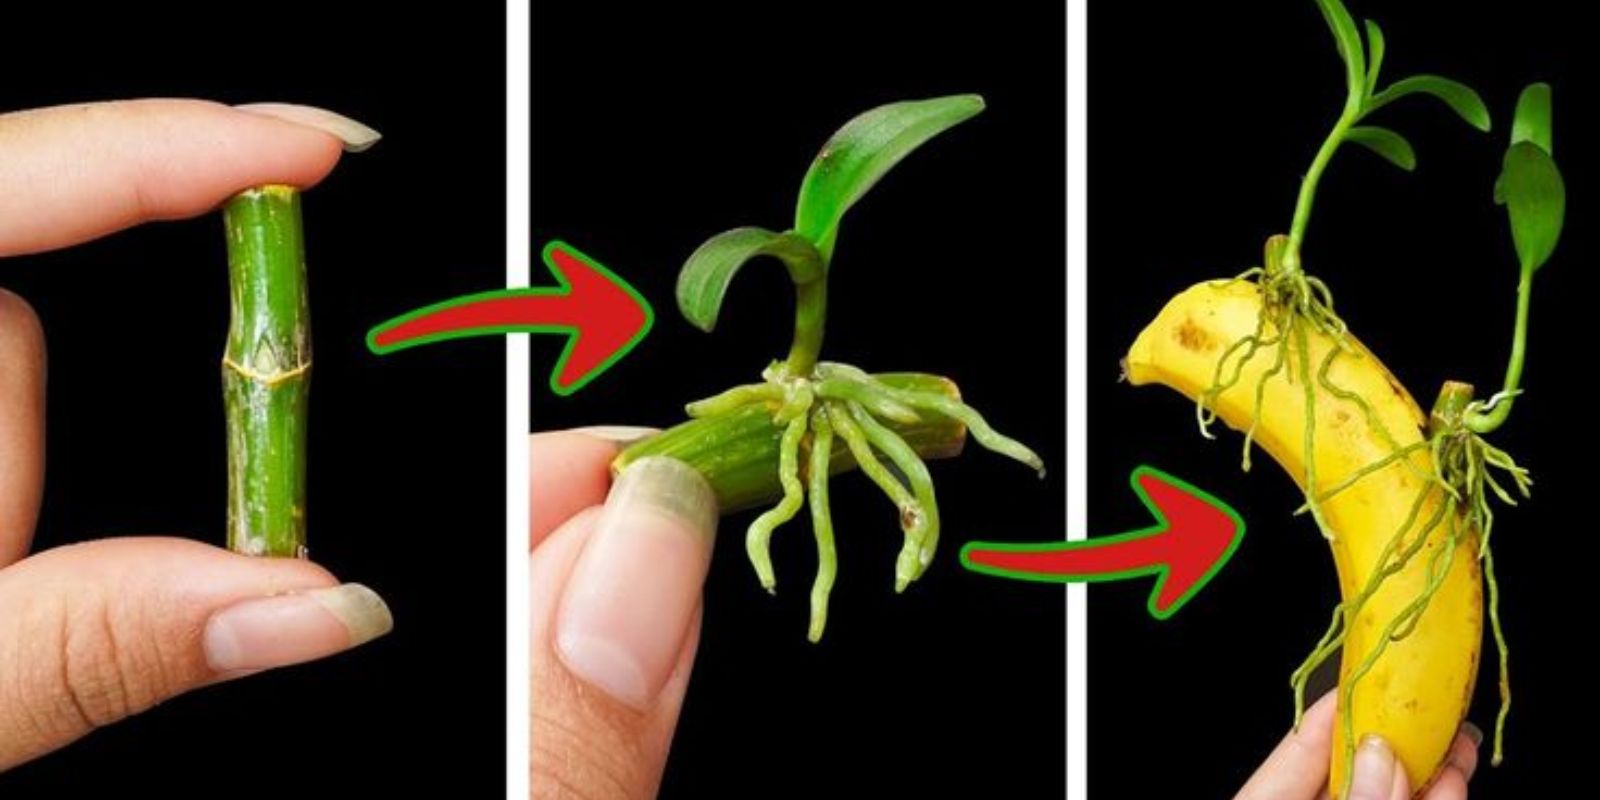
Orchids are one of the most stunning and captivating plants to grow, but they can sometimes be a bit tricky to propagate. While many gardeners rely on traditional methods, such as using stem cuttings or keikis (baby orchids), there’s a much simpler and more natural way to propagate your orchids – using a banana peel! Yes, you read that right: a banana peel can be the secret to helping your orchids thrive and grow in new ways.
In this article, we’ll dive into the step-by-step process of propagating an orchid using a banana peel. Not only is this method easy and cost-effective, but it also harnesses the power of nature to give your plants the nutrients they need to grow. Let’s get started!
Why Use a Banana Peel to Propagate Orchids?
Banana peels are packed with essential nutrients such as potassium, phosphorus, calcium, and magnesium, which are vital for healthy plant growth. These nutrients help orchids develop strong roots, promote new growth, and encourage flowering. By using a banana peel in the propagation process, you’re providing a natural fertilizer that stimulates root development and overall plant vitality.
Banana peels also contain auxins, which are plant hormones that aid in the process of root growth. These hormones are commonly used in commercial rooting compounds, making banana peels an excellent organic alternative to chemical fertilizers or rooting powders.
Using banana peels for propagation is not only environmentally friendly, but it’s also a great way to repurpose kitchen waste. Rather than tossing the peels away, you can use them to propagate your favorite orchids and watch them thrive.
What You’ll Need to Propagate an Orchid Using a Banana Peel
Before you begin, make sure you have the following materials on hand:
- A healthy orchid plant: This can be any type of orchid, such as Phalaenopsis, Dendrobium, or Cattleya. Make sure your orchid is in good health and free from pests or disease.
- A ripe banana peel: Choose a ripe, fresh banana peel that is free from any pesticides or chemicals.
- A clean pot with orchid potting mix: Ensure your pot has proper drainage holes, and the potting mix is suitable for orchids (a mix that includes bark, perlite, or sphagnum moss is ideal).
- A small knife or scissors: To cut the banana peel into smaller pieces.
- Water: To keep the orchid hydrated during the process.
- A sunny spot with indirect light: Orchids thrive in indirect sunlight, so place your plant in a spot where it gets bright, filtered light.
Step-by-Step Guide to Propagating an Orchid with a Banana Peel
Step 1: Prepare the Banana Peel
The first step in this process is to prepare the banana peel. Take a ripe banana peel and cut it into small, manageable pieces. You don’t need a lot of peel – just a few small chunks will suffice. These pieces will be buried in the orchid’s potting mix, where they will break down slowly and release nutrients into the soil.
Pro Tip: If you prefer, you can chop the peel into smaller pieces to speed up the decomposition process and allow for quicker nutrient release.
Step 2: Prepare Your Orchid Potting Mix
Next, prepare your orchid’s potting mix. If you’re propagating the orchid in a new pot, make sure it has proper drainage holes, as orchids do not like to sit in water. Fill the pot with orchid-specific potting mix, which typically includes a mixture of bark, perlite, and sphagnum moss. This type of mix ensures proper airflow to the roots, helping prevent root rot.
Step 3: Add the Banana Peel Pieces to the Pot
Now, it’s time to add the banana peel pieces. Gently press the small chunks of banana peel into the potting mix, burying them about 1–2 inches below the surface. The peels will start releasing nutrients like potassium and calcium into the soil, which helps stimulate root growth and encourage the development of new shoots.
Make sure the banana peel pieces are distributed evenly in the soil, so the orchid’s roots can absorb the nutrients from all sides.
Step 4: Water the Orchid
After you’ve buried the banana peel pieces, water the orchid thoroughly. Orchids prefer slightly moist conditions, so ensure that the potting mix is evenly moistened. Be careful not to overwater, as this can lead to root rot. Check that the water drains through the bottom of the pot, and avoid letting the orchid sit in standing water.
Step 5: Place the Orchid in Indirect Light
Now, it’s time to place your orchid in a bright spot with indirect sunlight. Orchids need plenty of light to grow and bloom, but direct sunlight can scorch their leaves. A windowsill with filtered light or a spot with dappled sunlight works best.
Make sure the temperature remains consistent – orchids generally prefer temperatures between 65°F and 75°F (18°C to 24°C). Avoid placing the orchid in a spot that is too hot or too cold, as this can hinder growth.
Step 6: Monitor the Orchid’s Progress
Now comes the exciting part – watching your orchid grow! Over the next few weeks, keep an eye on the plant’s progress. You should notice new roots starting to grow from the base of the plant as the banana peel decomposes and releases nutrients into the potting mix.
Keep the soil lightly moist, but not soggy, and avoid disturbing the roots as they develop. Be patient – orchids grow slowly, and it can take a few months for the roots to fully establish themselves.
Tips for Successful Orchid Propagation Using Banana Peels
- Change the Banana Peel Regularly: If you’re using the banana peel to propagate an orchid over a long period, be sure to replace the peel every few weeks to prevent any rotting or decay. Fresh banana peel will continue to release nutrients and promote root growth.
- Use Clean, Fresh Banana Peels: It’s important to use fresh banana peels for this process. Overripe or moldy peels may introduce unwanted bacteria or fungus into the potting mix, which could harm your orchid.
- Be Patient: Orchids can take time to propagate, so don’t expect instant results. It may take several months for the orchid to develop new roots or shoots. Keep providing optimal care and watch your plant grow slowly but surely.
- Avoid Overwatering: Overwatering is one of the biggest mistakes orchid owners make. Make sure the orchid has good drainage, and allow the water to drain from the pot after watering. Only water the plant when the top inch of the potting mix feels dry to the touch.
Why Propagate Your Orchid with a Banana Peel?
You may be wondering why this method works so well compared to other propagation techniques. Here are a few reasons why the banana peel method is highly effective for orchids:
- Natural Fertilizer: Banana peels are packed with essential nutrients that help orchids grow strong and healthy. These nutrients promote robust root systems and vibrant leaves.
- Cost-Effective: Instead of purchasing expensive rooting hormones or propagation kits, you can use a simple banana peel from your kitchen. It’s a budget-friendly and sustainable gardening hack.
- Low Maintenance: Orchids are delicate plants, and propagating them can be a time-consuming task. With the banana peel method, you don’t have to worry about complex processes. Simply add the peel to the soil, water, and wait.
- Environmentally Friendly: Using banana peels is a great way to repurpose kitchen waste and reduce the amount of organic waste that ends up in landfills. It’s a small, eco-friendly step toward sustainability.
Conclusion: Give It a Try and Watch Your Orchids Flourish!
Propagating an orchid using a banana peel is an incredibly simple and natural method that can yield beautiful results. Not only does this technique help promote root growth, but it also provides essential nutrients that your orchid needs to thrive. So, the next time you finish a banana, don’t toss the peel – give it a second life by using it to propagate your orchids.
With a little patience, proper care, and the help of a banana peel, your orchids can thrive, bloom, and continue to grow beautifully. Happy gardening!
#OrchidPropagation #GardeningHacks #BananaPeel #NaturalGardening #SustainableLiving #PlantLovers #EcoFriendlyGardening #EasyPlantCare