
Orchids are one of the most elegant and rewarding plants to grow, but many gardeners struggle with propagating them successfully. If you’re looking for a simple, natural, and cost-effective way to multiply your orchids, you’ll be surprised to learn that a banana peel can do the trick! Banana peels are rich in essential nutrients that help stimulate root growth, making them an excellent tool for orchid propagation.
In this guide, we’ll explore the benefits of using banana peels for orchid propagation, step-by-step instructions to ensure success, and tips to care for your newly propagated orchid.
Why Use a Banana Peel for Orchid Propagation?
Banana peels are packed with nutrients that are beneficial for plant growth, including:
- Potassium (K): Enhances root development and overall plant health.
- Phosphorus (P): Promotes root formation, making it ideal for propagation.
- Calcium (Ca): Strengthens cell walls, ensuring healthy new growth.
- Magnesium (Mg): Supports chlorophyll production, essential for photosynthesis.
When used in propagation, these nutrients can help stimulate root formation, speed up growth, and provide organic nourishment for young orchids.
Step-by-Step Guide to Propagating an Orchid with a Banana Peel
1. Select a Healthy Orchid Cutting
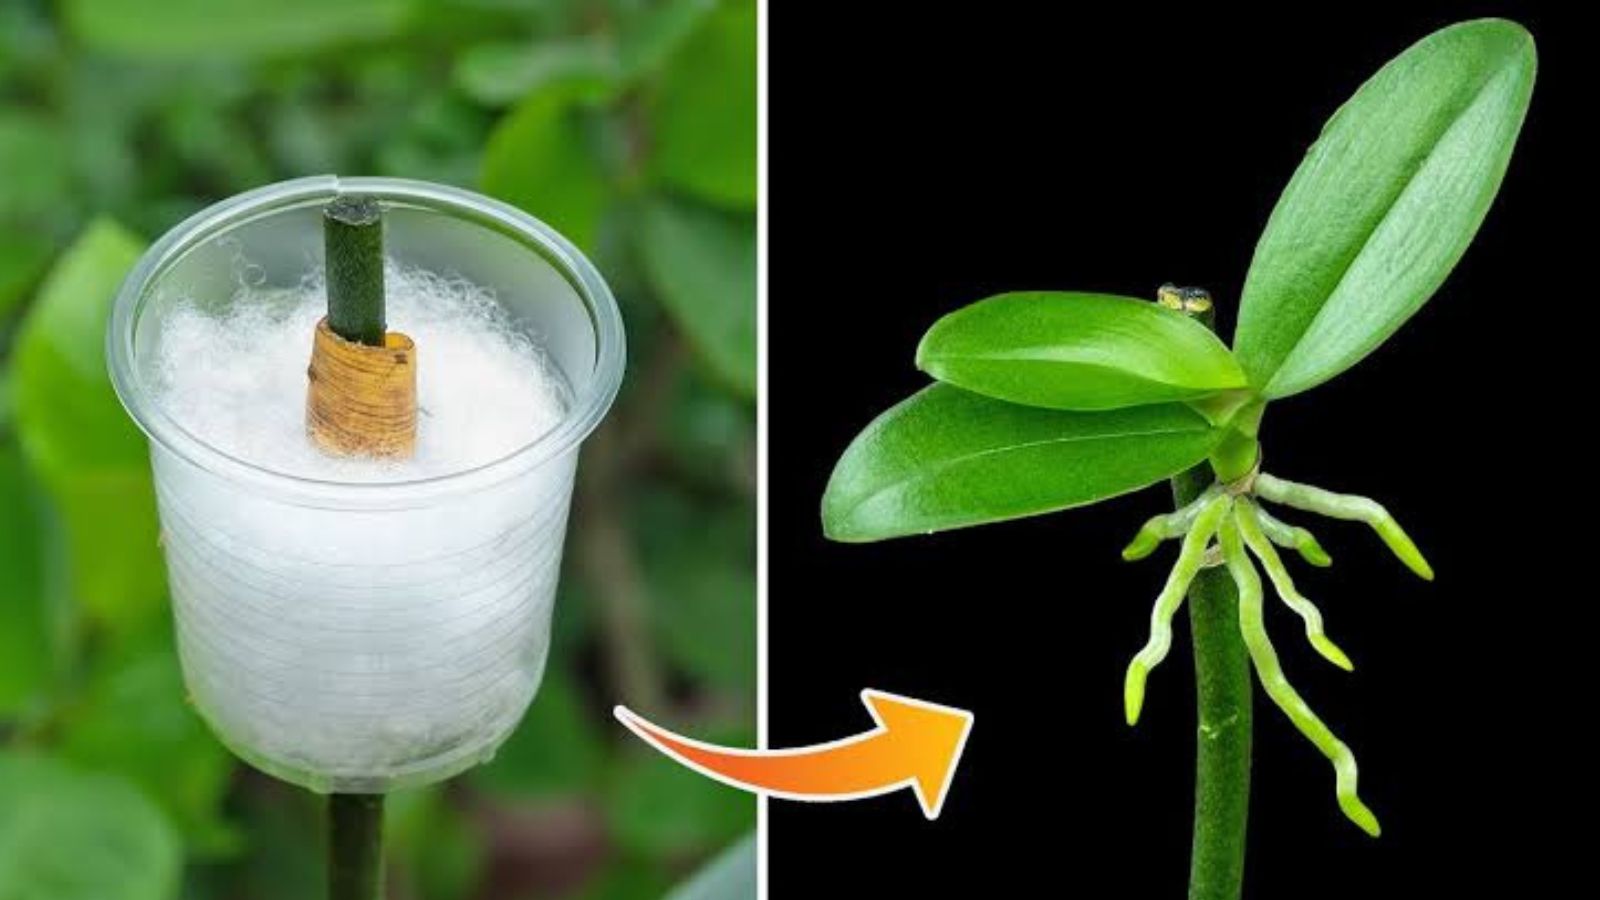
To start, you’ll need a healthy orchid with a keiki (baby orchid) or an aerial root that can be propagated. If your orchid has a keiki—a small growth along the flower spike—this is the best option for propagation.
How to Identify a Good Cutting: Look for a keiki with at least 2-3 small leaves and some root development. If using an aerial root, make sure it is firm and at least a few inches long. Choose a healthy parent plant with no signs of disease or rot.
2. Prepare the Banana Peel
Banana peels contain essential nutrients that encourage root growth. Here’s how to use them effectively:
Choose a fresh banana peel and cut it into small pieces. Optionally, let the peel sit for 12-24 hours to slightly dry, which reduces excess moisture that can lead to rot. Avoid using peels from bananas treated with pesticides; organic bananas are best.
3. Wrap the Orchid Cutting with the Banana Peel
Now, it’s time to apply the banana peel to your orchid cutting:
Place the banana peel around the exposed root or base of the keiki. Wrap the cutting in damp sphagnum moss to maintain moisture. Secure everything gently with twine or place it in a plastic container to retain humidity.
This method mimics a natural growing environment, helping the orchid to absorb nutrients while encouraging root formation.
4. Create the Right Growing Conditions
Orchids need specific conditions to thrive, especially during propagation. Here’s how to ensure success:
Humidity: Keep the environment moist but not soggy. Consider using a plastic bag to create a mini greenhouse effect. Light: Place the cutting in indirect sunlight, avoiding direct exposure that can cause dehydration. Temperature: Maintain a warm temperature between 70-80°F (21-27°C) to encourage growth. Air Circulation: Provide gentle airflow to prevent mold or fungal growth.
5. Monitor Growth and Mist Regularly
Over the next few weeks, your orchid cutting will begin developing roots. Here’s what to do:
Mist the moss and banana peel lightly every 2-3 days to maintain moisture. Check for root development—new roots should appear within 4-6 weeks. If the banana peel starts decomposing too quickly, replace it with a fresh one.
6. Transplanting the Rooted Cutting
Once your orchid cutting has several healthy roots (about 2-3 inches long), it’s time to transplant it into a pot:
Choose a well-draining orchid mix, preferably with bark and perlite. Gently remove the banana peel and moss from the roots. Place the cutting in a small pot, ensuring the roots are not buried too deeply. Water lightly and continue to provide indirect light and humidity.
Over time, your new orchid plant will grow stronger and eventually bloom!
Common Mistakes to Avoid
 Using too much banana peel: Overuse can lead to rot and mold growth. Keeping the cutting too wet: Excess moisture can cause fungal infections. Placing in direct sunlight: This can dry out the delicate roots before they establish. Not replacing the banana peel: If it decomposes too quickly, refresh it with a new one.
By avoiding these mistakes, you’ll increase your chances of successfully propagating your orchid.
Caring for Your New Orchid
After successfully propagating your orchid, here’s how to keep it thriving:
 Watering: Only water when the top layer of the orchid mix is dry. Overwatering can cause root rot.
 Light: Provide bright, indirect light to support healthy growth.
 Humidity: Maintain 50-70% humidity to mimic its natural environment.
 Fertilization: Use a balanced orchid fertilizer once a month to support new growth.
 Pruning: Remove dead or yellowing leaves to keep the plant healthy.
With proper care, your new orchid plant will flourish and eventually bloom beautifully.
Final Thoughts: A Natural and Effective Way to Propagate Orchids
Using a banana peel for orchid propagation is a simple, natural, and effective method that provides essential nutrients for root growth. Whether you’re an experienced gardener or a beginner, this technique offers an easy way to multiply your orchids without expensive rooting hormones.
Give this method a try and enjoy the rewarding experience of growing new orchids from cuttings!
Have you tried this banana peel trick before? Share your experience in the comments below! 
