
Orchids are among the most beautiful and sought-after plants, known for their exotic blooms and elegant appearance. While propagating orchids is typically done through division, keiki (baby orchid) growth, or back bulbs, many plant enthusiasts wonder: Can you propagate an orchid from a leaf?
The short answer is that orchids do not naturally propagate from a single leaf alone like succulents or some houseplants do. However, under the right conditions and with proper care, it is possible to encourage new growth from a leaf with part of the stem or node attached. This method is challenging and requires patience, but with the right approach, you can increase your chances of success.
In this comprehensive guide, we will explore how to propagate an orchid from a leaf, the best techniques to use, and expert tips to maximize your success.
Understanding Orchid Propagation: Can You Really Use a Leaf?
Orchids belong to the Orchidaceae family, which means their propagation methods differ from most houseplants. Unlike succulents or pothos, orchids cannot grow new roots from just a single leaf. However, if a leaf is taken with a small portion of the stem or a node (growth point), there is potential for root and shoot formation.
Ideal Orchid Types for Propagation
Different orchids respond differently to propagation attempts. The following types have better chances of growing from a leaf with a node:
- Phalaenopsis (Moth Orchid) – Best suited for keiki propagation but can sometimes regenerate from a node.
- Dendrobium Orchids – More likely to develop keikis or shoots from stem cuttings.
- Cattleya Orchids – May sprout new growth if a back bulb or healthy node is present.
Now, let’s go step by step through the propagation process.
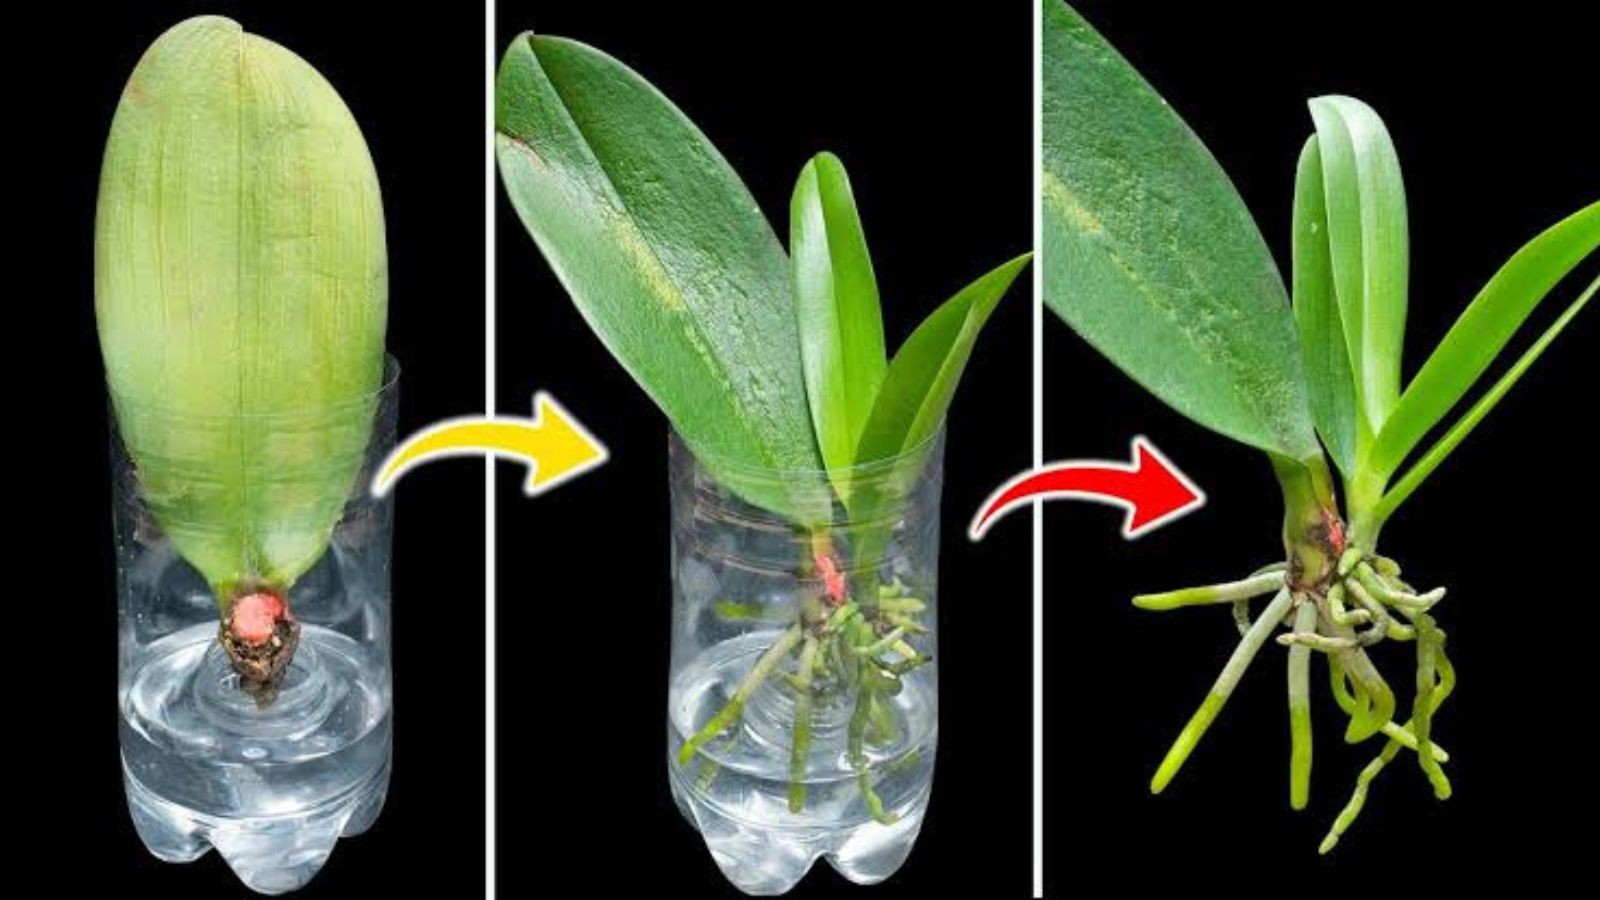
How to Propagate an Orchid from a Leaf: Step-by-Step Guide
Step 1: Select a Healthy Leaf with a Node
Choose a firm, disease-free, mature leaf that is attached to a small section of stem or a node. The node is essential because it contains the dormant growth cells necessary for root and shoot development.
🔹 Tip: Avoid using yellowing or damaged leaves, as they have a lower chance of survival.
Step 2: Make a Clean Cut
Using a sterile, sharp knife or scissors, carefully cut the leaf along with a small portion of the stem or node attached.
🔹 Tip: To prevent infection, sterilize the cutting tool with rubbing alcohol or boiling water before making the cut.
Step 3: Treat with Rooting Hormone
To boost the chances of root development, dip the cut end in a rooting hormone powder or gel containing auxins (such as indole-3-butyric acid or IBA).
🔹 Tip: If you don’t have rooting hormone, you can use cinnamon powder as a natural antifungal agent.
Step 4: Prepare the Growing Medium
Orchids thrive in well-aerated, moisture-retaining mediums. Instead of soil, use:
✅ Moist sphagnum moss – Retains humidity while allowing airflow.
✅ Orchid bark mix – Provides structure and drainage.
✅ Perlite & coconut husk mix – Enhances aeration and moisture retention.
Gently press the leaf cutting into the medium, ensuring the cut end is in contact with the moss or bark but not deeply buried.
🔹 Tip: Avoid using regular potting soil, as it retains too much moisture and can lead to rot.
Step 5: Create a Humid Growing Environment
Since orchids thrive in humid conditions, you need to create a mini-greenhouse effect to promote growth.
✅ Place the cutting in a plastic container with a transparent lid.
✅ Cover it loosely with a plastic bag to trap humidity.
✅ Mist it lightly every few days to maintain moisture.
🔹 Tip: Ensure the setup has small ventilation holes to prevent mold buildup.
Step 6: Provide Optimal Growing Conditions
Orchid propagation requires consistent warmth and indirect light. Keep the cutting in an area with:
☀️ Bright, indirect light – Avoid direct sunlight, which can dry out the leaf.
🌡 Temperature between 70-80°F (21-27°C) – Warmth speeds up growth.
💦 Humidity levels of 60-80% – Mimics the orchid’s natural environment.
🔹 Tip: If your home is dry, place a humidity tray (water-filled tray with pebbles) near the cutting.
Step 7: Monitor and Be Patient
Unlike fast-growing houseplants, orchid propagation takes time. Here’s what to expect:
✔️ In 4-6 weeks, the cut end should callus over (a protective layer forms).
✔️ In 2-3 months, tiny root formations may appear.
✔️ In 6+ months, a new shoot or keiki may start developing.
🔹 Tip: If the cutting starts turning black or mushy, remove it immediately—it may be rotting.
Common Mistakes to Avoid
🚫 Using a single detached leaf – Orchids don’t grow from just a leaf; a node is required.
🚫 Overwatering – Too much moisture leads to rot. Keep the medium damp, not soggy.
🚫 Placing in direct sunlight – This can dry out the cutting and kill it before roots form.
🚫 Not using a humidity dome – Without moisture retention, the cutting may dry out.
Alternative Orchid Propagation Methods
If propagating from a leaf proves too difficult, consider these more reliable methods:
✅ Keiki Growth – Some Phalaenopsis orchids naturally produce baby plants (keikis) on flower spikes. These can be separated and grown individually.
✅ Division of Pseudobulbs – Sympodial orchids like Cattleya and Dendrobium can be divided at the root level.
✅ Back Bulbs – Older dormant bulbs from orchids can sometimes sprout new growth.
If you want faster results, these methods have higher success rates than leaf propagation.
Final Thoughts: Is Propagating an Orchid from a Leaf Worth It?
Propagating orchids from a leaf with a node or stem section is challenging but not impossible. It requires patience, proper humidity, and optimal conditions to encourage root and shoot development. However, for quicker success, you may want to explore alternative propagation methods like keiki separation or division.
🌿 Have you ever tried propagating an orchid? Share your experience below! ⬇️✨