
Basil (Ocimum basilicum) is one of the most beloved herbs among gardeners, home cooks, and herb enthusiasts. Its aromatic leaves bring life to a variety of dishes, from pasta sauces to salads and cocktails. However, many gardeners treat basil as an annual herb, planting new seeds every year and forgetting that basil has the potential to last for much longer. What if I told you that there’s a secret trick to keep your basil thriving for over 10 years? This method involves propagation and a little bit of care, allowing you to enjoy fresh basil year-round, season after season.
In this article, I will explain the key steps you need to take to grow basil for over a decade. By employing this technique, you can keep a single basil plant going indefinitely. This method is great not only for basil but for other perennial herbs and plants as well, offering you a steady supply of fresh herbs with minimal effort.
Why Keep Basil for Over 10 Years?
Basil is typically grown as an annual because it is susceptible to frost and dies off during cold months. However, basil is technically a tender perennial, meaning that in ideal conditions, it can grow for many years. While basil is often replanted annually, there are benefits to cultivating the same plant year after year:
- Saves Money: No need to purchase new plants or seeds every year.
- Consistent Flavor: The same basil plant will develop a more intense, distinct flavor over time.
- More Sustainability: By keeping your basil for years, you’re reducing waste and supporting sustainability in your garden.
- Convenience: Instead of starting from scratch each year, you can harvest from a fully mature plant and enjoy year-round basil.
Now that you understand the benefits, let’s dive into the secret trick that will ensure your basil lives for over 10 years!
Step 1: Starting with Healthy Basil
If you want to extend the lifespan of your basil, you must start with a healthy plant. The better the starting point, the longer your basil will thrive. It is best to either:
- Purchase a healthy basil plant from a garden center or nursery, or
- Start from seeds, but this will require more time.
Choose a basil variety that’s well-suited to your climate and growing conditions. Varieties like Sweet Basil, Genovese Basil, or Thai Basil are excellent options. A healthy plant with strong stems and vibrant green leaves will have a better chance of growing for years.
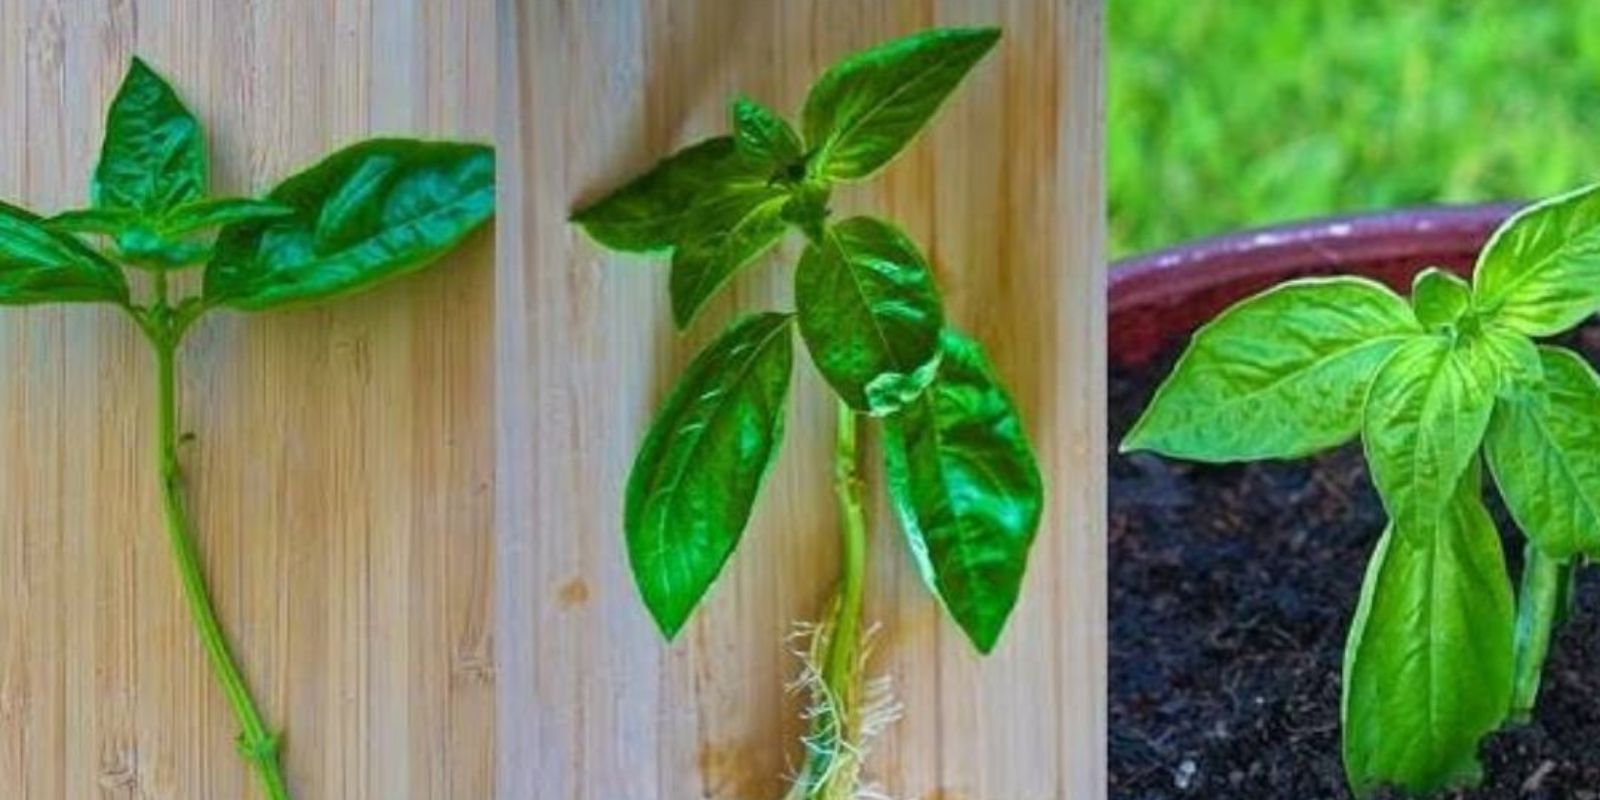
Step 2: Take Cuttings from the Mother Plant
Once your basil has been growing for some time and has reached a good size, you can begin the process of propagation. One of the easiest and most effective ways to propagate basil is through stem cuttings. Follow these steps for optimal results:
- Select a Stem: Choose a healthy stem that is around 4 to 6 inches in length. It should be free from any signs of disease or damage.
- Snip Below a Node: Using sharp scissors or pruning shears, cut the stem just below a node. The node is the small bump or swelling where leaves or branches grow. This is where new roots will form.
- Remove Lower Leaves: Trim the lower leaves of the cutting, leaving just the top few leaves. This helps reduce the plant’s energy consumption while rooting.
By propagating basil through cuttings, you’re giving the plant a chance to regenerate and grow new roots, which will eventually create a new basil plant that will live just as long as the original.
Step 3: Rooting the Cuttings in Water
To propagate basil, place the cutting in a glass of water. Water is an essential medium for basil’s roots to grow, and it’s easy to monitor the progress this way. Here’s how to root basil in water:
- Prepare the Glass: Place the cutting in a clear glass of water, ensuring that the leafless portion of the stem is submerged but the leaves are not touching the water.
- Place in a Sunny Spot: Position the glass in a bright, warm location, such as near a sunny windowsill. Basil thrives with plenty of light, so a location with indirect sunlight works best.
- Change the Water Regularly: Make sure to change the water every 2 to 3 days to keep it fresh. Stagnant water will encourage mold and mildew to grow, which could harm the cutting.
After about 7 to 10 days, you should start seeing roots developing from the nodes of the cutting. These roots will eventually grow long enough to support the cutting when it’s transferred into the soil.
Step 4: Planting the Basil Cuttings into Soil
Once your basil cutting has developed a healthy root system, it’s time to transfer it into the soil. At this point, you can plant it in a pot or directly into your garden, depending on your location and growing preferences.
- Choose a Suitable Container or Garden Bed: If planting in a container, ensure the pot has good drainage. Basil doesn’t like standing water, so proper drainage is key to healthy growth.
- Fill the Pot with Soil: Use a well-draining, nutrient-rich potting mix. If you’re planting directly in your garden, amend the soil with compost or organic matter for added nutrients.
- Plant the Cutting: Gently remove the cutting from the water and plant it in the soil, burying the root portion while leaving the top few leaves exposed above the surface.
- Water Well: Water the newly planted cutting thoroughly. Basil likes moist soil, but be sure not to overwater, as this can lead to root rot.
Now that your cutting is planted in the soil, you should continue caring for it as you would a mature basil plant. Water regularly, but ensure the soil drains well. Basil is a sun-loving herb, so make sure it gets plenty of light – 6 to 8 hours of sunlight each day is ideal.
Step 5: Pruning and Maintaining Healthy Growth
Basil is a fast-growing herb, so it requires regular pruning to maintain its health and vitality. As the plant matures, follow these tips to keep it thriving for years:
- Pinch Off Flower Buds: Basil produces flowers, but once the plant starts flowering, its flavor and growth begin to decline. Pinch off any flower buds as soon as they appear to prevent the plant from wasting energy on flowering.
- Prune Regularly: Trim the top of the basil plant to encourage bushy, full growth. Always cut just above a pair of leaves, which will promote two new branches to grow from that spot.
- Remove Dead or Yellowing Leaves: Regularly remove any dead or yellowing leaves to keep the plant healthy and prevent diseases.
By maintaining consistent pruning and removing any unhealthy portions of the plant, you will encourage more vigorous growth, resulting in a fuller and healthier basil plant.
Step 6: Propagate Continuously
Basil is an herb that grows quickly and abundantly, making it an ideal candidate for continuous propagation. To keep your basil plant alive for over 10 years, you’ll want to continually take cuttings from the original plant and root them in water. Over time, you will have an entire family of basil plants, all stemming from that one initial cutting. Each new cutting will live and thrive in the same way, creating an endless cycle of basil for you to harvest.
Conclusion: Growing Basil for Over 10 Years
By following these steps, you can easily grow basil for over 10 years and enjoy fresh leaves for years to come. Basil is not only a delicious and aromatic herb but also a wonderful addition to any garden. With patience and care, you can extend the lifespan of your basil plants, saving you money and time while ensuring a continuous supply of this herb in your kitchen.
So why not give it a try? Start by taking a cutting from your basil plant today, and in no time, you’ll be growing an endless supply of fresh, flavorful basil that will last for years to come. Happy gardening!