
Gardening is a rewarding hobby, but it often comes with the challenge of ensuring your plants are properly watered. Traditional watering methods can be wasteful, especially in regions where water is scarce. If you’re looking for a more sustainable, efficient way to water your garden, DIY ollas could be the solution. Ollas are ancient irrigation tools that have been used for centuries to provide consistent and deep hydration to plants. The best part? They’re easy to make, eco-friendly, and incredibly effective.
In this article, we will explore how to make DIY ollas for your garden, the benefits they offer, and why they could be a game-changer for gardeners looking to conserve water while keeping their plants healthy.
What Are Ollas?
Ollas (pronounced “oy-yahs”) are unglazed clay pots traditionally used for irrigation in arid regions. The concept behind ollas is simple: you bury the pot in the soil, fill it with water, and let the water seep out slowly through the porous walls, directly to the roots of the plants. This slow-release method minimizes evaporation and waste, ensuring that your plants get the water they need while you conserve precious resources.
The beauty of ollas lies in their simplicity. Made from natural clay, these pots are non-toxic and safe for plants. They also don’t require electricity or complex systems, making them an affordable and sustainable option for gardeners of all kinds.
Why Use Ollas in Your Garden?
Before diving into how to make your own DIY ollas, let’s explore the benefits of using these ancient irrigation devices:
- Water Conservation
Ollas are a game-changer when it comes to water conservation. The slow-release nature of ollas ensures that water is delivered directly to the roots of plants, minimizing evaporation and runoff. This means you’ll use less water to keep your garden thriving, which is especially important in areas experiencing drought or water restrictions. - Reduced Watering Time and Effort
Once you’ve set up your ollas, they take care of the watering for you. Instead of having to water your garden every day, you only need to refill the ollas every few days (depending on the size of the pots and the weather conditions). This reduces the time and effort spent on irrigation and allows you to focus on other aspects of gardening. - Healthier Plants
Since ollas provide consistent, deep watering, plants are able to establish stronger root systems. The water delivered directly to the roots encourages deep root growth, which helps plants become more resilient and better able to withstand heat, drought, and other stressors. - Simplicity and Affordability
DIY ollas are inexpensive and easy to make with basic materials. You don’t need any fancy equipment or complex systems—just some clay pots and a few basic tools. For gardeners on a budget or those who prefer eco-friendly solutions, ollas are an ideal choice. - Sustainability
Since ollas are made from unglazed clay, they’re environmentally friendly. Clay is a natural material that doesn’t leach harmful chemicals into the soil, and because ollas use little water, they help conserve a valuable resource.
Materials You’ll Need to Make DIY Ollas
Making your own ollas is a straightforward process that requires minimal tools. Here’s what you’ll need:
- Two unglazed clay pots: One should be smaller than the other so that the smaller pot can fit inside the larger one. Unglazed clay is essential because it’s porous and allows water to seep through.
- Waterproof sealant: This will help seal the gap between the two pots to prevent water from leaking out around the edges.
- A drill with a ceramic drill bit: You’ll need to drill a hole in the bottom of one pot and a small hole near the lip of the other.
- Plastic tube or hose: This will be used to refill the olla. You’ll drill a hole in the second pot to insert the tube.
Step-by-Step Guide to Making DIY Ollas
Follow these easy steps to make your own DIY ollas for your garden.
Step 1: Gather Your Materials
Before you begin, make sure you have all the necessary materials:
- Two unglazed clay pots (one smaller than the other)
- Waterproof sealant (check for one that is non-toxic)
- A drill with a ceramic drill bit
- A plastic tube or hose for refilling
- A clean, flat surface to work on
Step 2: Prepare the Pots
Start by placing the smaller pot inside the larger pot. There should be a small gap between the two pots where the water will seep out. This gap is key to the olla’s functionality, so be sure they fit snugly without gaps around the sides.
Step 3: Drill Holes
Using the ceramic drill bit, drill a small hole in the bottom of the smaller pot. This hole will allow water to be released into the soil. It’s important to keep the hole small to ensure a slow, steady release of water.
Next, drill a hole near the lip of the larger pot, just big enough to fit the plastic tube or hose. This will allow you to refill the olla easily.
Step 4: Seal the Pots Together
Apply waterproof sealant around the edge where the two pots meet. This will prevent water from escaping around the sides of the olla and ensure that all water seeps through the unglazed clay. Make sure the sealant is applied evenly and that there are no gaps.
Allow the sealant to dry for a few hours or according to the manufacturer’s instructions before moving on to the next step.
Step 5: Insert the Refill Tube
Take your plastic tube and insert it into the hole you drilled near the lip of the larger pot. This tube will act as your refill mechanism, allowing you to easily add water to the olla as needed. You can cut the tube to the desired length, making sure it’s long enough to reach above the surface of the soil once the olla is buried.
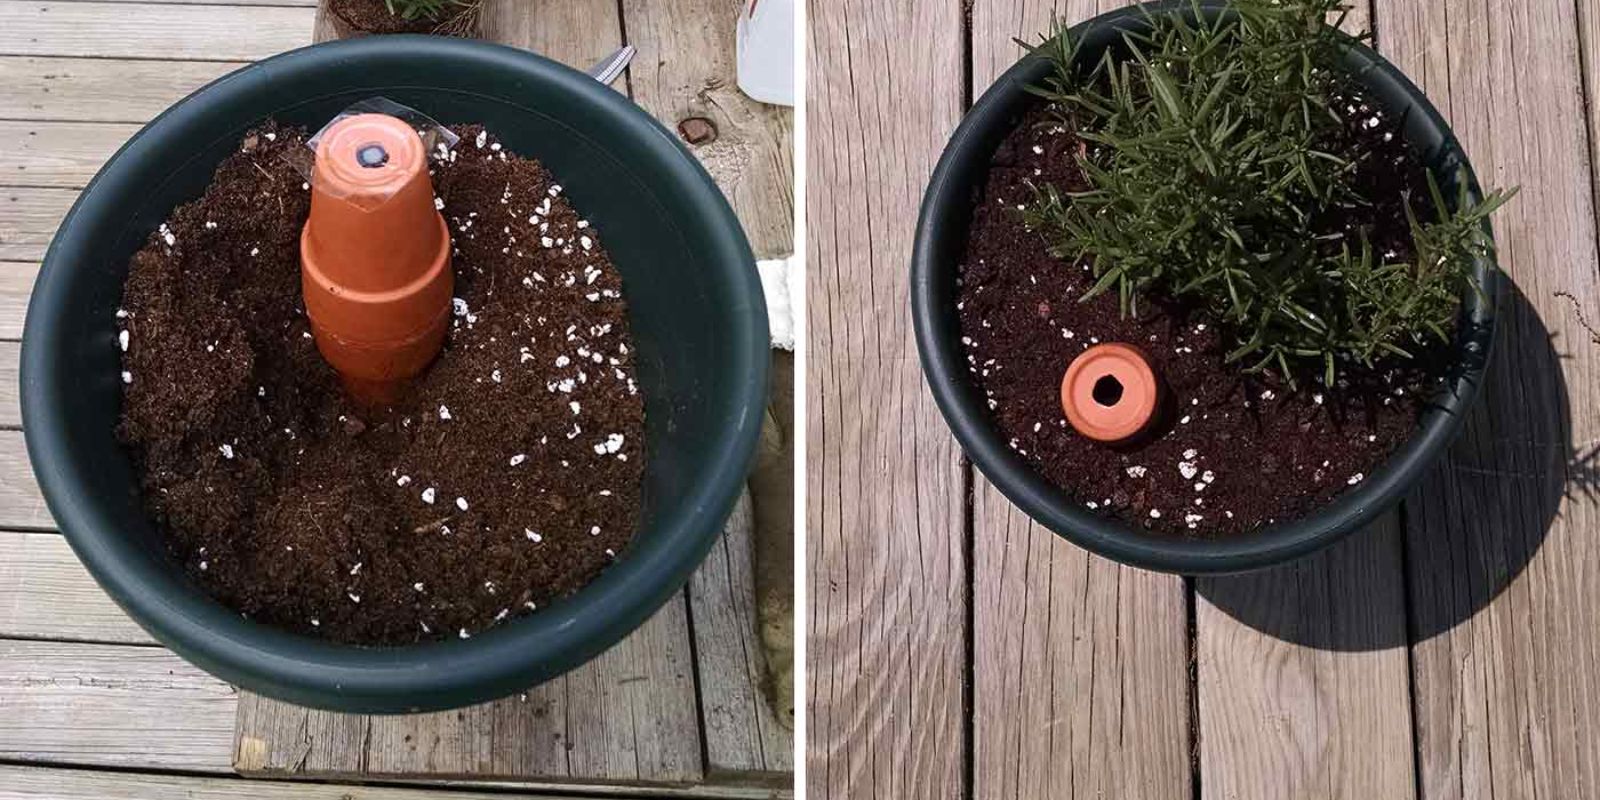
Step 6: Bury the Olla
Dig a hole in your garden bed where you want to place the olla. The hole should be deep enough to bury the larger pot, leaving the refill tube exposed above the surface of the soil. Place the olla into the hole, making sure the refill tube is easy to access. Cover the larger pot with soil, leaving the refill tube above the soil surface for easy refilling.
Step 7: Refill and Water
Once your olla is buried, it’s ready for use! Simply fill the smaller pot with water through the refill tube. The water will gradually seep through the porous clay and into the surrounding soil, providing deep, consistent watering to your plants. Depending on the size of the olla and the weather, you may need to refill the olla every few days.
Tips for Using Ollas in Your Garden
- Use multiple ollas: For larger garden beds or plants with high water needs, consider using multiple ollas to ensure even watering throughout your garden.
- Cover the refill tube: To prevent debris from entering the refill tube, consider covering it with a small mesh or cap.
- Monitor soil moisture: While ollas are great for deep watering, it’s still important to monitor soil moisture to ensure your plants are getting the right amount of water.
- Avoid direct sunlight: If possible, place your ollas in areas where they won’t be exposed to direct sunlight for long periods of time, as this can cause the water to evaporate too quickly.
Conclusion
DIY ollas are a simple, effective, and sustainable way to water your garden while conserving water. By making your own ollas, you can provide consistent hydration to your plants, promote healthy root growth, and reduce your gardening workload. Whether you have a small vegetable garden or a large flower bed, ollas are a fantastic option for eco-conscious gardeners.
With just a few basic materials and some simple steps, you can create your own DIY ollas and experience the benefits of water-efficient irrigation. So, why not give it a try and take your gardening to the next level?
Let’s make water conservation a priority in our gardens and grow smarter together!
#DIYGardening #WaterWise #GardenHacks #EcoFriendly #WaterConservation #GreenThumb #SustainableGardening #OllaIrrigation #GardeningTips #GrowYourOwnFood