
Maintaining a well-watered garden is essential for healthy plant growth, but traditional sprinklers can be expensive and sometimes wasteful. If you’re looking for an innovative and cost-effective way to keep your garden lush, creating a rotating irrigation sprinkler using plastic bottles is a perfect DIY project. Not only is this approach environmentally friendly by recycling plastic bottles, but it also gives you a functional and customizable irrigation solution. In this article, we’ll guide you through the step-by-step process of creating your own rotating sprinkler and offer tips for ensuring optimal performance.
Why Use a Rotating Sprinkler?
A rotating sprinkler offers several advantages over stationary sprinklers:
- Even Coverage: Rotating sprinklers cover a larger area and distribute water more evenly, reducing the risk of dry spots in your garden.
- Cost-Effective: Using plastic bottles for this project costs virtually nothing if you already have the materials on hand.
- Eco-Friendly: By recycling plastic bottles, you reduce plastic waste and contribute to a more sustainable lifestyle.
- Customizable: You can easily adjust the design to fit your garden’s specific needs and experiment with different configurations.
Materials You’ll Need
Before starting, gather the following materials:
- Plastic Bottles: Two-liter bottles work well for this project. You’ll need at least one bottle, but having a couple on hand can be helpful.
- Drill or Sharp Tool: For making holes in the bottles.
- Garden Hose: To connect your sprinkler to the water source.
- Scissors: To cut the bottles.
- Waterproof Tape or Glue: To secure the bottles and hose.
- Optional: Additional plastic caps or smaller bottles for customization.
Step-by-Step Instructions
1. Prepare the Bottle
Start by preparing your plastic bottle. Ensure it’s clean and dry before you begin working with it. Take one bottle and use a drill or a sharp tool to make small holes around the bottom of the bottle. The size and number of holes will affect the spray pattern, so feel free to experiment. Aim for a mix of small and slightly larger holes to create a more even water distribution.
2. Cut the Nozzle
Next, cut off the top of the bottle, leaving a narrow neck. This cut will allow you to attach the bottle to the garden hose. If you want to create a rotating effect, you may also need another bottle or a plastic cap to attach to the top. This piece should have holes drilled into it as well.
3. Attach to Hose
Secure the bottle to the end of your garden hose using waterproof tape or glue. Ensure that the connection is tight to prevent leaks. You can use a second bottle or cap with additional holes to create a rotating effect. To do this, cut the second bottle or cap so that it fits snugly over the first bottle’s neck. Drill holes into the second bottle or cap to allow water to flow through. Attach this piece to the top of the first bottle.
4. Create the Rotating Effect
The rotating effect is achieved by allowing water to flow through the holes, causing the bottle or cap to spin. This spinning motion helps distribute water more evenly across a larger area. Adjust the number and size of the holes to control the rotation speed and coverage area. You might need to experiment to find the right balance for your garden.
5. Test and Adjust
Once everything is assembled, turn on the water and observe how the sprinkler performs. Check for even water distribution and make any necessary adjustments. If the sprinkler isn’t rotating as desired, you might need to increase the size of some holes or adjust the position of the bottles. Make sure the bottles are securely attached and that there are no leaks.
Tips for Optimal Performance
- Hole Size and Placement: The size and placement of the holes will significantly impact the sprinkler’s performance. Smaller holes create a fine mist, while larger holes produce a more direct spray. Experiment with different combinations to achieve the desired effect.
- Bottle Stability: Ensure that the bottles are stable and securely attached. If the sprinkler wobbles or tilts, it may not distribute water evenly.
- Hose Connection: Check the hose connection regularly for leaks or loose fittings. A secure connection is essential for optimal performance.
- Regular Maintenance: Clean the holes periodically to prevent clogs and ensure consistent water flow. Over time, debris or mineral buildup can affect performance.
Customization Ideas
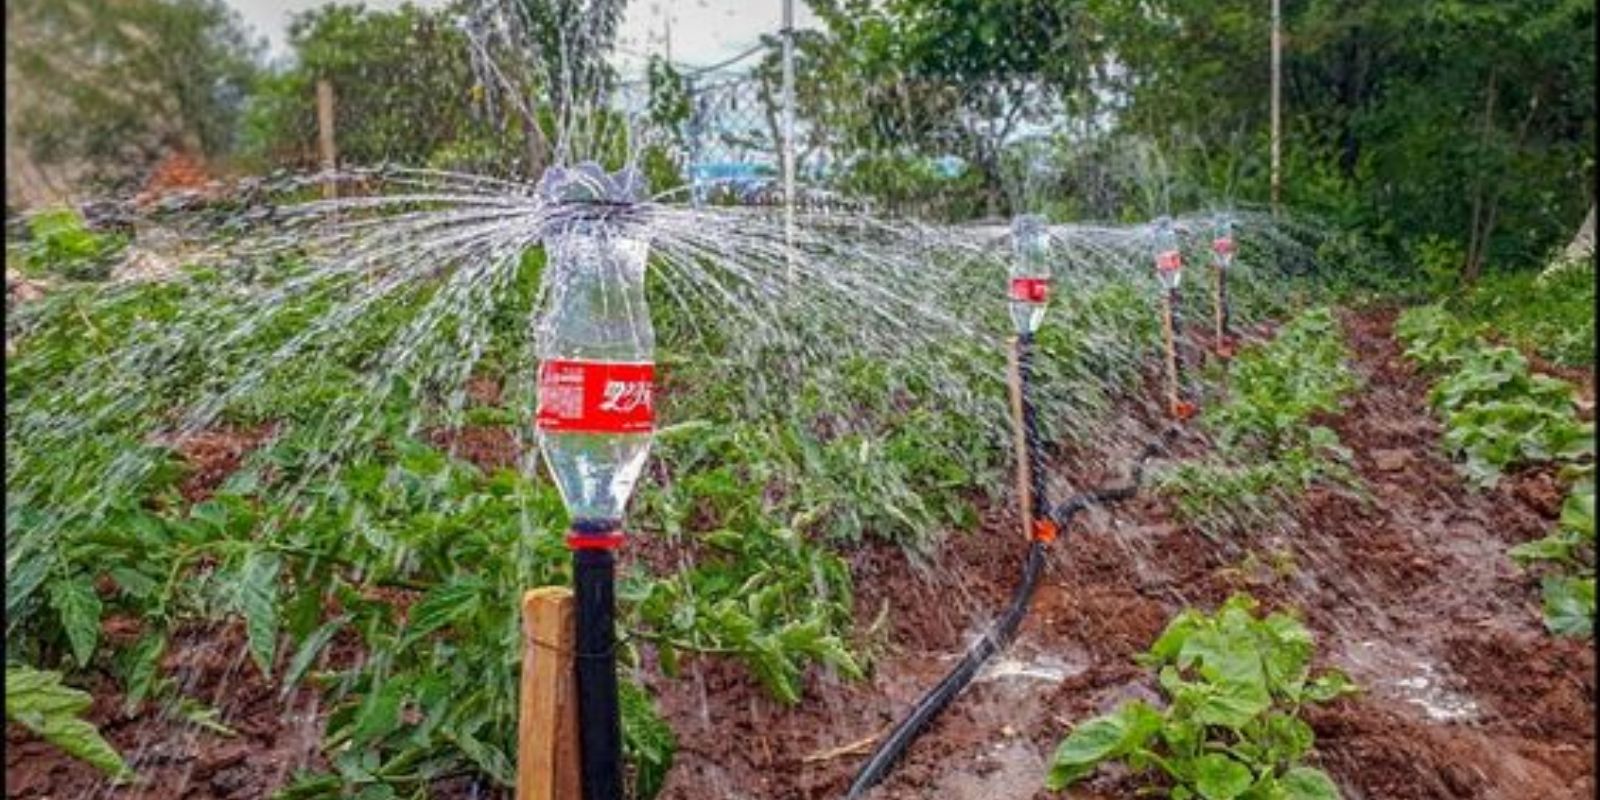
- Multi-Bottle Setup: For larger gardens, consider using multiple bottles connected in series. This setup allows for more extensive coverage and better distribution.
- Colorful Sprinklers: Use colored plastic bottles to add a decorative touch to your garden. The vibrant colors can make your sprinkler a fun focal point.
- Adjustable Nozzles: Create adjustable nozzles by using different sizes of bottles or caps. This feature allows you to customize the spray pattern and coverage area.
Conclusion
Creating a rotating irrigation sprinkler using plastic bottles is a simple yet effective way to enhance your garden’s watering system. This DIY project not only helps you save money but also promotes environmental sustainability by repurposing plastic waste. By following the steps outlined in this article and experimenting with different configurations, you can design a sprinkler that meets your garden’s specific needs and ensures optimal plant growth.
Don’t be afraid to get creative and make the project your own. Happy gardening, and enjoy the satisfaction of a well-watered and thriving garden!