
Ginger is a beloved spice and herb known for its incredible culinary and medicinal uses. From adding zest to your favorite dishes to being a powerhouse ingredient in soothing teas, ginger is truly a plant worth cultivating. But why purchase ginger at the store when you can grow your own at home? Whether you have a sprawling garden or just a few pots on a balcony or windowsill, ginger is surprisingly easy to grow, and once established, it provides a bountiful harvest that can last for years.
In this article, we will take you through a simple, step-by-step guide on how to grow your own endless supply of ginger at home. From selecting the perfect rhizomes to harvesting your fresh ginger, this guide will cover all the essential steps to help you get started and ensure a healthy, thriving ginger plant.
Why Grow Ginger at Home?
Ginger is more than just a flavorful spice; it’s a treasure trove of health benefits. Ginger is widely known for its ability to aid in digestion, reduce inflammation, and boost immunity. It’s a go-to ingredient in herbal remedies and is commonly used to treat nausea, digestive upset, and even colds. Growing ginger at home gives you access to fresh, organic ginger that you can incorporate into your meals and health routines.
Moreover, ginger is a relatively easy plant to grow with minimal effort. It thrives in warm and humid conditions, which can be replicated indoors or outdoors depending on your climate. The best part is that once you establish a ginger plant, it can keep providing you with rhizomes for years, ensuring an endless supply of this amazing root.
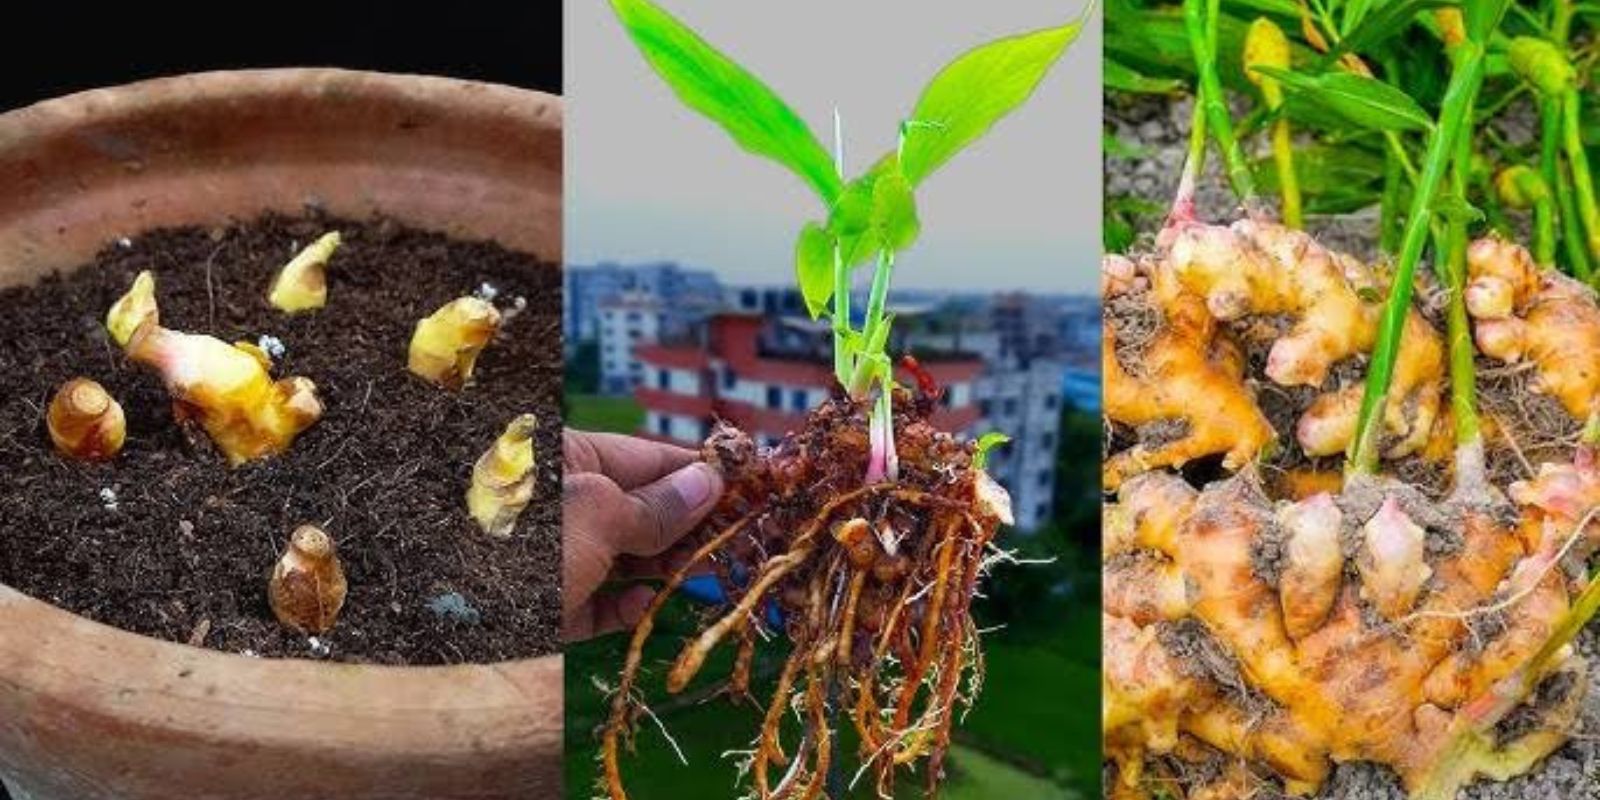
Step 1: Selecting the Right Ginger Rhizome
The first step in growing ginger is selecting the right rhizome. A rhizome is the part of the ginger plant that grows underground and stores nutrients. To get started, you’ll need to choose a fresh, healthy rhizome from a reputable source. You can find ginger rhizomes at garden centers, nurseries, or even in the produce section of your grocery store.
When selecting your rhizome, look for one that is plump and firm. The rhizome should be free of mold, shriveling, or any signs of rot. Ideally, the rhizome should have visible “eyes,” which are small growth buds that will sprout into new shoots. These eyes are crucial for propagation, so make sure the rhizome you choose has at least one or two.
If you can, opt for organic ginger, as it’s less likely to have been treated with pesticides or chemicals that could hinder growth.
Step 2: Preparing the Rhizome for Planting
Once you have selected your ginger rhizome, the next step is to prepare it for planting. Start by soaking the rhizome in lukewarm water for about 12-24 hours. This will hydrate it and activate the growth process. After soaking, use a clean, sharp knife to cut the rhizome into sections, ensuring each piece has at least one eye or bud.
If your rhizome has multiple eyes, you can divide it into several pieces. Each section should be approximately 2-4 inches long. Be sure to allow the cut ends to dry for a day or two before planting. This helps to prevent rot and gives the cut sections time to callus over.
Step 3: Choosing the Right Container
Ginger plants have broad, spreading roots, so choosing the right container is key to their success. The container should be wide and shallow, rather than deep, as ginger’s roots tend to grow horizontally. Choose a container with good drainage holes to prevent water from accumulating at the bottom, which could lead to root rot.
A plastic, ceramic, or clay pot works well for ginger. You can also grow ginger in a large, shallow garden bed if you’re planting it outdoors. If you’re growing ginger indoors, make sure to place the pot in a location that receives indirect sunlight.
Fill the container with well-draining, loamy potting mix. Ginger plants thrive in soil that is rich in organic matter. You can mix regular potting soil with compost or well-rotted manure to improve its fertility and structure.
Step 4: Planting the Rhizome
With your container prepared and your rhizome ready, it’s time to plant. Take the rhizome sections and place them in the soil, ensuring that the eyes are facing upward. Plant the rhizome pieces about 2 inches below the surface of the soil. Ginger rhizomes don’t need to be buried deeply, but they should be adequately covered to encourage rooting.
After planting, water the soil thoroughly to settle the roots and ensure the soil is evenly moist. Ginger requires consistently moist soil, but be careful not to overwater, as soggy soil can lead to root rot. Keep the soil lightly moist throughout the growing season.
Step 5: Providing the Right Growing Conditions
Ginger thrives in warm and humid environments, so it’s important to replicate these conditions for successful growth. Ideally, ginger prefers a temperature range of 75-85°F (24-29°C). If you’re growing ginger indoors, place your plant in a location with indirect sunlight, such as near a bright window. However, avoid placing it in direct sunlight, as this can scorch the leaves.
To maintain high humidity levels, you can place a humidity tray filled with water and stones near the plant. Alternatively, mist the leaves regularly to keep the plant’s environment moist. Ginger plants are sensitive to cold temperatures, so avoid placing them in drafty areas or near air conditioners.
Step 6: Watering and Fertilizing Ginger
Ginger plants require consistent watering to thrive. Ensure the soil remains moist but not waterlogged. To check if your plant needs watering, stick your finger into the soil about an inch deep. If it feels dry, it’s time to water.
Ginger plants also benefit from regular feeding. During the growing season (spring and summer), fertilize every 2-4 weeks with a balanced, liquid fertilizer. You can use a general-purpose fertilizer or organic options such as compost tea, fish emulsion, or seaweed extract. Fertilizing helps promote healthy growth and ensures that your ginger plant has access to the nutrients it needs to thrive.
Step 7: Encouraging Growth and Flowers
While ginger is typically grown for its rhizomes, it’s possible for it to produce beautiful flowers under the right conditions. Ginger flowers are small, white or pink, and are fragrant. However, flowering is not essential to the growth of the rhizomes, so if your ginger plant doesn’t bloom, don’t be discouraged.
To encourage your ginger plant to grow vigorously, ensure it has access to adequate sunlight, warmth, and moisture. Additionally, avoid disturbing the plant too much, as ginger plants can be sensitive to frequent handling or repotting.
Step 8: Harvesting Your Ginger
One of the most rewarding steps in growing ginger is the harvest. Ginger takes time to grow, and it can take anywhere from 8-10 months for the rhizomes to be ready for harvesting. You’ll know your ginger is ready when the plant’s leaves begin to yellow and die back, signaling that the plant has reached maturity.
To harvest ginger, gently dig around the base of the plant to expose the rhizomes. You can harvest as much as you need, leaving the rest of the plant to continue growing. If you want to allow the plant to keep producing, leave a portion of the rhizome in the ground so it can continue to develop.
Once harvested, ginger can be used fresh, stored in the fridge, or dried for future use. Fresh ginger has a more intense flavor than dried ginger, so it’s perfect for cooking, baking, or brewing ginger tea.
Conclusion: Enjoy the Fruits of Your Labor
Growing ginger at home is a rewarding and sustainable way to enjoy this flavorful and healthful root. With just a little time, patience, and the right care, you can grow an endless supply of ginger that will keep you supplied with fresh rhizomes for cooking, health, and herbal remedies.
By following these simple steps, you can start your own ginger-growing journey today and experience the satisfaction of harvesting fresh, homegrown ginger whenever you need it. Whether you’re a beginner gardener or a seasoned pro, growing ginger at home is a fulfilling and enjoyable process that will bring you closer to nature while providing a constant supply of this versatile plant.
Happy gardening, and enjoy the many benefits of growing your own ginger! 🌱 #GrowYourOwnGinger #HomegrownHerbs #SustainableGardening #OrganicLiving #DIYGarden #GardeningAtHome #FreshGinger #HealthyLiving #GardeningTips #EdibleGarden