
Tulips, with their vibrant colors and graceful blooms, are one of the most beloved flowers in gardens and homes alike. Known for their simple elegance, tulips bring a burst of springtime cheer and can be grown both in gardens and containers. Whether you’re a seasoned gardener or a beginner, growing tulips can be a rewarding and relatively simple endeavor if you follow the right steps.
In this guide, we’ll walk you through everything you need to know about planting and caring for tulips, whether you’re growing them in your garden or in pots. By the end of this article, you’ll be well-equipped to enjoy the beauty of these stunning flowers in your own space.
Why Choose Tulips?
Tulips are a favorite among gardeners for many reasons. They are available in a wide variety of colors, including red, yellow, purple, pink, and white, and come in different shapes and sizes. These flowers are often associated with spring, as they typically bloom in early to mid-spring, brightening up your garden after the cold winter months.
One of the main benefits of growing tulips is their versatility—they can be planted both in the ground and in containers, making them perfect for all types of gardens, whether you have a small balcony, a sprawling backyard, or a raised bed.
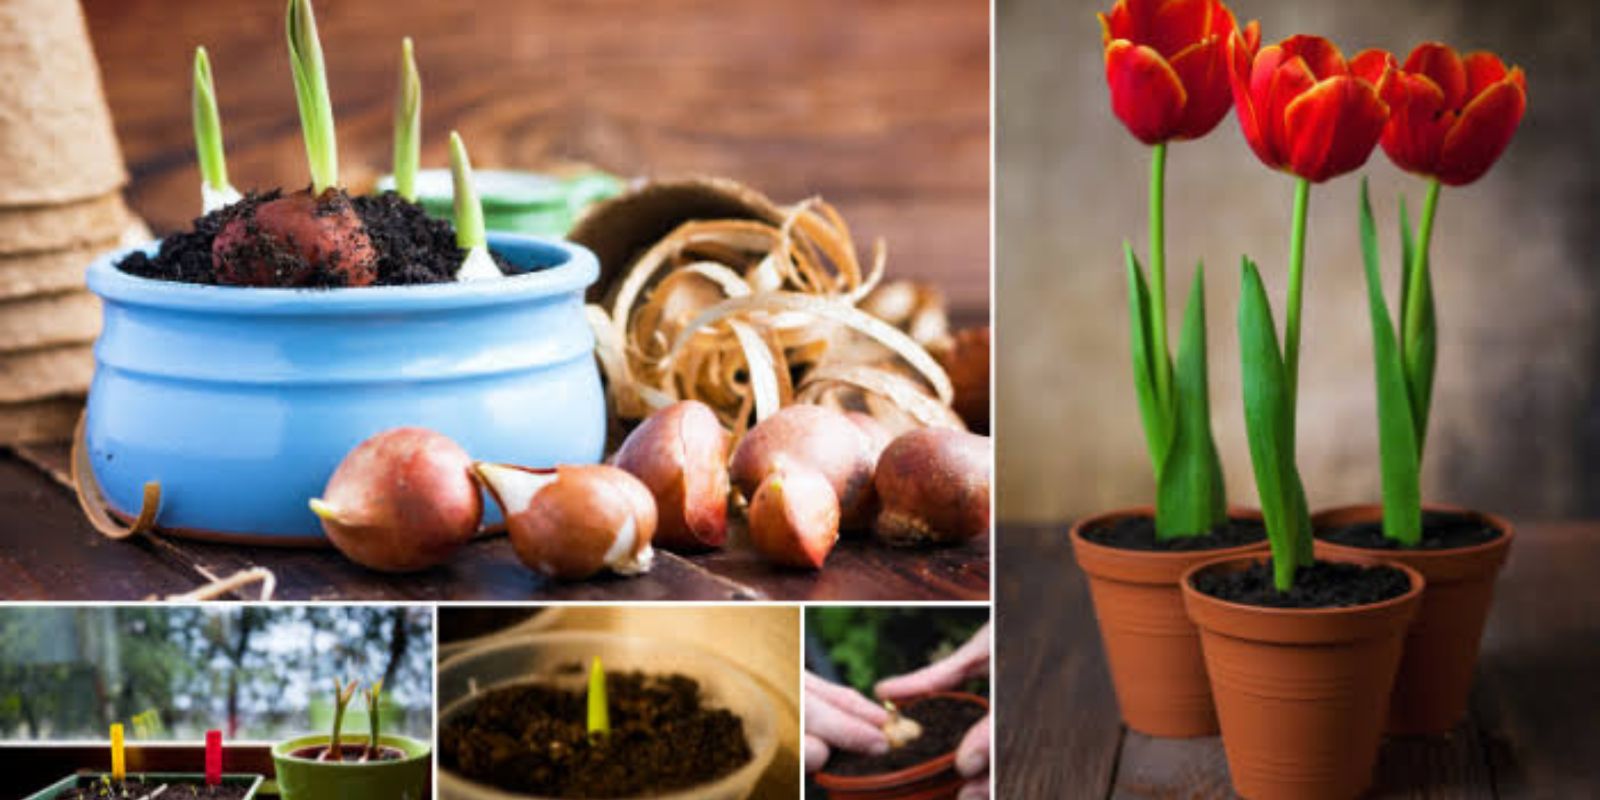
Step 1: Choosing Healthy Tulip Bulbs
The first step in successfully growing tulips is choosing the right bulbs. Healthy bulbs are essential for ensuring vibrant and strong plants. When selecting tulip bulbs, look for those that are firm, free from mold or soft spots, and not damaged in any way. Larger bulbs typically produce stronger and more vibrant flowers.
Tulip bulbs are typically available for purchase in the fall, which is the ideal time for planting. Look for bulbs from reputable suppliers to ensure you’re getting the best quality.
Step 2: Understanding the Best Time to Plant Tulips
Tulips are fall-planted bulbs, meaning they need to be planted in the autumn months to bloom the following spring. The ideal time to plant tulips is approximately 6-8 weeks before the first frost, which is usually in October or early November, depending on your location. Planting at this time gives the bulbs enough time to develop strong roots before the ground freezes.
If you’re in a region with very cold winters, you may want to plant a little earlier to ensure the bulbs are well-established before the frost arrives.
Step 3: Preparing the Soil for Tulips
Whether you’re planting in the garden or in containers, soil preparation is essential for healthy tulips. Tulips prefer well-draining soil, as they don’t like standing water, which can lead to bulb rot. To ensure good drainage, mix organic matter, such as compost, into the soil to improve texture and nutrients.
For garden planting, choose a sunny spot, as tulips require at least 6 hours of sunlight per day to thrive. If you’re planting in pots, select a container with drainage holes to prevent waterlogging.
Step 4: Planting Tulips in the Ground
To plant tulips in the garden, follow these steps:
- Dig the Holes: Use a shovel or garden trowel to dig a hole that’s 6-8 inches deep for each bulb. Tulips need to be planted at a depth that allows their roots to establish, but not too deep that they struggle to emerge.
- Place the Bulbs: Place the tulip bulbs into the holes with the pointed side facing upward. If the bulb is not perfectly shaped, simply plant it with the broadest side facing down.
- Space the Bulbs: Tulips need room to grow, so space each bulb about 4-6 inches apart. This allows them to grow freely without overcrowding, which could stunt their growth and lead to fewer flowers.
- Cover and Water: After placing the bulbs, cover them with soil and water gently to settle the earth around them. This helps the roots establish themselves before the colder months.
Step 5: Planting Tulips in Pots
Planting tulips in containers is a great option for those with limited garden space or those who want the flexibility of moving their flowers around. Here’s how to plant tulips in pots:
- Select the Right Pot: Choose a pot that’s at least 8-12 inches deep and has adequate drainage holes. This is crucial for preventing water from pooling at the bottom and potentially causing bulb rot.
- Prepare the Soil: Fill the pot with well-draining potting soil, which is designed to provide the necessary nutrients for your tulips. You can add some compost or organic matter for added richness.
- Plant the Bulbs: Place the tulip bulbs in the pot with the pointed side facing up. Space the bulbs about 4-6 inches apart, just as you would in the garden. If planting multiple layers of bulbs (for a layered effect), place them at different depths in the pot.
- Water Lightly: After planting, water the soil lightly to help settle the bulbs in place.
Step 6: Caring for Tulips During Growth
Once your tulips are planted, it’s important to care for them as they grow. Here are some tips for proper tulip care:
- Watering: Water tulips regularly but ensure that the soil has good drainage. Tulips do not like wet feet, so it’s important not to overwater them. Only water when the soil is dry to the touch.
- Sunlight: Tulips need plenty of sunlight to thrive. Make sure your garden or pots are located in a spot that receives at least 6 hours of sunlight each day. If growing indoors in pots, place the tulips near a sunny window where they can get adequate light.
- Fertilization: While tulips don’t require much fertilizer, you can feed them in the spring to encourage better growth and more flowers. A balanced, water-soluble fertilizer is a good option. Apply according to the instructions on the packaging, being careful not to over-fertilize, as this can harm the plants.
- Pest Control: Watch for pests such as aphids or snails, which can damage tulip plants. If you notice pests, treat the plants with an organic pesticide or neem oil spray.
Step 7: Post-Bloom Care and Replanting
After your tulips have finished blooming, it’s time to care for them properly to ensure they return the following year. Here’s what to do:
- Deadheading: Once the tulip flowers have faded, remove the spent blooms by gently snipping them off with a clean pair of scissors. This prevents the plant from expending energy on seed production and encourages it to focus on root growth.
- Allow the Leaves to Die Back Naturally: Tulips need their leaves to gather energy from the sun to nourish the bulb for the next season. Don’t cut the leaves until they turn yellow and die off on their own.
- Storing Bulbs: In warmer climates where tulips are not hardy perennials, dig up the bulbs after the foliage has died back. Store the bulbs in a cool, dry place until the fall, when they can be replanted.
Conclusion
Growing tulips in your garden or pots is a wonderful way to add beauty and vibrancy to your space. With a little care, these stunning flowers will reward you with colorful blooms year after year. Whether you’re planting tulips in your garden or in containers, following these steps will help you create a thriving, beautiful display.
By selecting healthy bulbs, planting them at the right time, and caring for them properly, you can enjoy a lovely spring bloom season after season. Happy gardening! 🌷
#TulipCare #GardenTips #FlowerGardening #PlantInspiration #SpringBlooms #GardeningLife #TulipSeason #PotPlanting #DIYFlowers #TulipsInBloom