
Sweet potatoes are not only delicious but also packed with nutrients. From their sweet flavor to their versatility in cooking, sweet potatoes are a favorite in many kitchens. What’s even better? You can easily grow them right at home, whether you have a large garden or just a small balcony. In this article, we’ll walk you through everything you need to know about growing sweet potatoes at home, from selecting the right variety to harvesting the tubers. If you’ve ever wanted to try growing sweet potatoes yourself, this guide will provide you with all the essential tips and steps.
Why Grow Sweet Potatoes at Home?
Sweet potatoes are relatively easy to grow, making them an excellent choice for both beginners and seasoned gardeners alike. Here are some reasons why you should consider growing them:
- Nutrient-Dense Food: Sweet potatoes are high in vitamins A and C, potassium, and fiber. They are an excellent addition to a healthy diet and can be used in a variety of dishes, from baked goods to savory meals.
- Low Maintenance: Sweet potatoes are a hardy crop that requires minimal care once planted, especially if grown in the right conditions.
- Cost-Effective: Growing your own sweet potatoes can save you money at the grocery store, and the harvest can be plentiful.
- Space-Friendly: Whether you have a large garden or a small balcony, sweet potatoes can be grown in containers, raised beds, or traditional garden plots.
With these benefits in mind, let’s dive into the process of growing sweet potatoes from start to finish.
Step 1: Choose Your Sweet Potato Slips
To grow sweet potatoes, you need to start with “slips,” which are shoots that sprout from the tuber. While you can grow sweet potatoes from seed, it’s far easier to propagate them using slips. You can either purchase sweet potato slips from a nursery or garden center, or you can grow your own from a store-bought sweet potato.
Here’s how you can grow your own sweet potato slips:
- Select a Healthy Sweet Potato: Choose a firm, organic sweet potato from a local store. Ideally, select a medium-to-large size for better yields.
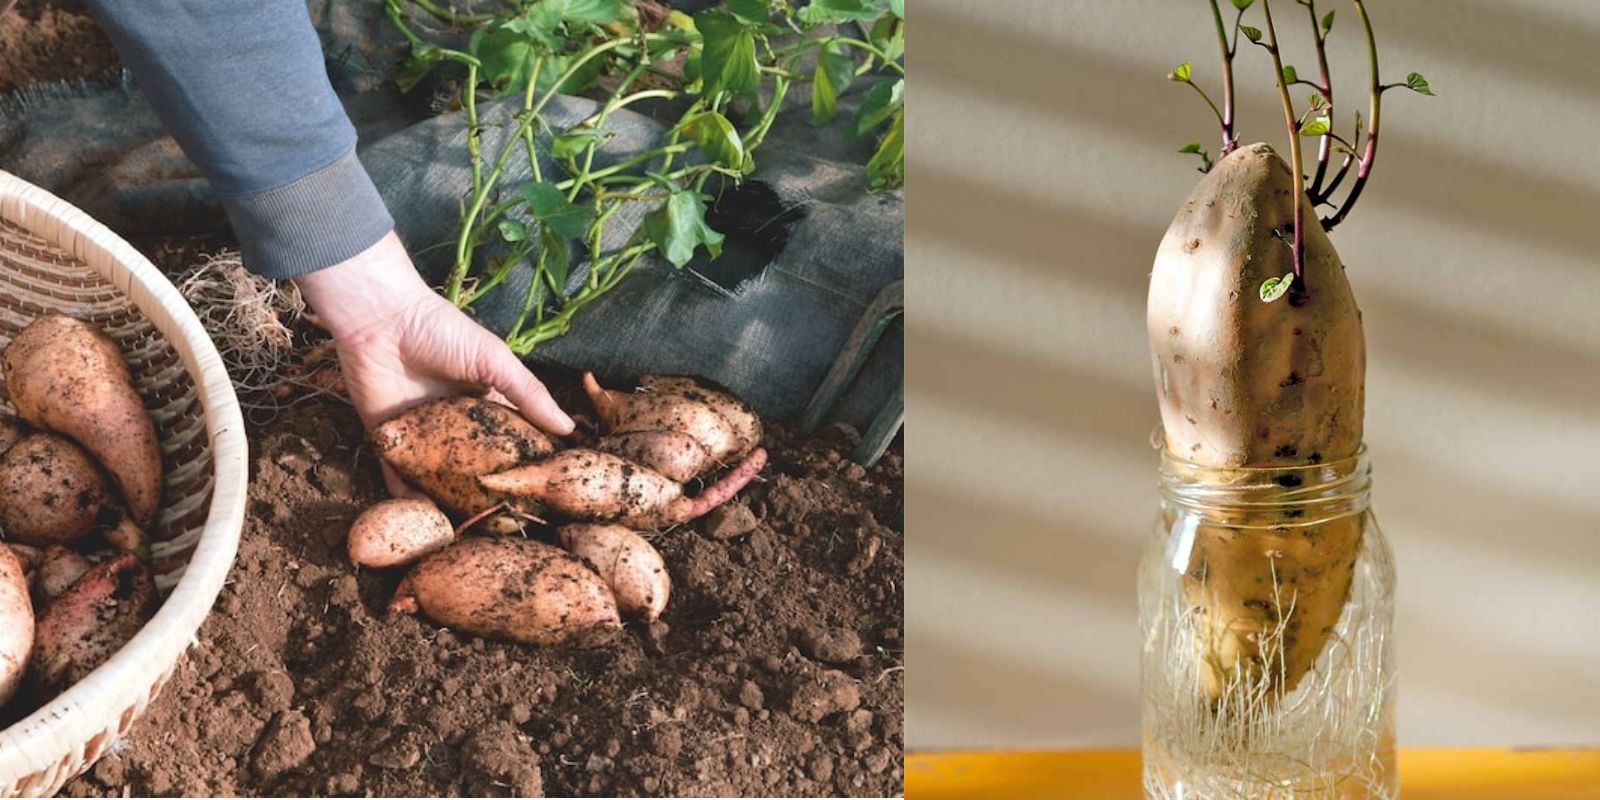
- Prepare the Sweet Potato: Place your sweet potato in a jar or glass of water, with the bottom submerged and the top exposed to the air. You can support the potato by suspending it with toothpicks, ensuring only the bottom is in contact with the water.
- Wait for Sprouts: Place the jar in a sunny window, and over the course of several weeks, the sweet potato will begin to sprout. The sprouts, or “slips,” will grow from the top of the potato. Once they’re about 6 inches long, you can break them off and prepare them for planting.
You should aim to start the sprouting process about 4 to 6 weeks before your last expected frost date. This will give the slips enough time to mature before they go into the soil.
Step 2: Prepare the Soil
Sweet potatoes thrive in loose, well-drained soil that is rich in organic matter. To give your sweet potatoes the best growing conditions, follow these steps:
- Choose a Sunny Spot: Sweet potatoes need full sun to grow properly. Select a location that receives at least 6 to 8 hours of sunlight each day.
- Test the Soil: Sweet potatoes prefer slightly acidic soil with a pH of 5.8 to 6.2. If you’re unsure of your soil’s pH, you can test it with a soil test kit from a garden center. If your soil is too acidic or alkaline, amend it with appropriate soil conditioners.
- Prepare the Soil: If you’re planting in the ground, till the soil to a depth of about 8 to 12 inches, removing any weeds or grass. Incorporate organic compost to improve the soil structure and fertility. You can also add a balanced organic fertilizer if your soil is lacking nutrients.
- Raised Beds or Containers: If you don’t have garden space, sweet potatoes grow well in raised beds or containers. Choose a container that’s at least 18 inches deep and has proper drainage holes. Fill the container with a mix of compost and well-draining soil to give your sweet potatoes plenty of room to grow.
Step 3: Plant the Sweet Potato Slips
Once your sweet potato slips are ready, it’s time to plant them. The best time to plant sweet potatoes is after the last frost when the soil has warmed up to around 65-70°F (18-21°C). You can plant sweet potatoes in the ground, raised beds, or containers.
Here’s how to plant sweet potato slips:
- Create Planting Holes: For each slip, dig a small hole or trench about 6 inches deep. Space each slip about 12 to 18 inches apart to allow for proper growth. If you’re planting in rows, leave about 3 feet of space between each row.
- Plant the Slips: Place each slip into the hole or trench, burying it up to the leaves. Gently firm the soil around the base of the slip to hold it in place.
- Water Thoroughly: After planting, water the area well to ensure that the slips settle into the soil and have enough moisture to root.
Step 4: Care for Your Sweet Potatoes
Sweet potatoes are relatively low-maintenance once planted, but they do require consistent care to thrive.
- Watering: Sweet potatoes need regular watering, especially during the early stages of growth. However, be careful not to overwater, as they don’t like to sit in soggy soil. Water deeply to encourage the roots to grow deep into the soil. Once the plants are established, they are somewhat drought-tolerant.
- Mulching: Apply a layer of organic mulch, such as straw or leaves, around the base of the plants. This helps retain moisture, suppresses weeds, and keeps the soil temperature consistent.
- Fertilizing: Sweet potatoes don’t require much fertilization. If you used compost to prepare the soil, that should be sufficient. However, if your plants show signs of nutrient deficiency (such as yellowing leaves), you can apply a balanced, slow-release fertilizer once or twice during the growing season.
- Vine Care: Sweet potatoes produce long vines that will spread out across the ground. As the vines grow, gently guide them to avoid crowding or tangling. You can prune back excess vines if necessary, but be sure not to damage the main stems, as this can affect tuber production.
- Weeding: Keep the area around your sweet potato plants free from weeds, as they can compete for nutrients and water. Mulch will help with weed control, but be sure to remove any weeds that pop up.
Step 5: Harvesting Sweet Potatoes
Sweet potatoes are typically ready for harvest 90 to 170 days after planting, depending on the variety. You’ll know it’s time to harvest when the leaves begin to yellow and die back. Here’s how to harvest sweet potatoes:
- Check for Maturity: Gently dig around the base of the plants to check the size of the sweet potatoes. They should be firm and have developed full color. If the soil is dry, it’s a sign they’re ready to be harvested.
- Digging: Use a shovel or garden fork to gently lift the sweet potatoes out of the soil. Be careful not to damage the tubers.
- Curing: After harvesting, cure your sweet potatoes by placing them in a warm, dry location for about 10 to 14 days. This helps the skins harden and improves the flavor.
Step 6: Storing and Using Your Sweet Potatoes
After curing, store your sweet potatoes in a cool, dark, and well-ventilated space. They can be stored for several months in a pantry or root cellar. Use them in a variety of dishes, such as roasted sweet potatoes, casseroles, soups, or even baked goods like sweet potato pie or bread.
Conclusion
Growing sweet potatoes at home is a rewarding and relatively easy gardening project that can yield an abundance of delicious and nutritious food. By following these steps—selecting slips, preparing the soil, planting, and caring for the vines—you’ll be able to enjoy homegrown sweet potatoes in no time. Whether you’re a beginner or an experienced gardener, this guide provides all the information you need to successfully grow sweet potatoes and enjoy the fruits (or tubers) of your labor. Happy gardening!