
Roses are often considered the crown jewels of any garden. Their vibrant colors, rich fragrances, and timeless beauty make them a beloved choice for gardeners worldwide. Whether you’re looking to expand your rose garden or share the joy of these stunning flowers with friends, propagating roses from cuttings is a simple yet effective way to grow new plants.
In this comprehensive guide, we’ll walk you through the process of growing roses from cuttings, ensuring that you have the necessary knowledge and tools to propagate beautiful roses successfully. From choosing the right rose cuttings to caring for the newly rooted plants, we’ll cover each step in detail to help you achieve flourishing rose bushes.
Why Propagate Roses from Cuttings?
Propagation by cuttings is one of the most popular methods for growing roses. Unlike growing roses from seeds, which can be a long and uncertain process, cuttings allow you to create genetically identical plants that are true to the parent plant. This means that the roses you propagate from cuttings will have the same characteristics, such as color, fragrance, and growth habit, as the original plant.
Growing roses from cuttings is also cost-effective, as you don’t need to buy new plants. You can take cuttings from your existing rose bushes or from a friend or neighbor’s garden, giving you the opportunity to expand your garden with minimal investment. The process is relatively simple, and with a little patience, you can have new rose plants ready to bloom.
Materials You’ll Need for Propagating Roses from Cuttings
Before diving into the step-by-step process, it’s important to gather the necessary materials to ensure the success of your propagation efforts. Here’s a list of what you’ll need:
- Healthy Rose Cuttings – Choose healthy stems from a rose bush that is free of diseases or pests. The cuttings should be taken from the current year’s growth, ideally during late spring or early summer.
- Pruning Shears – Use clean, sharp pruning shears to cut the stems to ensure a clean, precise cut.
- Rooting Hormone (Optional) – Rooting hormone helps stimulate root growth and can increase the chances of successful rooting.
- Small Pots or Containers – Use small containers to hold the cuttings while they root. Make sure they have drainage holes to prevent waterlogging.
- Well-Draining Potting Mix – Use a potting mix that drains well to avoid waterlogged soil. A mix of peat moss, perlite, and vermiculite is ideal.
- Plastic Bags or Propagation Domes – These help create a humid environment that encourages rooting.
- Watering Can or Spray Bottle – Keep the cuttings moist but not soggy. A spray bottle is ideal for gentle watering.
- Transplant Soil or Compost – Once the cuttings have rooted, they’ll need to be transplanted into larger pots or directly into the garden.
Step-by-Step Guide to Propagating Roses from Cuttings
Now that you have your materials ready, let’s dive into the step-by-step process of propagating roses from cuttings. With a little care and patience, you’ll be able to grow your own beautiful rose bushes.
1. Choosing the Right Rose Cuttings
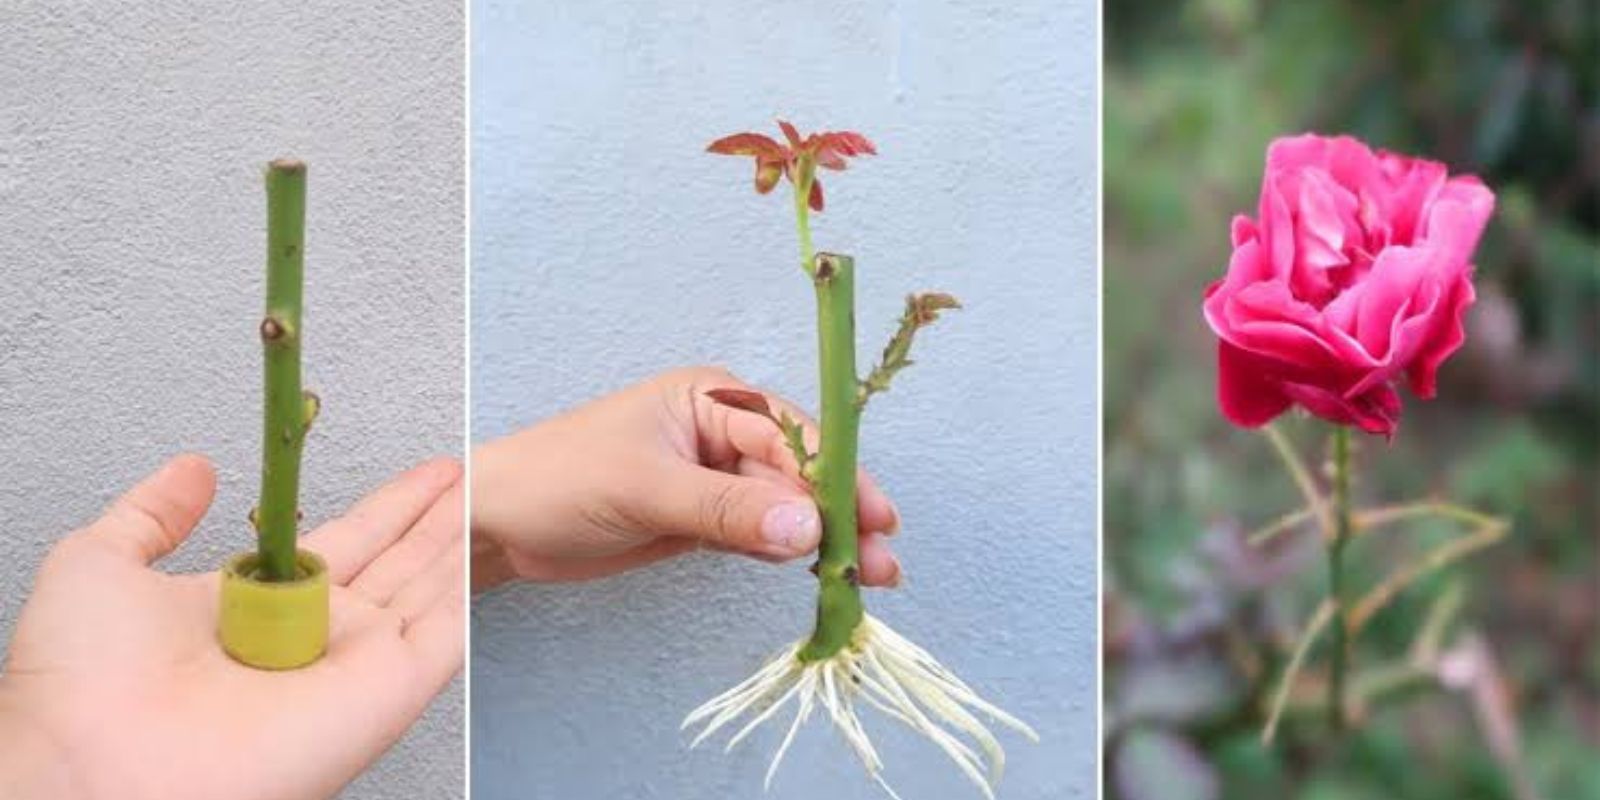
The first step in propagating roses from cuttings is selecting the right stems. Choose healthy, disease-free roses that are actively growing. Ideal cuttings are taken from the current year’s growth, which is typically soft and flexible. Avoid using older, woody stems as they are less likely to root successfully.
Cut a healthy stem that is about 6 to 8 inches long, with at least two or three leaf nodes. The cutting should be taken just below a leaf node, as this is where the roots will develop. Make sure the stem is not in bloom, as flowering stems are less likely to root.
2. Preparing the Cuttings
After selecting your cuttings, it’s time to prepare them for planting. Use sharp, clean pruning shears to make a clean cut just below a leaf node. Remove any leaves from the lower half of the cutting, leaving only a few leaves at the top. This helps reduce the amount of water the cutting loses while it’s rooting.
If you choose to use rooting hormone, now is the time to dip the bottom of your cutting into the hormone powder or gel. Rooting hormone can help speed up the rooting process and increase the chances of successful rooting.
3. Planting the Cuttings
Now that your cuttings are ready, it’s time to plant them. Fill small pots or containers with a well-draining potting mix. Make a small hole in the center of the soil with a stick or pencil, and carefully insert the cutting into the hole, ensuring that the bottom of the cutting is buried in the soil.
Make sure the leaves of the cutting are above the soil level to avoid rotting. Firm the soil around the cutting to ensure it’s stable and then water it lightly to settle the soil.
4. Creating a Humid Environment
Rose cuttings need a humid environment to root successfully. To create this, cover the pots with a clear plastic bag or place them under a propagation dome. This helps to retain moisture and provides the cutting with the warmth and humidity it needs to encourage root growth.
Place the pots in a location with bright, indirect light. Avoid direct sunlight, as it can be too harsh for the cuttings and may cause them to dry out. Ensure there is adequate air circulation to prevent mold or fungus from developing.
5. Caring for the Cuttings
The most important thing to remember when propagating roses from cuttings is to keep the soil moist but not soaking wet. Overwatering can lead to rot, so it’s essential to keep the soil just damp enough. Use a spray bottle or watering can to water the cuttings gently. If you’re using a plastic bag, make sure to check for condensation inside, which indicates that the environment is too humid. If this happens, remove the bag for a few hours to allow some moisture to escape.
Regularly check the cuttings for signs of new growth, such as the appearance of small leaves or shoots. This is a good indicator that the cutting is starting to root. It typically takes 4 to 6 weeks for rose cuttings to establish roots.
6. Transplanting the Rooted Cuttings
Once your cuttings have rooted, it’s time to transplant them. Gently remove the rooted cutting from the pot and place it in a larger container filled with fresh potting soil or compost. Make sure the new plant has enough space for its roots to grow and spread.
If you prefer, you can transplant the rooted cutting directly into your garden. Be sure to choose a spot with well-draining soil and plenty of sunlight. Roses need about 6-8 hours of sunlight per day for healthy growth and blooming.
7. Ongoing Care for Your Rose Bushes
After transplanting, your roses will need regular care to ensure they thrive. Water them regularly, especially during dry periods, and provide adequate sunlight for healthy growth. Fertilize your roses with a balanced fertilizer to encourage strong growth and blooming.
To promote bushier growth, prune your rose bushes regularly, removing dead or diseased stems. Deadheading spent flowers will also encourage the plant to produce more blooms.
8. Enjoying Your Beautiful Roses
With proper care, your rose bushes will soon be covered in vibrant, fragrant blooms. Watch as your hard work pays off, and enjoy the beauty of the roses you grew from cuttings.
Tips for Successful Rose Propagation
- Choose Healthy Stems – Healthy, disease-free stems are key to successful propagation. Avoid using stems that are too old or too young.
- Use Clean Tools – Clean pruning shears and tools to prevent the spread of disease.
- Patience is Key – Rooting can take time. Be patient and check regularly for signs of new growth.
- Temperature and Humidity Matter – Keep the cuttings in a warm, humid environment to encourage rooting.
Conclusion
Propagating roses from cuttings is a rewarding and simple process that allows you to grow beautiful, fragrant roses without having to purchase new plants. By following these simple steps, you can successfully propagate roses and expand your garden. With a little care and patience, you’ll soon have stunning rose bushes that will brighten up your outdoor space.
Start your rose propagation journey today and enjoy the beauty of homegrown roses!