
Introduction
Growing your own fruits can be an incredibly rewarding experience, and few fruits are as exotic and visually stunning as the purple pitahaya, also known as dragon fruit. This tropical delight not only boasts vibrant colors and unique textures but also offers numerous health benefits. For beginners, propagating pitahaya from cuttings is a straightforward process that can lead to a fruitful gardening adventure. In this article, we will guide you through each step to successfully grow purple pitahaya from cuttings, ensuring you enjoy a bountiful harvest in no time.
Why Choose Purple Pitahaya?
1. Unique Appearance
The purple pitahaya stands out with its striking purple skin and green-tipped scales, making it an attractive addition to any garden. Its stunning appearance often draws attention, making it a conversation starter.
2. Health Benefits
Rich in vitamins, antioxidants, and fiber, dragon fruit is a nutritious choice that supports overall health. It’s low in calories, making it an excellent option for those looking to maintain a healthy diet.
3. Easy to Grow
Pitahaya is relatively easy to cultivate, even for beginners. Once established, it requires minimal care, making it an ideal choice for those new to gardening.
Steps to Grow Purple Pitahaya from Cuttings
Step 1: Select Healthy Cuttings
The first step in your pitahaya journey is selecting the right cuttings.
A. Choosing the Right Plant
Look for a mature and healthy purple pitahaya plant from which to take cuttings. It’s best to source cuttings from a vigorous plant to ensure robust growth.
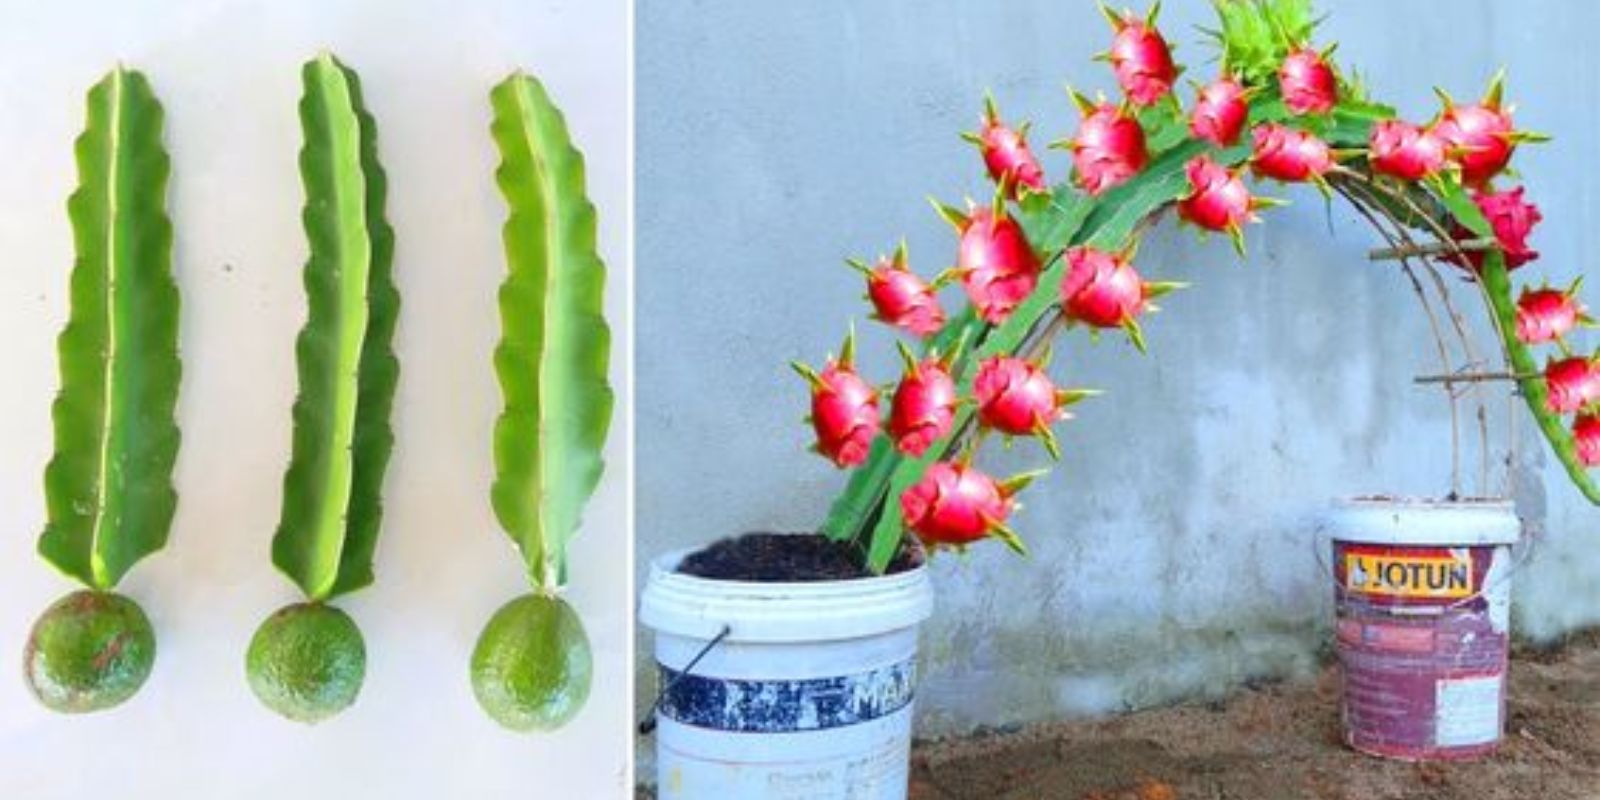
B. Taking Cuttings
Select stems that are about 12 inches long and have several segments. Avoid using any cuttings that show signs of disease or damage, as these can hinder your success.
Step 2: Let Cuttings Callus
Once you have your cuttings, it’s crucial to prepare them properly.
A. Drying the Cuttings
Place the cuttings in a dry, shaded area for about 1-3 days. This allows the cut ends to form a callous, which is essential for preventing rot once planted.
B. Check the Callous
Ensure that the cut ends have dried sufficiently and formed a callous. This step is vital to promote successful rooting.
Step 3: Prepare the Soil
Selecting the right soil is crucial for the healthy growth of your pitahaya.
A. Choosing the Soil Mix
Use a well-draining cactus or succulent potting mix. These mixes typically contain ingredients like perlite or sand, which enhance drainage and prevent root rot.
B. Pot Selection
Choose a pot with drainage holes to facilitate proper drainage. This is essential to prevent water accumulation at the bottom, which can harm the roots.
Step 4: Plant the Cuttings
Now it’s time to plant your prepared cuttings.
A. Planting Technique
Fill your pot with the prepared soil mix, leaving some space at the top. Plant the calloused end of the cutting into the soil, burying it about 2-3 inches deep.
B. Spacing Considerations
If planting multiple cuttings, ensure they are spaced apart to allow for airflow and prevent overcrowding.
Step 5: Water Sparingly
Proper watering is crucial for the success of your pitahaya cuttings.
A. Initial Watering
After planting, lightly water the soil to settle the cuttings. Be cautious not to overwater, as this can lead to rot.
B. Ongoing Watering Schedule
Keep the soil moist but not soggy. Water the cuttings only when the top inch of the soil feels dry to the touch. It’s better to underwater than overwater in this initial stage.
Step 6: Provide Sunlight
Light conditions play a significant role in the growth of your pitahaya.
A. Ideal Light Conditions
Place your pot in a bright location with indirect sunlight. Pitahaya thrives in warm environments and benefits from ample light while avoiding direct, harsh sunlight that could scorch the cuttings.
B. Indoor vs. Outdoor Placement
If growing indoors, a south-facing window is ideal. For outdoor planting, choose a location that receives partial shade during the hottest part of the day.
Step 7: Monitor Growth
As your cuttings begin to establish themselves, regular monitoring is essential.
A. Watch for New Growth
Over the coming weeks, keep an eye out for signs of new growth, such as fresh leaves or stems. This indicates that your cuttings are taking root and thriving.
B. Adjust Care as Needed
If you notice any signs of distress, such as yellowing leaves or wilting, adjust your care regimen accordingly, checking for issues like overwatering or insufficient light.
Step 8: Transplanting
Once your cuttings have developed strong roots and new growth, it may be time to transplant them.
A. When to Transplant
After a few months, when the roots are well-established and the plant has grown significantly, consider transplanting to a larger pot or directly into the ground.
B. Transplanting Process
Carefully remove the young plant from its pot, taking care not to damage the roots. Prepare the new pot or garden bed by loosening the soil and adding organic matter if necessary.
Step 9: Ongoing Care
After transplanting, continue providing care to ensure healthy growth.
A. Fertilization
Feed your pitahaya with a balanced fertilizer every few weeks during the growing season (spring and summer). This promotes healthy growth and flowering.
B. Watering and Monitoring
Continue to monitor moisture levels and adjust watering as needed. Ensure the plant receives adequate sunlight and protect it from extreme temperatures.
Tips for Success
1. Be Patient
Growing pitahaya from cuttings requires patience. It may take time for roots to develop and for the plant to show significant growth, so resist the urge to rush the process.
2. Experiment and Learn
Don’t hesitate to try different techniques or adjust your methods based on your observations. Each plant is unique, and experimentation can lead to valuable learning experiences.
3. Join a Community
Consider joining gardening forums or local gardening clubs to connect with fellow enthusiasts. Sharing experiences and tips can enhance your gardening journey and provide valuable insights.
4. Educate Yourself
Read books, watch tutorials, and explore resources on pitahaya cultivation. The more knowledge you gain, the better equipped you’ll be to care for your plants effectively.
5. Pest Management
Be vigilant about monitoring for pests. Common pests that can affect pitahaya include aphids and mealybugs. If detected, treat them promptly with organic insecticides or neem oil.
Common Challenges and Solutions
1. Poor Root Development
If your cuttings are not developing roots, ensure they are not overwatered and that the soil is well-draining. Check the light conditions and adjust as necessary.
2. Yellowing Leaves
Yellowing leaves can indicate overwatering or nutrient deficiencies. Assess your watering habits and consider applying a balanced fertilizer if necessary.
3. Pest Infestations
To combat pests, maintain good hygiene in your growing area and introduce beneficial insects when possible. Regularly inspect your plants for any signs of infestation.
Conclusion
Growing purple pitahaya from cuttings is a fulfilling and enjoyable process that can lead to beautiful plants and delicious fruits. By following the steps outlined in this guide, you can successfully propagate your own pitahaya and watch it thrive in your garden or home. Embrace the adventure of gardening, and soon you’ll be enjoying the vibrant colors and unique flavors of your very own dragon fruit! 🌵✨