
Growing pineapples at home is an exciting and rewarding venture, especially when you consider that you can start the process using the leafy crown of a store-bought pineapple! This method not only allows you to recycle kitchen scraps but also provides an opportunity to cultivate your own tropical fruit. In this article, we’ll explore the step-by-step process of growing pineapples from leaves in a pot, including tips for success and what to expect along the way.
Understanding Pineapples
Pineapples (Ananas comosus) are tropical plants native to South America, prized for their sweet, juicy fruit and striking appearance. While they thrive in warm, humid environments, they can also be grown in pots, making them suitable for home gardens, patios, or even indoors with adequate light. The good news is that you can propagate pineapples from the leafy tops, making the process accessible for gardeners of all skill levels.
Why Grow Pineapples?
- Unique Gardening Experience: Growing pineapples can be a fun and engaging project that offers a unique challenge compared to more common garden plants.
- Sustainable Gardening: Using kitchen scraps to grow new plants reduces waste and promotes sustainable gardening practices.
- Tropical Flair: Pineapple plants add a tropical aesthetic to your garden or home, making them a beautiful decorative element.
- Homegrown Flavor: There’s nothing quite like the taste of fresh, homegrown pineapple. The flavor is often superior to store-bought varieties.
Step-by-Step Guide to Growing Pineapples from Leaves
Step 1: Choose Your Pineapple
Select a healthy, ripe pineapple from your local grocery store or farmer’s market. Look for the following features:
- Healthy Green Leaves: Choose a pineapple with vibrant green leaves, as this indicates freshness.
- Ripe Fruit: The fruit should have a sweet aroma and slight give when pressed, indicating ripeness.
Step 2: Cut the Top
Once you’ve chosen your pineapple, follow these steps:
- Use a Sharp Knife: Make a clean cut about an inch below the crown, including a small portion of the fruit.
- Ensure Clean Cuts: This minimizes damage to the plant and helps prevent rot.
Step 3: Prepare the Cutting
Preparation is key to ensuring your pineapple top roots successfully:
- Remove Excess Flesh: Carefully cut away any remaining fruit from the base of the leaves. This helps prevent rot and disease.
- Let it Dry: Allow the cut end to dry for 24-48 hours in a cool, dry place. This allows the cut surface to callous over, reducing the risk of rot when planted.
Step 4: Planting the Pineapple Top
Now that your pineapple crown is prepared, it’s time to plant it:
- Select a Pot: Choose a pot that is at least 6-8 inches in diameter with good drainage holes.
- Use Well-Draining Soil: Fill the pot with a high-quality potting mix or a mixture of potting soil and sand to enhance drainage.
- Plant the Cutting: Make a hole in the soil with your finger or a pencil and place the pineapple top in, burying it about an inch deep.
- Firm the Soil: Gently press the soil around the base of the cutting to secure it.
Step 5: Watering and Care
Proper watering and care are crucial for the successful growth of your pineapple plant:
- Water Sparingly: Water the cutting lightly after planting, making sure not to soak the soil. Pineapples prefer to dry out between waterings.
- Create Humidity: Pineapples thrive in humid environments. If your home is dry, consider covering the pot with a plastic bag to create a greenhouse effect. Remove the bag periodically for air circulation.
- Place in Sunlight: Position your pot in a location that receives bright, indirect sunlight for the best results. Pineapples need at least 6 hours of sunlight each day.
Step 6: Monitoring Growth
Once planted, it’s time to be patient! Here’s what to look for:
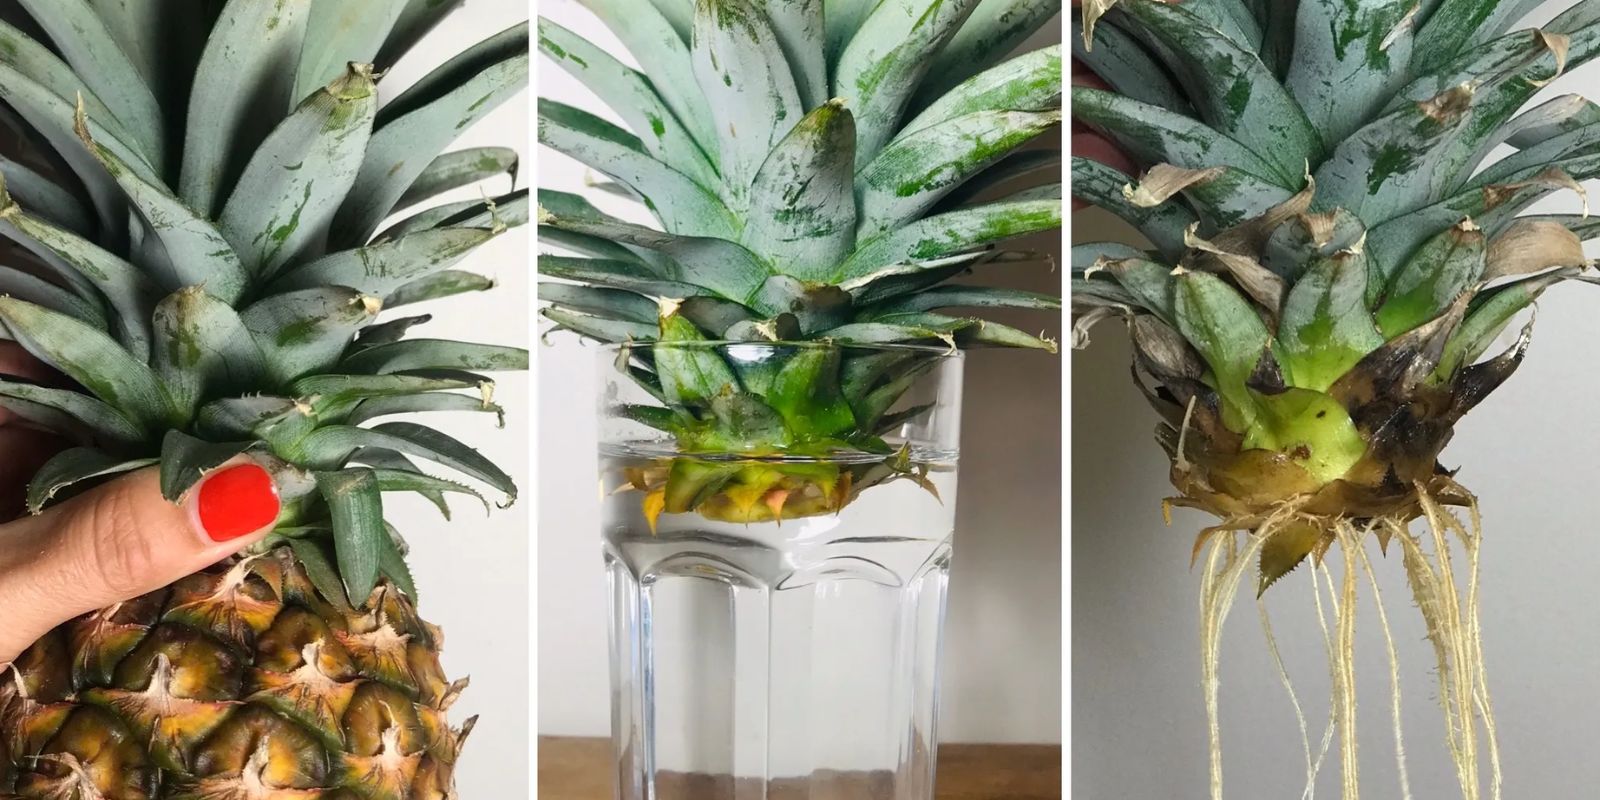
- Roots Development: In about 2-3 weeks, you should start to see roots developing. You can gently tug on the plant; if you feel resistance, that’s a sign that roots are forming.
- New Leaves: After a few weeks, you should notice new growth emerging from the center of the plant. This is a good indicator that your pineapple is establishing itself.
Step 7: Transplanting (Optional)
If your pineapple plant outgrows its pot or you want to move it to a larger space, follow these steps:
- Choose a Larger Pot: Opt for a pot that is at least 12-14 inches in diameter with drainage holes.
- Carefully Remove: Gently remove the pineapple from its current pot, taking care not to damage the roots.
- Plant in New Pot: Place the pineapple in the new pot, filling with fresh potting mix and ensuring it is secure.
Step 8: Fertilizing Your Pineapple
To encourage healthy growth, fertilize your pineapple plant:
- Choose the Right Fertilizer: Use a balanced, water-soluble fertilizer or a slow-release fertilizer designed for fruiting plants.
- Frequency: Fertilize every 4-6 weeks during the growing season (spring and summer). Reduce feeding in the fall and winter months.
Step 9: Pests and Diseases
While pineapples are relatively resilient, keep an eye out for common pests:
- Mealybugs: These pests can appear as white, cotton-like spots on the plant. Remove them with a cotton swab dipped in rubbing alcohol.
- Spider Mites: If you notice fine webbing, check for spider mites. Increase humidity and use insecticidal soap if necessary.
Step 10: Patience and Care
Growing pineapples is a long-term commitment:
- Time to Fruit: It can take 2-3 years for your pineapple plant to produce fruit. Be patient and enjoy the growth process!
- Continue Care: Maintain regular watering, fertilizing, and monitoring for pests. Your effort will be rewarded with a delicious pineapple.
Troubleshooting Common Issues
Slow Growth
If your pineapple plant isn’t growing as expected, consider these factors:
- Insufficient Light: Ensure it receives enough sunlight.
- Overwatering: Pineapples prefer dry conditions; adjust your watering schedule.
Yellowing Leaves
Yellowing can indicate:
- Overwatering: Check for root rot.
- Nutrient Deficiency: Consider fertilizing with a balanced fertilizer.
Wilting Leaves
Wilting can be a sign of:
- Underwatering: Ensure the plant is adequately hydrated.
- Excessive Heat: If the plant is in direct sunlight, consider providing some shade.
Conclusion
Growing pineapples from leaves in a pot is a fulfilling and engaging gardening project that offers numerous benefits, including fresh fruit and sustainable practices. By following the steps outlined in this guide, you can successfully cultivate your own pineapple plant and enjoy the delicious rewards of your efforts.
Embark on this tropical gardening adventure today and turn your kitchen scraps into a beautiful and productive plant! 🍍✨ #Pineapple #GardeningTips #PlantPropagation #HomeGarden #SustainableLiving #UrbanGardening