
Mint is a herb that’s both delightful and functional, often used in everything from drinks to desserts to savory dishes. Known for its vibrant aroma and cool taste, it’s no wonder that gardeners often seek to grow this herb at home. However, mint can sometimes be a bit tricky to grow, especially for beginners. But there’s a surprisingly simple and efficient way to grow mint using a plastic cup! This method is so easy that it might even exceed your expectations.
In this article, we’ll explore the step-by-step process of growing mint in a plastic cup, and why this method works wonders for gardeners, whether you’re a seasoned pro or just starting out. So, grab your plastic cup, and let’s get started!
Why Choose a Plastic Cup?
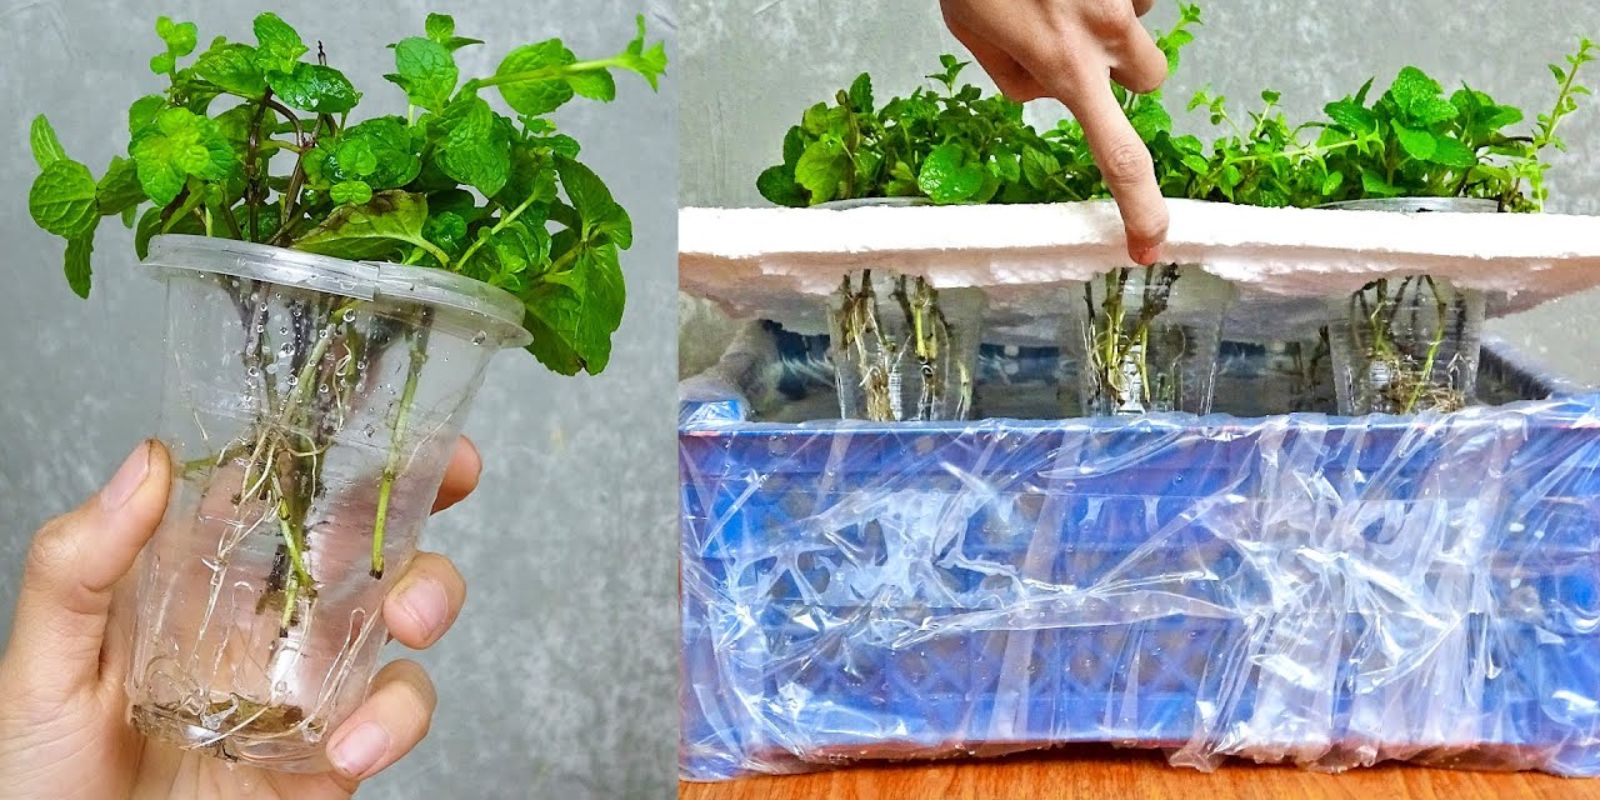
You might be wondering, why a plastic cup? After all, mint is usually grown in larger containers or in the garden. The reason plastic cups are a great option is that they are lightweight, easy to handle, and affordable. Plastic is also durable and can be reused. When growing mint in a cup, you’ll be able to monitor the plant closely, and it won’t take up much space—ideal for small homes, apartments, or balconies.
Another benefit of using a plastic cup is the ability to see the roots as they grow. Since plastic cups are often clear, you can monitor the plant’s progress, which helps you know when it’s time to transplant or when it needs extra care.
Materials You’ll Need
Before diving into the steps, let’s gather all the necessary materials to grow mint in a plastic cup:
- A plastic cup (clear is ideal for root visibility)
- Potting soil (make sure it’s good-quality, well-draining soil)
- Mint cutting (you can use a store-bought mint plant or harvest from a garden)
- Water (to keep the soil moist)
- A small watering can or spray bottle
- A sunny windowsill or a spot with indirect sunlight
- A small knife or scissors for cutting the mint stems
Step-by-Step Guide to Growing Mint in a Plastic Cup
1. Choose Your Plastic Cup
Start by selecting a clean plastic cup. If possible, pick a transparent one to help you keep an eye on the growth of the roots. Ensure that the cup has drainage holes at the bottom. This is crucial for preventing the soil from becoming waterlogged, which could lead to root rot. You can easily make small holes in the bottom of a plastic cup using a knife or a sharp object.
2. Fill the Cup with Potting Soil
Next, fill the plastic cup about two-thirds full with potting soil. Opt for a light, well-draining potting mix to allow the mint roots to spread out easily. Mint plants prefer soil that is rich in nutrients but doesn’t hold too much water. You can also add a handful of perlite or sand to the potting soil if it’s too heavy. Gently pack the soil down so that it’s firm but not compacted.
3. Prepare the Mint Cutting
Now, it’s time to prepare the mint cutting. You can either buy fresh mint from the store or use a cutting from an existing plant. To take a cutting, simply snip a healthy stem of mint that is at least 4-6 inches long. Make sure the stem is free of any signs of disease or damage.
Remove any lower leaves, leaving the top leaves intact. This will ensure that the plant directs its energy into growing roots instead of sustaining unnecessary leaves. If you want to propagate mint faster, you can dip the cut end of the stem into rooting hormone, but this step isn’t necessary for mint. Mint is a fast grower and often roots easily on its own.
4. Plant the Cutting in the Soil
Create a small hole in the center of the soil using your finger or a stick. Gently insert the cutting into the hole, making sure that the cut end of the stem is buried in the soil. The top leaves should remain above the soil. Press the soil gently around the cutting to hold it in place.
5. Water the Cutting
Once your cutting is planted, give it a good watering. You want the soil to be moist but not soggy, as mint doesn’t like to sit in waterlogged soil. You can use a small watering can or spray bottle for this. Keep the soil lightly moist, and avoid over-watering.
6. Provide the Right Environment
Mint needs plenty of light to grow, but it prefers indirect sunlight. Direct sunlight might scorch the leaves of young plants, so it’s best to place the plastic cup on a sunny windowsill where the plant can receive bright, indirect light for several hours a day. If you don’t have access to natural light, you can use a grow light as an alternative.
If you’re in a warm climate, make sure the mint is placed in a spot with temperatures ranging between 65°F and 75°F (18°C – 24°C), which is the ideal temperature for mint growth.
7. Monitor the Growth
Mint plants grow quickly, so you should start to see new growth within a couple of weeks. The cutting will begin to develop roots, and small new leaves will appear. At this stage, it’s important to keep an eye on the water level. If the soil starts to dry out, give it a little more water, but don’t let it become too soggy.
8. Transplanting and Harvesting
After a few weeks, your mint cutting should have developed a solid root system. At this point, it’s ready to be transplanted to a larger pot or into your garden if you prefer. However, if you like, you can keep it in the plastic cup as a small houseplant.
Mint grows quickly, and you can start harvesting leaves as soon as the plant is well-established. Snip the leaves just above a pair of leaves to encourage new growth. Regularly harvesting the leaves will help the plant grow more vigorously.
Benefits of Growing Mint in a Plastic Cup
- Space-saving: Mint can be invasive, but when grown in a confined space like a plastic cup, you can control its spread. This method works perfectly for small homes or apartments where garden space is limited.
- Easy to Maintain: Mint is relatively low-maintenance, and the plastic cup method allows for easy monitoring. You can see how much water the soil retains, and since it’s lightweight, you can move it around to find the best spot for growth.
- Cost-effective: Growing mint in a plastic cup is an inexpensive way to start your own herb garden. You won’t need expensive pots or soil – just use what you already have at home.
- Quick Growth: Mint is a fast-growing herb, and when you propagate it using this method, you’ll see results in no time. You’ll be able to enjoy fresh mint leaves for cooking, tea, and garnishes within a few weeks.
Tips for Success
- Avoid Overwatering: While mint likes moisture, it’s important not to drown the plant. Ensure there is good drainage, and let the soil dry out slightly between waterings.
- Prune Regularly: If the mint grows too long or starts to look leggy, prune it back to encourage bushier growth. Pruning also prevents the plant from becoming too invasive.
- Repot as Needed: If you notice that the roots are outgrowing the plastic cup, it’s time to repot your mint into a larger container or move it to the garden.
Conclusion
Growing mint in a plastic cup is a simple and effective method that can yield excellent results with minimal effort. Whether you’re growing it as a kitchen herb or just for the joy of having fresh mint, this easy propagation technique will allow you to enjoy the benefits of mint all year round. By following these easy steps, you can cultivate a healthy, thriving mint plant with just a few materials, and in no time, you’ll have your very own supply of fresh, fragrant leaves.
So, grab a plastic cup, take a cutting, and start growing your mint today. The results will not only exceed your expectations but also give you a sense of accomplishment as you watch your little plant flourish!
Happy gardening! 🌱
#MintInACup #HomeGardening #UrbanGardening #SustainableGardening #DIYHerbGarden #GardeningHacks #FreshMint #GrowYourOwnFood #PlasticCupGarden #HerbPropagation #EasyGardening #SmallSpaceGardening