
Guava is a tropical fruit that’s not only delicious but packed with vitamins and nutrients, making it a popular choice for home gardeners. Growing guava at home can be incredibly rewarding. Whether you have a spacious backyard or just a small balcony, you can grow this fruit tree in containers or directly in the ground, depending on your available space. This guide will take you through the essential steps to grow guava at home, ensuring you enjoy fresh, homegrown guavas in the future.
Introduction to Guava
Guava (Psidium guajava) is a tropical fruit native to Central America and the Caribbean, though it now grows in many parts of the world with warm climates. The fruit is known for its fragrant aroma and sweet, slightly tangy taste. Guava trees can thrive in both tropical and subtropical regions, but they also adapt well to container gardening, making them perfect for urban environments.
Growing your own guava at home can be an enjoyable and sustainable way to harvest this nutritious fruit. Not only will you benefit from having fresh guavas right at your fingertips, but you’ll also have the satisfaction of watching a tree grow from seed to fruit-bearing plant.
Step 1: Choose the Right Guava Variety
The first step in successfully growing guava at home is selecting the right variety. There are two main types of guava: the common guava (Psidium guajava) and the strawberry guava (Psidium cattleianum). Common guavas are larger, have a greenish-yellow skin when ripe, and are typically round or pear-shaped. Strawberry guavas are smaller, have a red skin, and tend to be a bit sweeter.
The type of guava you choose will depend on your taste preference, space, and climate. In regions where winters are mild or where you can grow plants in containers, both varieties can thrive. If you’re unsure which one to choose, visit a local nursery to learn more about which varieties are best suited to your climate.
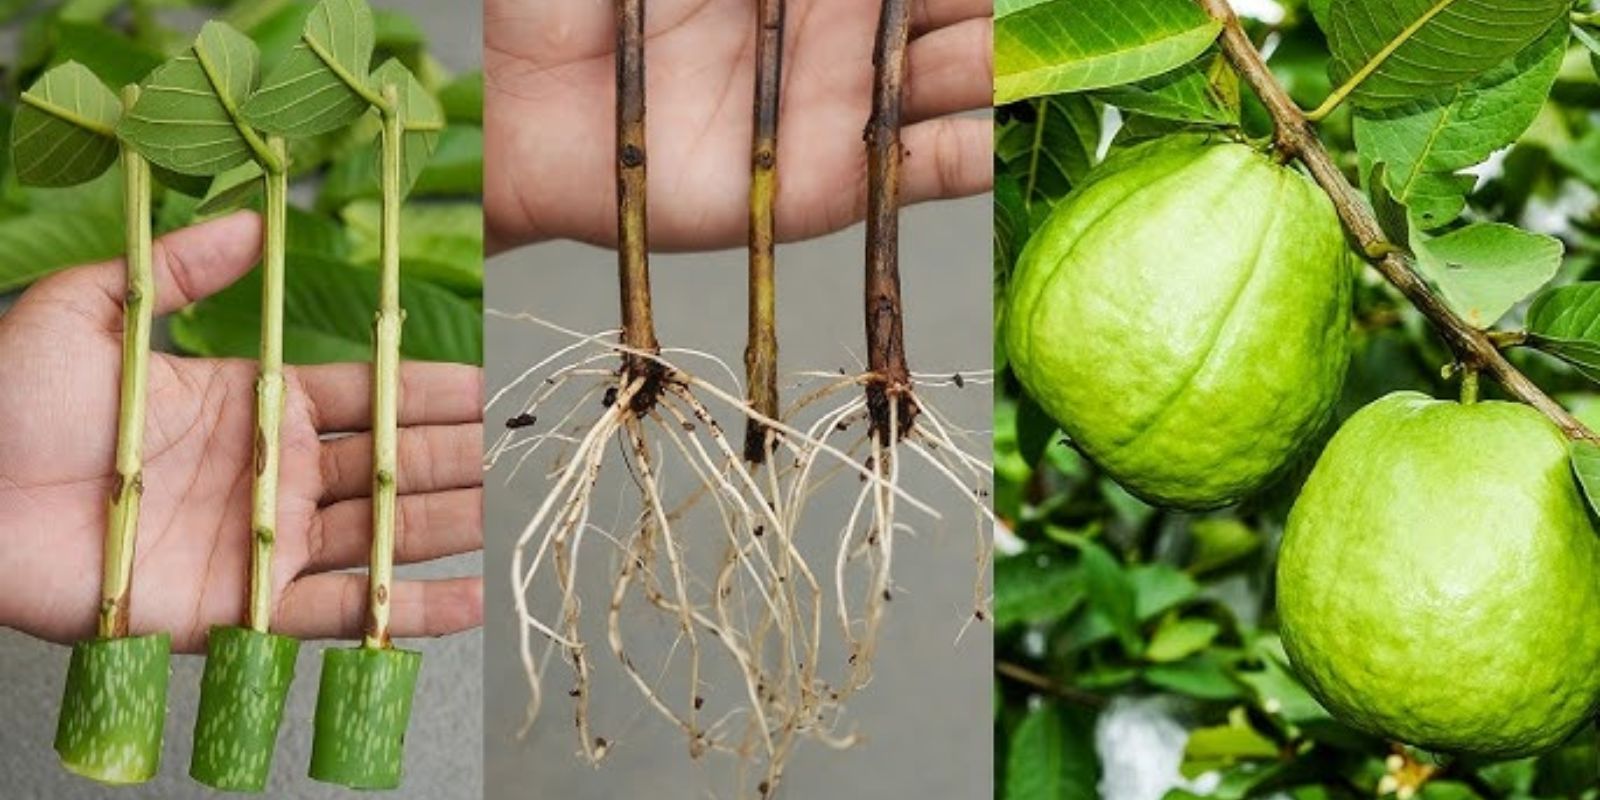
Step 2: Propagating Guava from Seeds
Guava can be propagated from seeds, cuttings, or even air layering. For beginners, starting with seeds is a straightforward and rewarding method.
- Collecting Seeds: If you’re using store-bought guavas, cut open a ripe fruit and scoop out the seeds. Wash the seeds thoroughly to remove any fruit pulp, which can inhibit germination.
- Soaking Seeds: Soak the guava seeds in water for 24 hours to help soften their hard outer coating. This increases the chances of successful germination.
- Planting Seeds: Once soaked, plant the seeds about 1 inch deep in a small pot filled with well-draining potting soil. A mixture of peat moss, perlite, and pine bark works well for guava. If you’re starting multiple seeds, make sure each one has its own pot or enough space to grow without crowding.
- Germination Conditions: Place the pots in a warm, sunny location. Guava seeds need temperatures between 75°F and 85°F to germinate, so keep the pots in an area with consistent warmth. Germination should occur within 2-4 weeks, but it can take longer depending on conditions.
Step 3: Caring for Young Guava Plants
Once your guava seeds have sprouted, it’s important to give them proper care to help them grow into strong, healthy plants.
- Watering: Water your guava plants regularly, ensuring the soil stays moist but not soggy. Over-watering can lead to root rot, so allow the top of the soil to dry slightly between waterings. A good rule of thumb is to water when the top inch of soil feels dry to the touch.
- Fertilizing: After the guava plants have grown their first set of leaves, start fertilizing with a balanced, organic fertilizer. Choose a fertilizer with an equal ratio of nitrogen (N), phosphorus (P), and potassium (K), like 10-10-10. Guavas are heavy feeders and will benefit from regular feeding to encourage healthy growth. You can fertilize every 4-6 weeks during the growing season (spring and summer).
- Light Requirements: Guava plants need plenty of sunlight to thrive. Place them in a location where they can receive at least 6-8 hours of direct sunlight each day. If you’re growing guavas indoors, consider using grow lights to supplement the sunlight.
- Pruning: As guava trees grow, it’s important to prune them to promote strong branching and keep the plant’s shape manageable. Trim any weak, spindly growth to encourage more robust development. This also helps improve airflow, reducing the risk of fungal infections.
Step 4: Transplanting Guava Plants
Once your guava plants have grown large enough (usually after 3-4 months), it’s time to transplant them into larger containers or directly into the ground.
- Choosing a Location: Guava trees prefer well-draining, slightly acidic soil. Choose a location that gets plenty of sunlight and is sheltered from strong winds. If you live in an area with cold winters, it’s best to grow guava in containers so you can bring it indoors during the colder months.
- Transplanting into Containers: If growing in containers, select a large pot with drainage holes that can accommodate the growing tree. Use a mix of organic potting soil and sand to ensure good drainage. Be sure the pot is large enough to give the guava tree ample room to grow for a couple of years.
- Planting in the Ground: If planting directly in the ground, dig a hole twice as wide as the root ball of the guava plant. Gently place the plant in the hole and cover the roots with soil. Water the plant well after transplanting and mulch around the base to help retain moisture.
Step 5: Maintaining Guava Trees
As your guava tree matures, you’ll need to continue providing it with care to ensure healthy growth and fruit production.
- Watering: Mature guava trees still need regular watering, but they are more drought-tolerant than young plants. Water deeply but allow the soil to dry out between waterings. During the growing season, water the tree once a week.
- Fertilizing: Continue fertilizing the tree with a balanced fertilizer every 2-3 months, especially during the growing season. If you notice yellowing leaves, the tree may be lacking nutrients and could benefit from an application of fertilizer.
- Pruning: Prune the tree regularly to remove dead or damaged branches and encourage the development of a strong, productive canopy. Pruning also helps manage the size of the tree, especially if you’re growing guavas in a container.
Step 6: Flowering and Fruit Production
Guava trees typically begin flowering within 3-4 years of planting, but the timing can vary based on the variety and growing conditions. Guava flowers are small and white, with a pleasant fragrance. After pollination, which can be done by insects or wind, the flowers will develop into fruits.
- Pollination: While guava trees can self-pollinate, you may improve fruit production by encouraging pollinators, such as bees, to visit your garden. Planting flowering plants nearby can help attract these pollinators.
- Fruiting: Guava trees take 3-4 months to produce mature fruit after flowering. The fruit will begin to turn color, depending on the variety—green to yellow or red—and will soften when it’s ripe. Harvest the fruit when it yields slightly to gentle pressure and has a pleasant aroma.
Step 7: Harvesting Guava
Once your guava fruit is ripe, it’s time to harvest. Gently twist or cut the fruit from the stem to avoid damaging the plant. Guavas can be eaten fresh, used in cooking, or preserved through canning and jellies.
Conclusion
Growing guava at home is a fulfilling and enjoyable gardening project that yields delicious, nutritious fruit. With the right care and attention, you can successfully grow a guava tree from seed and enjoy fresh guavas in just a few years. Whether you’re growing guava in containers or directly in the ground, following these steps will ensure that your tree remains healthy and productive for years to come.
By choosing the right variety, starting from seeds, providing proper care, and ensuring adequate space for growth, you’ll be on your way to enjoying the benefits of your very own guava tree. So, get started today, and before you know it, you’ll have your very own tropical fruit right at home!
Happy gardening! 🌱🍊 #GrowGuava #HomeGardening #TropicalFruits #GuavaTree #OrganicGardening #UrbanGardening #GardeningTips #PlantParenthood #FruitGarden