
Growing garlic is a rewarding endeavor that can be simplified with the right techniques. One innovative method is to use plastic bottles filled with water to cultivate garlic. This method is not only environmentally friendly but also ensures that you get fresh garlic bulbs and vibrant green leaves right from the comfort of your home. In this comprehensive guide, we’ll walk you through the steps to successfully grow garlic in plastic bottles, from preparation to harvesting.
Introduction
Garlic (Allium sativum) is a staple in many kitchens, prized for its flavor and health benefits. While traditional garlic growing methods involve planting cloves in soil, using plastic bottles with water offers a modern twist on this classic practice. This method is particularly useful for those with limited space or those who want to grow garlic indoors. It’s an excellent way to enjoy the benefits of garlic and lush green leaves without needing a garden.
Step 1: Choose the Right Garlic
The first step in growing garlic in plastic bottles is to select high-quality garlic bulbs. Opt for organic garlic, which is less likely to be treated with chemicals that can inhibit sprouting. Look for garlic bulbs that are firm and plump, with no signs of mold or damage. Each bulb should have several cloves, which will be planted individually.
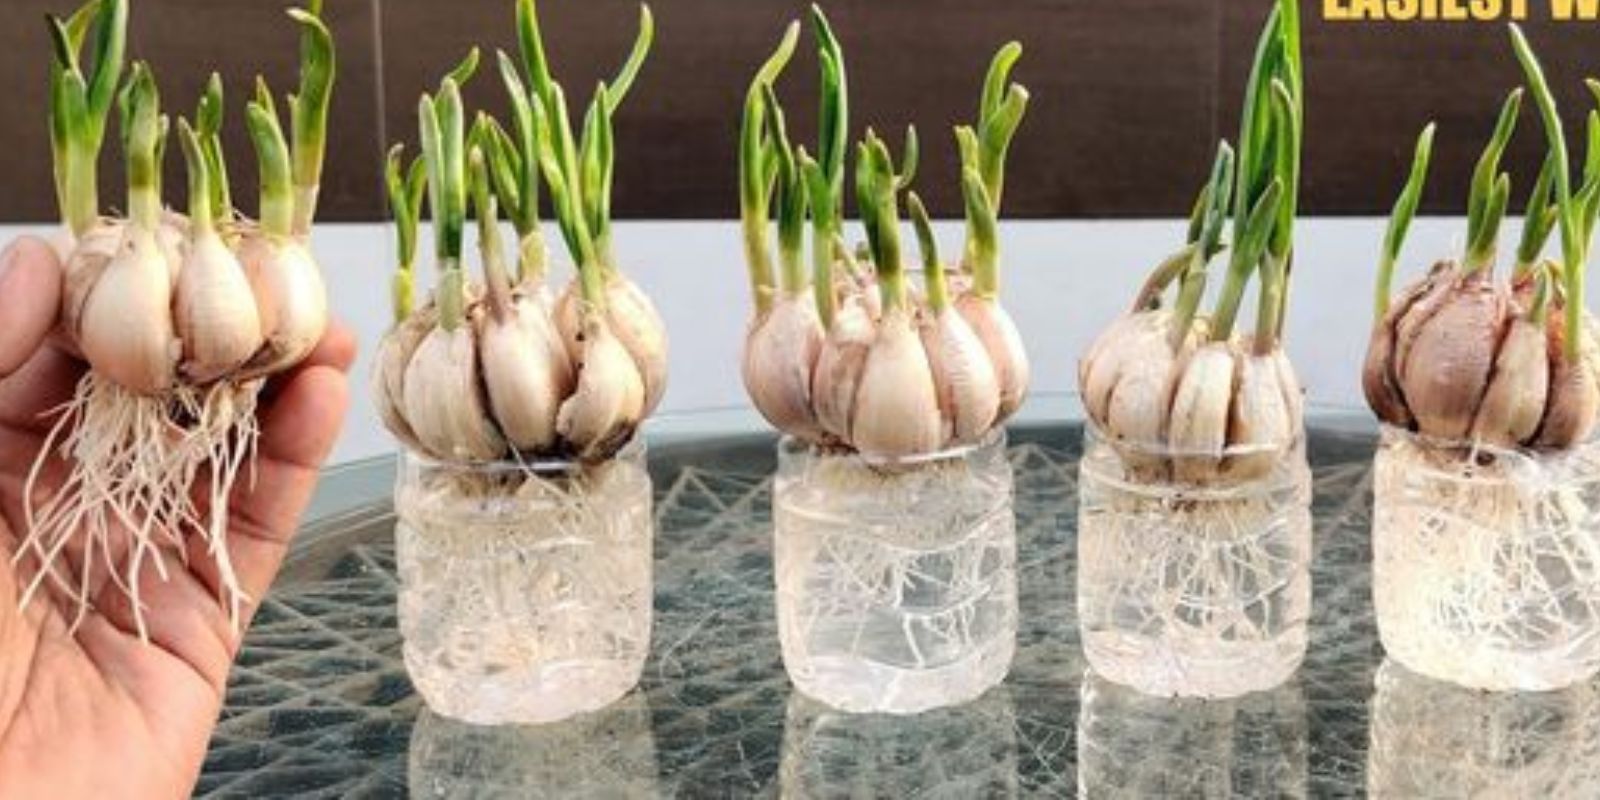
Step 2: Prepare the Bottles
Next, prepare your plastic bottles for planting. You’ll need clean, empty plastic bottles with a capacity of at least one liter. To create your planting containers, follow these steps:
- Clean the Bottles: Rinse the bottles thoroughly to remove any residual liquid or labels.
- Cut the Bottles: Use a utility knife or scissors to cut the bottles. You can cut them in half or just below the neck, depending on your preference. The goal is to create a container that can hold water and support the garlic cloves.
- Make Drainage Holes: Puncture a few small holes in the bottom of the bottle to allow excess water to drain. This helps prevent waterlogging, which can cause rot.
Step 3: Plant the Cloves
With your bottles prepared, it’s time to plant the garlic cloves:
- Separate the Cloves: Gently separate the cloves from the garlic bulb. Choose large, healthy cloves for the best results.
- Insert the Cloves: Place each garlic clove in the bottle with the pointed end facing up. The clove should be partially submerged in water, with just the tip above the surface.
- Add Water: Fill the bottle with water until it covers the bottom part of the garlic clove. Ensure that the water level is consistent but does not completely submerge the clove.
Step 4: Position the Bottles
Garlic needs light to grow, so positioning the bottles correctly is crucial:
- Find a Sunny Spot: Place the bottles in a sunny location, such as a south-facing windowsill. Garlic thrives in bright, indirect light.
- Maintain Temperature: Garlic prefers a cool environment, ideally between 60°F and 70°F (15°C to 21°C). Avoid placing the bottles in direct sunlight or near heat sources, as extreme temperatures can affect growth.
Step 5: Change the Water Regularly
Water management is key to successful garlic cultivation in bottles:
- Monitor Water Levels: Keep an eye on the water level in the bottles and top it up as needed to ensure the cloves remain partially submerged.
- Change the Water: Replace the water every few days to prevent stagnation and reduce the risk of mold or algae growth. Fresh water encourages healthy root development.
Step 6: Watch for Growth
With proper care, you’ll soon notice signs of growth:
- Sprouting: Garlic cloves will begin to sprout green shoots within a couple of weeks. These shoots are the beginning of the garlic plant’s growth.
- Root Development: As the garlic grows, roots will form at the base of the clove. The roots will anchor the plant and help it absorb nutrients from the water.
- Bulb Formation: Over time, the cloves will develop bulbs. The growth of the bulbs may take several months, depending on the conditions.
Step 7: Harvesting
Once the garlic has matured, it’s time to harvest:
- Check the Bulbs: Garlic bulbs are ready to harvest when the shoots turn yellow and start to wither. This typically happens a few months after planting.
- Remove the Garlic: Gently remove the garlic bulbs from the bottle. Be careful not to damage the bulbs or roots.
- Dry the Bulbs: Allow the harvested garlic to dry in a cool, dry place for a few weeks. Proper drying helps to enhance the flavor and shelf life of the garlic.
Additional Tips
- Fertilization: While garlic grown in bottles primarily relies on water for nutrients, you can add a diluted liquid fertilizer every few weeks to boost growth.
- Pest Management: Watch out for pests such as aphids or mold. If you notice any issues, address them promptly to prevent damage to your garlic.
- Reuse the Bottles: After harvesting, clean and reuse the plastic bottles for future garlic crops or other hydroponic plants.
Conclusion
Growing garlic in plastic bottles with water is a practical and efficient method that offers a host of benefits. Not only does it allow you to grow garlic indoors or in limited spaces, but it also provides an easy way to enjoy fresh garlic bulbs and vibrant green leaves. By following these simple steps, you can cultivate garlic successfully and enhance your culinary experience with homegrown produce.
Motivation: Discover the joy of homegrown garlic with this easy-to-follow method. Transform your kitchen into a fresh garlic haven and enjoy the process of growing your own aromatic bulbs and lush green leaves. 🌱🧄