
Clivias (Clivia miniata) are stunning, evergreen perennials, admired for their elegant, trumpet-shaped flowers and striking green foliage. Native to South Africa, they are known for their vibrant blooms in shades of orange, red, and yellow, making them a favorite for gardeners looking to add a touch of beauty to their indoor or outdoor spaces. While clivias can be purchased as mature plants, growing them from seed is a rewarding process that allows gardeners to experience the full life cycle of this remarkable plant.
In this comprehensive guide, we’ll walk you through everything you need to know about growing clivias from seed, from harvesting the seeds to caring for seedlings, and eventually enjoying the beautiful blooms. Patience is key when growing clivias from seed, but with the right approach, the results are more than worth it.
Why Grow Clivias from Seed?
Growing clivias from seed provides several benefits:
- Cost-effective: Seeds are typically less expensive than buying mature plants.
- Variety: Growing from seed allows you to cultivate different clivia varieties and potentially create new hybrids.
- Satisfaction: Watching a plant grow from seed to a blooming beauty is a deeply rewarding experience for any gardener.
- Longevity: Clivias can live for many years, and the plants you grow from seed may eventually be passed down through generations.
While clivias take a few years to mature and bloom, the process of growing them from seed is relatively simple. Let’s get started!
Step-by-Step Guide to Growing Clivias from Seed
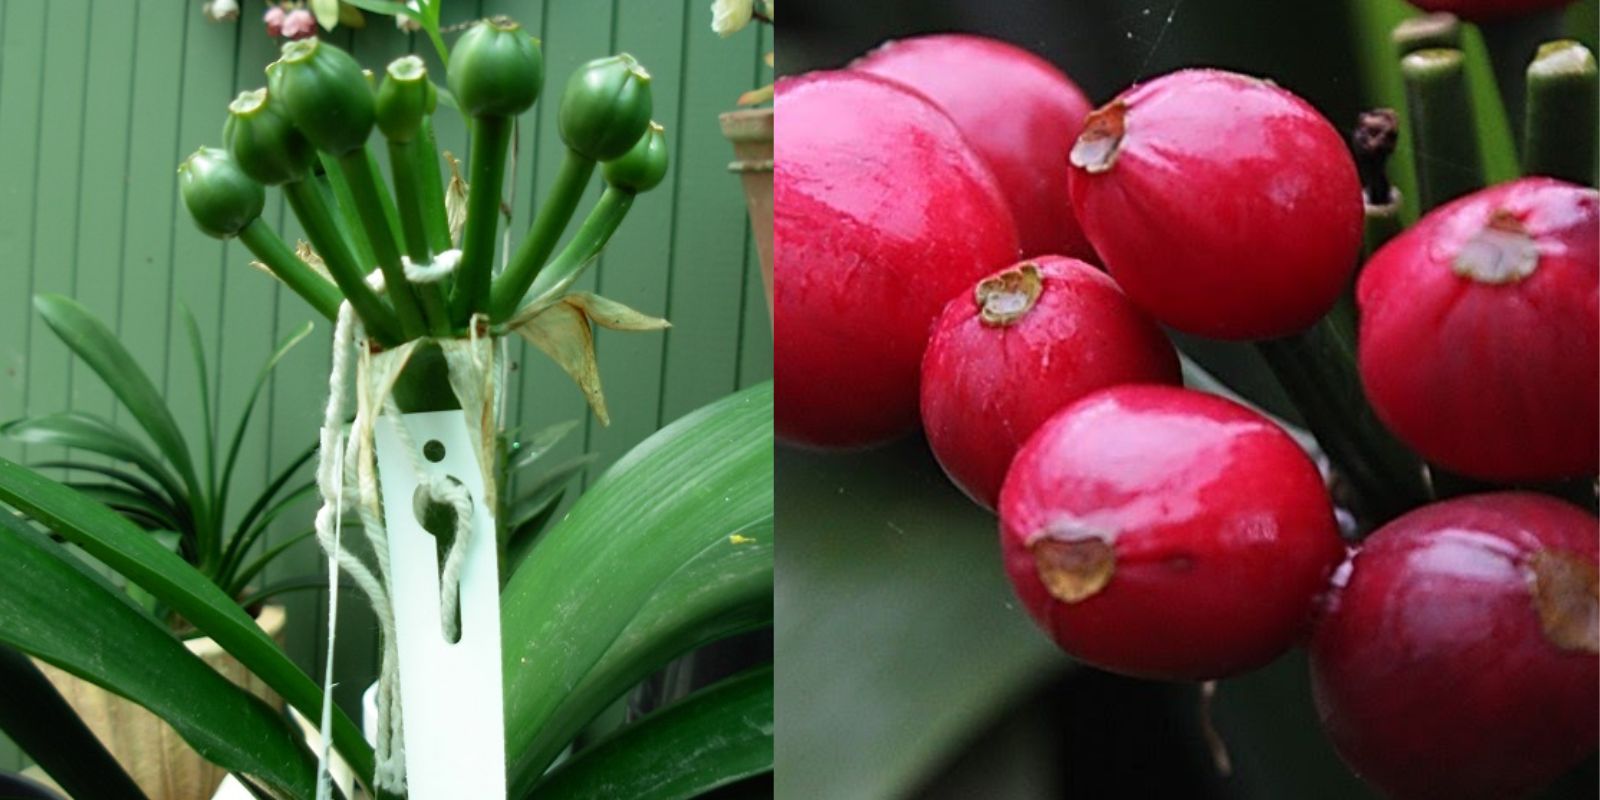
1. Harvesting Seeds
Clivia seeds are produced after the flowers have been pollinated. Once the flowers fade, green seed pods will develop. It can take 6 to 9 months for these pods to mature and turn red or orange, signaling that the seeds inside are ready for harvest.
- When to Harvest: Wait until the seed pods are soft, plump, and start to wrinkle. This indicates that the seeds inside are mature and ready to be planted.
- How to Harvest: Carefully cut the seed pod from the plant using clean, sharp scissors or pruners. Gently open the pod and extract the seeds, which are usually round and about the size of a small marble. Each pod can contain several seeds.
2. Preparing the Seeds for Planting
Before planting clivia seeds, it’s a good idea to prepare them by removing the fleshy outer coating. This coating can inhibit germination, so removing it ensures better chances of success.
- Soak the Seeds: Place the seeds in warm water for 24 hours to soften the outer coating. After soaking, gently rub the seeds with your fingers to remove the outer layer.
- Inspect the Seeds: Check each seed for any signs of damage or mold. Only plant healthy, firm seeds, as damaged seeds may not germinate.
3. Prepare the Growing Medium
Clivias prefer well-draining soil with good aeration to prevent root rot. You can create a simple mix for your clivia seeds by combining equal parts of the following:
- Peat moss or coco coir: Provides moisture retention while remaining light and airy.
- Perlite or sand: Ensures good drainage and prevents the soil from becoming compacted.
Fill a seed tray or small pots with this mixture. If using a seed tray, make sure it has drainage holes to prevent waterlogging.
4. Planting the Seeds
Once your seeds are prepared and your soil mix is ready, it’s time to plant the seeds.
- Sowing Depth: Place the seeds on top of the soil mix and gently press them down so they’re partially embedded. Cover them with a thin layer of soil, just enough to lightly cover the seeds.
- Spacing: If planting multiple seeds in a tray, space them about 1 inch apart to allow room for root development.
- Watering: Lightly water the soil until it’s evenly moist but not soggy. Keep the soil moist throughout the germination period, as clivias do not tolerate drying out at this stage.
5. Creating the Right Environment for Germination
Clivia seeds need a warm, humid environment to germinate. You can create these conditions by:
- Covering the Tray: Cover the seed tray with plastic wrap or place it in a plastic bag to retain humidity.
- Warm Temperature: Keep the seed tray in a warm location, ideally between 68-75°F (20-24°C). Avoid direct sunlight, as this can cause the soil to dry out too quickly.
- Monitor Moisture: Check the soil regularly to ensure it remains moist. If condensation builds up on the plastic cover, remove it briefly to allow air circulation, then replace it.
Germination can take 4-8 weeks, depending on the temperature and humidity. Be patient, and soon you’ll notice small seedlings emerging from the soil!
6. Caring for Clivia Seedlings
Once your clivia seeds have germinated and small seedlings start to grow, it’s time to remove the plastic covering and give them the care they need to thrive.
- Light: Move the seedlings to a bright, indirect light location, such as near a window. Avoid direct sunlight, which can scorch the young plants.
- Watering: Keep the soil evenly moist but not waterlogged. As the seedlings grow, you can reduce the frequency of watering slightly, but never allow the soil to dry out completely.
- Fertilization: After the seedlings have developed their first true leaves, you can begin to feed them with a diluted liquid fertilizer once every 4-6 weeks. Use a balanced fertilizer (such as 10-10-10) to promote healthy growth.
7. Transplanting Seedlings into Individual Pots
Once the seedlings have developed a few sets of leaves and their roots have filled the seed tray, it’s time to transplant them into individual pots. Choose pots that are about 4-6 inches in diameter, with good drainage.
- Soil Mix: Use the same well-draining soil mix (peat moss/coco coir and perlite) for the new pots.
- Transplanting: Gently remove the seedlings from the tray, being careful not to damage the roots. Place each seedling into its own pot, covering the roots with soil and watering lightly.
- Continued Care: Keep the newly potted clivias in bright, indirect light and water them regularly. As the plants mature, they will need less frequent watering but will still require consistent moisture.
8. Long-Term Care for Mature Clivias
Clivias are slow-growing plants, and it can take 3-5 years for them to reach maturity and begin flowering. However, with proper care, they can become beautiful, long-lasting additions to your garden or indoor space.
- Light Requirements: Mature clivias prefer bright, indirect light. They can tolerate some direct sunlight, especially in the early morning or late afternoon, but too much sun can scorch their leaves.
- Watering: Water clivias moderately, allowing the top inch of soil to dry out between waterings. Overwatering can lead to root rot, so always ensure good drainage.
- Fertilization: During the growing season (spring and summer), feed clivias with a balanced fertilizer every 6-8 weeks. Reduce fertilization during the winter months when the plant goes into a dormant period.
- Repotting: Clivias do not need frequent repotting and often bloom better when slightly root-bound. Repot your plant every 3-4 years, using a pot that’s just slightly larger than the current one.
9. Encouraging Clivia Blooms
Clivias are known for their striking, colorful blooms, but they can be slow to flower. To encourage blooming:
- Cool Dormancy: In the winter months, move your clivia to a cooler location (around 50-60°F or 10-15°C) and reduce watering. This rest period helps trigger blooming in the spring.
- Light: Ensure the plant gets bright, indirect light throughout the year.
Conclusion
Growing clivias from seed is a rewarding project for gardeners who are patient and enjoy nurturing plants from their earliest stages. While it may take a few years for clivias to bloom, the vibrant flowers and lush green foliage make the wait worthwhile. By following these steps, you can successfully grow clivias from seed and enjoy the beauty of this remarkable plant in your garden or home.
Motivation to Grow Clivias:
Transform your garden with the vibrant beauty of clivias—start growing them from seed today! 🌸 #CliviaMagic #SeedToBloom #GardeningJourney #GrowFromSeed #GardenersLife #PlantLovers #GreenThumb