
Growing your own vegetables at home is a rewarding and sustainable activity, especially when space is limited. One vegetable that can be surprisingly easy to grow in small spaces is the carrot. Typically thought of as a root vegetable that requires a lot of depth to thrive, carrots can actually be successfully cultivated in containers — even plastic bags. This article will guide you through the entire process of growing carrots in plastic bags, from selecting the right materials to harvesting your crop.
The Benefits of Growing Carrots in Plastic Bags
Before diving into the detailed steps, it’s important to understand why using plastic bags for growing carrots can be such a great method:
- Space-saving: Plastic bags don’t take up much room and can be placed anywhere — on a patio, balcony, windowsill, or even a small backyard. If you have limited space for traditional in-ground gardening, plastic bags are an excellent alternative.
- Ease of movement: Unlike traditional raised beds or containers, plastic bags can be easily moved around. This flexibility allows you to adjust the location of your carrot plants based on sunlight and temperature requirements.
- Cost-effective: Plastic bags are a cheap and recyclable material, so growing carrots in them won’t break the bank. You likely already have some lying around at home, making this a low-cost gardening method.
- No need for digging: Growing carrots in plastic bags eliminates the need to dig deep garden beds, making it easier for those with physical limitations to grow their own food.
- Improved root growth: Carrots need deep soil for their roots to grow properly, and plastic bags are deep enough to allow for good root development. The loose and well-drained soil in the bags promotes healthy root systems.
Materials You’ll Need
Before you start planting, make sure you have the following materials:
- Carrot seeds: Choose a variety that is suited for container or small space gardening. Varieties like ‘Nantes,’ ‘Danvers,’ or ‘Chantenay’ are particularly good for container gardening because they grow in a smaller, more compact form.
- Large plastic bags: Opt for bags that are at least 12-18 inches deep to accommodate the carrot roots. You can use old compost bags, grocery bags, or any other type of strong, durable plastic bag.
- Potting mix or garden soil: The soil needs to be light, loose, and well-drained. Avoid using heavy garden soil, as it may become compacted and hinder root growth. Instead, choose a good-quality potting mix or make your own by mixing compost, sand, and perlite.
- Watering can or spray bottle: To keep the soil moist but not soaking, a gentle watering tool like a can or bottle is essential.
- Sunny location: Carrots need 6-8 hours of sunlight daily to grow strong and healthy. Ensure the spot where you place your plastic bags receives enough sunlight.
Step-by-Step Guide to Growing Carrots in Plastic Bags
Step 1: Prepare the Bags
The first thing you need to do is prepare the plastic bags. Select large bags that are at least 12 to 18 inches deep to allow space for the carrot roots to develop properly. Poke several small holes at the bottom of the bags to ensure adequate drainage. This is crucial because carrots do not like waterlogged soil. Good drainage prevents root rot and ensures healthy plant growth.
Step 2: Fill the Bags with Soil
Once your bags are ready, it’s time to fill them with soil. Choose a loose, well-drained potting mix or garden soil. Fill the bags about 3/4 full, leaving some space at the top for watering. The soil should be light and fluffy, not compacted, as carrots need room to grow and expand their roots. If the soil is too dense, the carrots will have a hard time pushing through, and the growth will be stunted.
Step 3: Plant the Seeds
Carrot seeds are tiny, so they can be difficult to plant. Scatter the seeds evenly over the surface of the soil, making sure to space them at least 1-2 inches apart. Cover the seeds lightly with a thin layer of soil (about 1/4 inch deep) and gently water the soil to keep it moist. Keep in mind that carrots are slow to germinate, so don’t be discouraged if you don’t see growth immediately. Typically, carrot seeds take 10-14 days to sprout, depending on the temperature and soil conditions.
Step 4: Provide the Right Growing Conditions
Carrots need at least 6-8 hours of sunlight each day to grow properly. Choose a location that receives plenty of sunlight, such as a balcony, patio, or windowsill. If you’re growing carrots indoors, ensure that the location gets enough natural light or consider using a grow light.
In addition to sunlight, carrots need consistent moisture to thrive. Water the bags gently with a watering can or spray bottle to avoid disturbing the seeds. Keep the soil moist, but not soaking wet, as overwatering can lead to root rot. It’s essential to maintain a balanced moisture level.
Step 5: Thin the Seedlings
Once your carrot seedlings have grown to about 2 inches tall, it’s time to thin them out. This is an important step, as overcrowding can prevent the carrots from growing properly. Thin the seedlings by removing the smaller or weaker ones, leaving about 2-3 inches of space between each plant. Thinning helps the remaining plants grow larger and healthier, with enough space for their roots to develop.
Step 6: Care for the Growing Carrots
As your carrots continue to grow, monitor the soil and water regularly. Carrots don’t like to be waterlogged, so be sure to water them consistently but without overdoing it. Check for any signs of pests or diseases and address them promptly. If the soil in your bags starts to sink, you can top it up with more potting mix to cover the exposed roots.
Step 7: Harvest the Carrots
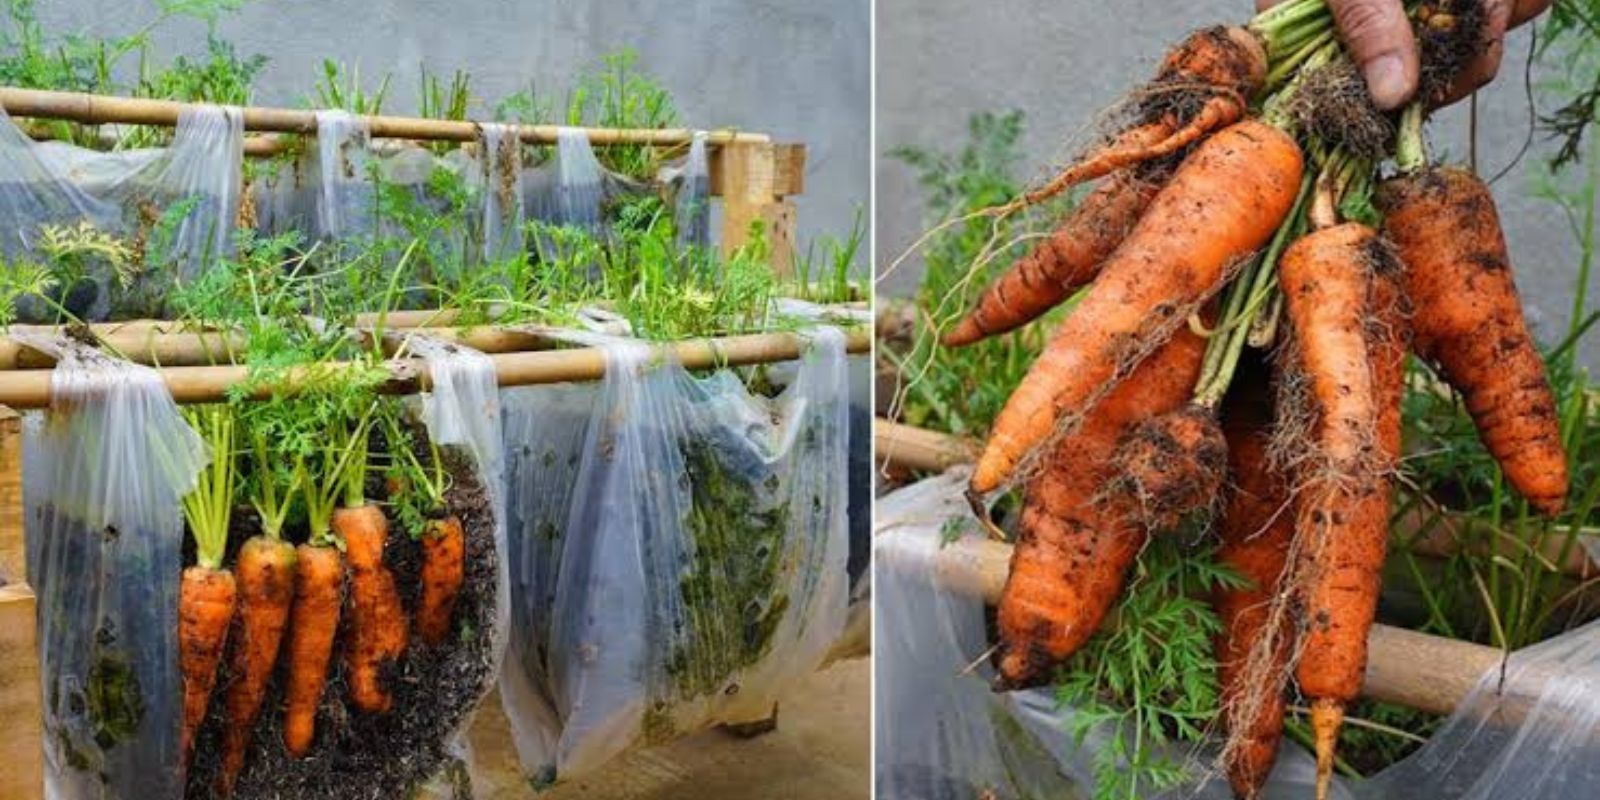
Carrots are typically ready for harvest 60-80 days after planting, depending on the variety and growing conditions. To check if your carrots are ready, gently pull up a carrot from the bag to see if it has reached the desired size. If the carrot is still small, leave the rest of the crop for a few more days.
When harvesting, carefully pull the carrots out of the soil by the tops, being gentle so you don’t damage the roots. After harvesting, you can wash and store the carrots, or enjoy them immediately.
Tips for Success
- Choose the right carrot varieties: Some carrot varieties are more suitable for container gardening than others. Varieties like ‘Nantes,’ ‘Danvers,’ and ‘Chantenay’ tend to be more compact and better suited to growing in bags or containers.
- Don’t overwater: Excess water can lead to root rot. Make sure the soil is moist but not waterlogged. Use a spray bottle or a watering can with a gentle nozzle to water the plants.
- Rotate the bags: If you are growing your carrots in a location with uneven sunlight, be sure to rotate the bags occasionally. This ensures that all the plants get equal exposure to the sun.
- Watch for pests: Although carrots are generally hardy, they can still be susceptible to pests like aphids, root maggots, and carrot flies. Keep an eye on the plants and treat any infestations promptly with organic pest control methods.
Conclusion
Growing carrots in plastic bags is an easy, space-efficient, and fun way to cultivate these delicious root vegetables at home. With the right materials, some basic care, and a little patience, you can enjoy fresh, home-grown carrots in just a few months. Whether you’re limited by space or just looking for a low-maintenance gardening project, this method is perfect for urban gardeners or anyone looking to grow their own vegetables with minimal effort.
So, grab your plastic bags, sow some carrot seeds, and enjoy the process of growing your own fresh, organic carrots — right from your home!