
Cardamom is one of the world’s most prized and aromatic spices, known for its sweet, citrusy, and spicy flavor. It is used widely in cooking, baking, and even in herbal medicine, making it a highly sought-after plant in kitchens and gardens alike. While cardamom is native to the tropical climates of Southeast Asia, it is entirely possible to grow cardamom from seed in your own garden or even indoors. Whether you want to grow it for culinary purposes or to add a unique tropical flair to your home, this article will guide you through every step of the process.
Introduction: The Magic of Cardamom
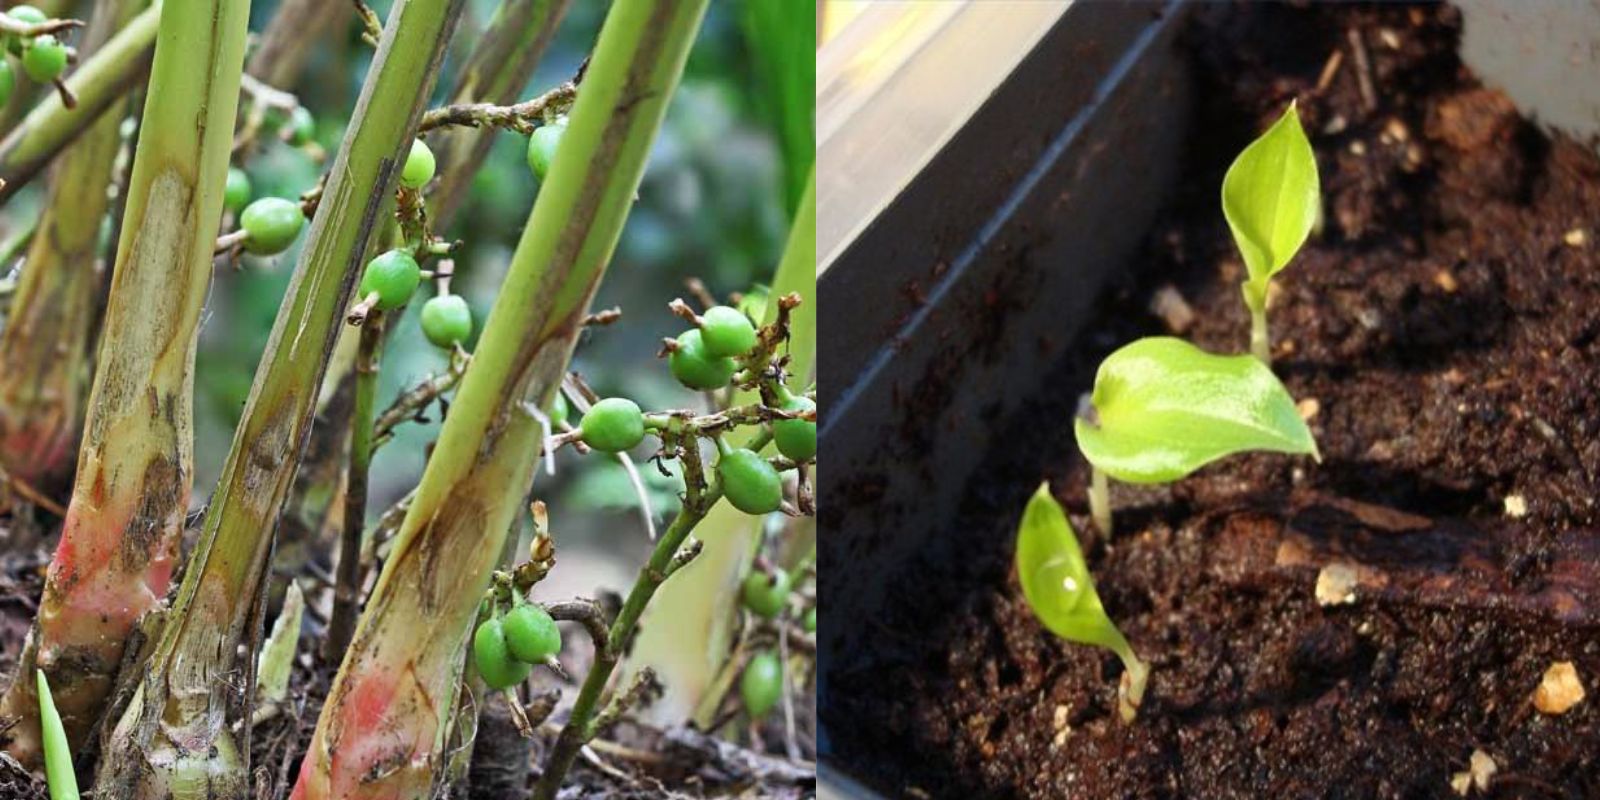
Cardamom, scientifically known as Elettaria cardamomum, is a member of the ginger family. It thrives in warm, humid environments and can grow up to 6 feet tall when fully mature. The plant produces aromatic green pods containing tiny black seeds, which are harvested and dried for use in a variety of dishes, teas, and even perfumes. In addition to its culinary uses, cardamom has medicinal properties and is believed to aid in digestion and improve oral health.
Growing cardamom from seed can seem daunting, especially since it is typically cultivated in tropical regions, but with patience and the right care, you can successfully cultivate this spice plant right in your own home or garden.
Step-by-Step Guide to Growing Cardamom from Seed
Growing cardamom from seed requires patience and attention to detail, but the reward is a beautiful, fragrant plant that will add a unique touch to your indoor or outdoor garden. Let’s dive into the essential steps involved in growing cardamom from seed.
1. Start with Fresh, High-Quality Seeds
The first step in successfully growing cardamom from seed is obtaining fresh, high-quality seeds. Cardamom seeds lose their ability to germinate quickly after harvesting, so it’s important to source fresh seeds from a reputable supplier. You can purchase cardamom seeds from gardening centers, online stores, or specialty spice retailers.
If you have a fresh cardamom pod, you can extract the seeds and plant them, but keep in mind that the seeds will lose their viability much quicker than fresh seeds purchased for planting. Make sure to use fresh seeds within a month or two of obtaining them for the best chance of success.
2. Soak the Seeds for Germination
Cardamom seeds have a hard outer shell that can make germination a slow process. To enhance the likelihood of germination, you should soak the seeds in warm water for 24 to 48 hours before planting. Soaking softens the seed coat and helps the seeds break dormancy, making it easier for the embryo inside to sprout.
After soaking the seeds, drain the water, and proceed to the next step.
3. Prepare the Soil
Cardamom prefers well-draining, fertile soil rich in organic matter. The best soil for cardamom is a mixture that retains moisture but also allows for adequate drainage. If you’re planting in a pot or container, a good mix would be one-third potting soil, one-third compost, and one-third perlite or sand to ensure good drainage.
For outdoor planting, choose a location with rich, loamy soil that drains well. If the soil in your garden isn’t naturally fertile, you can amend it by adding organic compost or well-rotted manure to improve its texture and fertility.
4. Plant the Seeds
Once the seeds are soaked and the soil is ready, it’s time to plant. Fill a small seed tray or container with the prepared soil mix. For each seed, create a small hole about 1 inch deep. Place a soaked seed into each hole and cover it lightly with soil. You can plant multiple seeds in a single container but make sure to space them out to give each seed enough room to grow.
Gently pat the soil down around the seeds to ensure good seed-to-soil contact. Avoid pressing too hard, as this may compact the soil and hinder germination.
5. Create a Warm and Humid Environment
Cardamom is a tropical plant, and it thrives in warm, humid conditions. After planting, it’s essential to keep the environment warm and humid to encourage germination. Ideal temperatures for cardamom seed germination range between 70-90°F (21-32°C). If you live in a colder climate, you may need to start the seeds indoors where you can control the temperature.
To maintain humidity, cover the seed tray or container with a plastic dome or a clear plastic sheet. This will trap moisture and create a greenhouse effect, helping the seeds stay moist and warm. Make sure to place the tray in a location that receives bright, indirect light—direct sunlight can scorch the delicate seedlings.
6. Water Regularly, But Avoid Overwatering
The soil should be kept consistently moist but not soggy. Check the soil regularly and water when it feels slightly dry to the touch. It’s crucial to avoid overwatering, as this can lead to root rot. A good practice is to water gently and ensure that the excess water can drain freely from the container.
7. Be Patient—Germination Takes Time
Germinating cardamom seeds can take a while, sometimes anywhere from 4 to 8 weeks. Be patient and resist the urge to disturb the seeds during this time. Keep the soil moist, the environment warm, and the humidity high, and eventually, you’ll see the first signs of germination. Once the seedlings emerge, remove the plastic covering to prevent mold growth.
8. Transplant the Seedlings
Once the cardamom seedlings are large enough to handle, and they have developed a few sets of true leaves, it’s time to transplant them into larger pots or into the ground. If you’re growing cardamom indoors, choose a large pot with good drainage, as cardamom grows into a sizable plant.
If you’re planting outdoors, choose a location that is protected from strong winds and receives partial shade. Cardamom does not do well in direct, harsh sunlight, so it’s best to plant it in a spot with dappled light or partial shade.
9. Ongoing Care for Cardamom
Cardamom requires consistent care to thrive. The plant needs bright, indirect sunlight, warm temperatures, and high humidity. Water the plant regularly to keep the soil moist, but ensure proper drainage to avoid waterlogging. Fertilize your cardamom plant with a balanced liquid fertilizer every few months to encourage healthy growth.
During the growing season, cardamom plants can reach up to 6 feet tall, so be sure to provide them with enough space to grow. In addition, you may need to support the plant with a stake or trellis to keep it upright as it matures.
Additional Tips for Growing Cardamom
- Humidity is Key: Cardamom thrives in humid environments, so consider placing a humidifier nearby or misting the plant regularly if you are growing it indoors.
- Pest Management: While cardamom is generally pest-resistant, you should still keep an eye out for common houseplant pests like aphids and mealybugs. Treat infestations with organic insecticidal soap or neem oil.
- Be Patient for Harvest: Cardamom plants take about 2 to 3 years to mature and produce flowers. Once the flowers bloom, they develop into pods that are harvested when they turn yellow or brown. The seeds inside the pods are the cardamom spice used in cooking.
Conclusion
Growing cardamom from seed can be a rewarding and unique addition to your gardening journey. While it requires patience and attention to detail, the fragrance and flavor that this plant offers are well worth the effort. Whether you’re growing it indoors in containers or in your garden, cardamom can be a beautiful and functional plant that enhances your space and provides you with a steady supply of one of the world’s most beloved spices.
With the right care and conditions, your cardamom plant will thrive, offering both beauty and a fantastic spice to use in your culinary creations. Happy gardening, and may your cardamom plants grow strong and fragrant!