
Bitter melon, also known as Momordica charantia, is a highly nutritious vegetable that’s popular in Asian and African cuisines. Not only is it a unique ingredient with a distinct flavor profile, but it also boasts numerous health benefits, such as being rich in vitamins A and C, antioxidants, and compounds that may help regulate blood sugar levels. Growing bitter melon at home is a great way to ensure you have a steady supply of this beneficial vegetable. In this article, we will guide you through the process of growing bitter melon from scratch, whether you have a spacious backyard garden or a compact urban space.
Why Grow Bitter Melon at Home?
Before diving into the details of how to grow bitter melon, it’s worth considering why this vegetable makes an excellent addition to your garden. First and foremost, bitter melon is an incredibly healthy plant to grow, offering high nutritional value. Its unique flavor can be an acquired taste, but it pairs well in many traditional dishes, particularly in stir-fries, curries, and soups.
Additionally, growing bitter melon at home can be an eco-friendly and cost-effective option. Instead of purchasing it from a grocery store, where it may have been grown with pesticides, you can grow your own using organic methods. Furthermore, it’s relatively simple to care for, making it ideal for both beginner and experienced gardeners.
Best Growing Conditions for Bitter Melon
Like most tropical plants, bitter melon thrives in warm climates. To successfully grow bitter melon at home, it is essential to provide the right growing conditions. Let’s look at the key factors for growing healthy bitter melons.
1. Climate & Temperature
Bitter melon is native to tropical regions, which means it loves heat. It requires warm temperatures of at least 75-85°F (24-29°C) to grow well. Bitter melon plants will not survive frost, so it’s best to plant them after the last frost of the season. If you live in a cooler climate, you can grow bitter melon indoors or in a greenhouse during the colder months.
2. Sunlight
Bitter melon needs plenty of sunlight to thrive, ideally 6-8 hours of direct sunlight per day. Plant it in a sunny spot in your garden or place it in a location where it can receive ample sunlight, such as a balcony or patio.
3. Soil Requirements
Bitter melon grows best in well-draining, slightly acidic to neutral soil (pH 5.5-7). The soil should be rich in organic matter, which helps retain moisture and provides essential nutrients for the plant. You can enhance your soil by adding compost or well-aged manure.
4. Space & Support
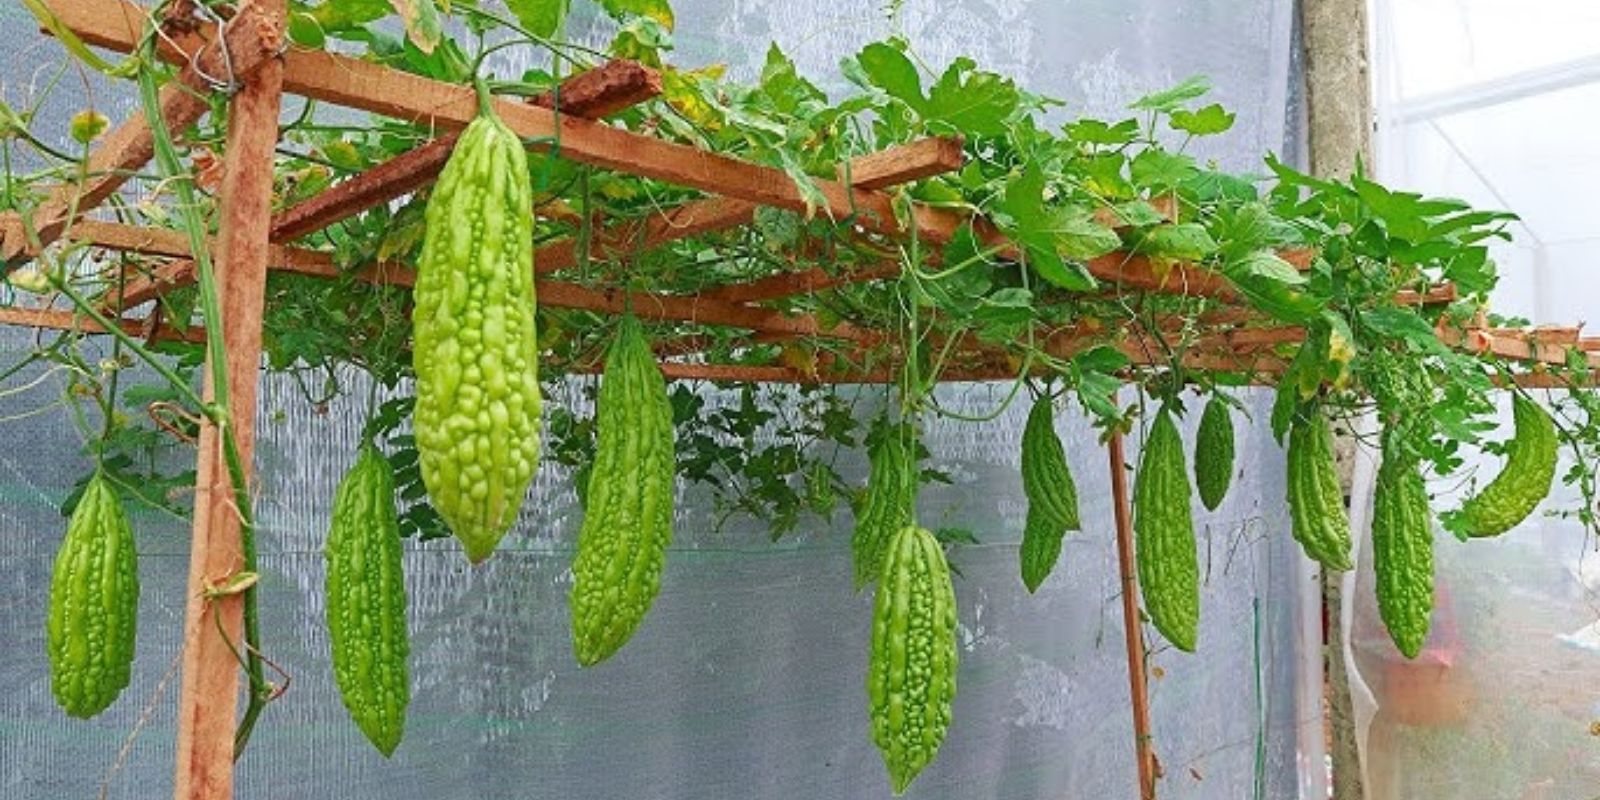
Bitter melon is a climbing vine, which means it requires vertical space to grow. It is best to provide support in the form of a trellis, fence, or other structure that allows the vines to climb. This will help keep the plant healthy and will also save valuable ground space in your garden. A trellis can also prevent fruit from lying on the ground, which helps reduce the risk of disease.
Step-by-Step Guide to Growing Bitter Melon at Home
Step 1: Choose the Right Variety of Bitter Melon
Before you begin, you’ll need to select the right variety of bitter melon for your climate and growing space. There are several varieties of bitter melon, ranging from small and slender to large and round. Some varieties are more suited for cooler climates, while others are better suited for hot, tropical regions. Choose a variety that suits your growing conditions, and if you’re unsure, consult a local nursery or gardening center for advice.
Step 2: Start Seeds Indoors
Bitter melon can be grown from seeds, which are available at most garden centers or online. To give your plants a head start, it’s best to start seeds indoors 4-6 weeks before the last expected frost. To do this, follow these simple steps:
- Soak the Seeds: Bitter melon seeds have a hard outer shell, so soak them in warm water for 12-24 hours before planting. This helps to soften the seed coat and promotes better germination.
- Prepare Seed Trays or Pots: Use seed trays or small pots with well-draining potting mix. Plant the seeds about 1-2 inches deep into the soil.
- Place in a Warm Area: Keep the seeds in a warm spot with temperatures between 75-85°F (24-29°C). Use a seed heat mat if necessary to maintain consistent warmth.
- Water Gently: Keep the soil moist but not soggy. Water gently to avoid disturbing the seeds.
Step 3: Transplant Outdoors
Once your bitter melon seedlings have grown strong enough and the risk of frost has passed, it’s time to transplant them outdoors. Ensure that your chosen planting location receives plenty of sunlight, and prepare the soil by loosening it and adding compost or organic matter.
- Spacing: Space the seedlings about 18-24 inches apart to give them enough room to spread and grow. If you’re growing them in containers, make sure the pots are large enough to accommodate the plant’s root system.
- Acclimate the Plants: Gradually acclimate your seedlings to outdoor conditions by hardening them off. Place the seedlings outside for a few hours each day, gradually increasing the time until they are fully adjusted to outdoor temperatures.
Step 4: Provide Support
As bitter melon plants are climbing vines, it’s essential to set up a trellis or other support structure to help them grow vertically. You can use a variety of materials for this, such as bamboo stakes, wire fencing, or even old tomato cages. Ensure the structure is tall enough to allow the vines to grow up and spread out.
Step 5: Water Regularly and Fertilize
Bitter melon plants need consistent moisture, especially during hot weather. Water the plants deeply once or twice a week, depending on the weather and soil conditions. Be sure to water at the base of the plant to avoid wetting the foliage, which can lead to fungal diseases.
Fertilize your bitter melon plants with a balanced fertilizer every 3-4 weeks to promote healthy growth and fruit production. Organic fertilizers like compost tea, fish emulsion, or seaweed extract are excellent choices for providing nutrients without the risk of chemical buildup.
Step 6: Watch for Pests and Diseases
Bitter melon plants are generally resistant to most pests, but they can occasionally attract aphids, whiteflies, and beetles. Keep an eye on the plants and take action promptly if you notice any signs of infestation. Neem oil or insecticidal soap can help control pests naturally.
In terms of diseases, bitter melon is susceptible to fungal diseases such as powdery mildew and downy mildew. Make sure to space the plants properly to ensure good air circulation, and avoid overhead watering to reduce the risk of fungal infections. If you notice signs of disease, remove affected leaves immediately.
Step 7: Harvesting
Bitter melon fruits are ready to harvest when they are bright green and still tender. If left too long on the vine, they turn yellow and become bitter and tough. It’s best to harvest the melons when they are 4-6 inches long, but be sure to pick them before they reach full maturity.
Use a sharp knife or garden shears to cut the fruit from the vine, being careful not to damage the plant. Harvest regularly to encourage more fruit production.
Tips for Maximizing Your Bitter Melon Harvest
- Mulch the Soil: Apply a layer of mulch around the base of the plants to help retain moisture, regulate soil temperature, and suppress weeds.
- Prune the Vines: Regularly prune your bitter melon vines to remove dead or diseased growth and encourage more productive fruiting.
- Maintain Consistent Care: Ensure your plants get adequate water, sunlight, and nutrients throughout the growing season.
Conclusion
Growing bitter melon at home is a rewarding and nutritious endeavor that can provide you with a steady supply of this health-boosting vegetable. With the right growing conditions, care, and attention, you can enjoy a bountiful harvest of bitter melon right from your garden or balcony. Whether you’re a seasoned gardener or a beginner, growing this unique plant is an enjoyable and fulfilling experience that allows you to incorporate fresh, organic produce into your meals. Happy gardening!