
If you’re looking for a rewarding and nature-filled project, growing a tree from a pine cone is a fantastic option. Not only does it allow you to witness the fascinating process of germination, but it also connects you with nature in a meaningful way. Pine trees are hardy, resilient, and grow into magnificent structures, and cultivating one from a simple pine cone can be a fulfilling experience. In this comprehensive guide, we will walk you through the steps required to grow a pine tree from a pine cone, ensuring success in your journey of planting and growing.
Why Grow a Tree from a Pine Cone?
Pine trees are an essential part of many ecosystems, providing shelter and food for wildlife. By growing your own tree from a pine cone, you can help contribute to your local environment, promote biodiversity, and enjoy the satisfaction of nurturing a tree from seed to maturity. Additionally, pine trees offer several benefits:
- Aesthetic Appeal: Pine trees are beautiful, with their tall trunks and soft, evergreen needles. Their distinctive cones are also visually appealing.
- Air Quality: Like most trees, pine trees purify the air, absorbing carbon dioxide and releasing oxygen.
- Wildlife Habitat: Pine trees provide shelter for various wildlife, from birds to small mammals, making them a great choice for any garden or backyard.
Growing a pine tree from a pine cone may take some time, but the payoff is well worth the effort. Let’s dive into the steps required to successfully grow your own pine tree from a pine cone.
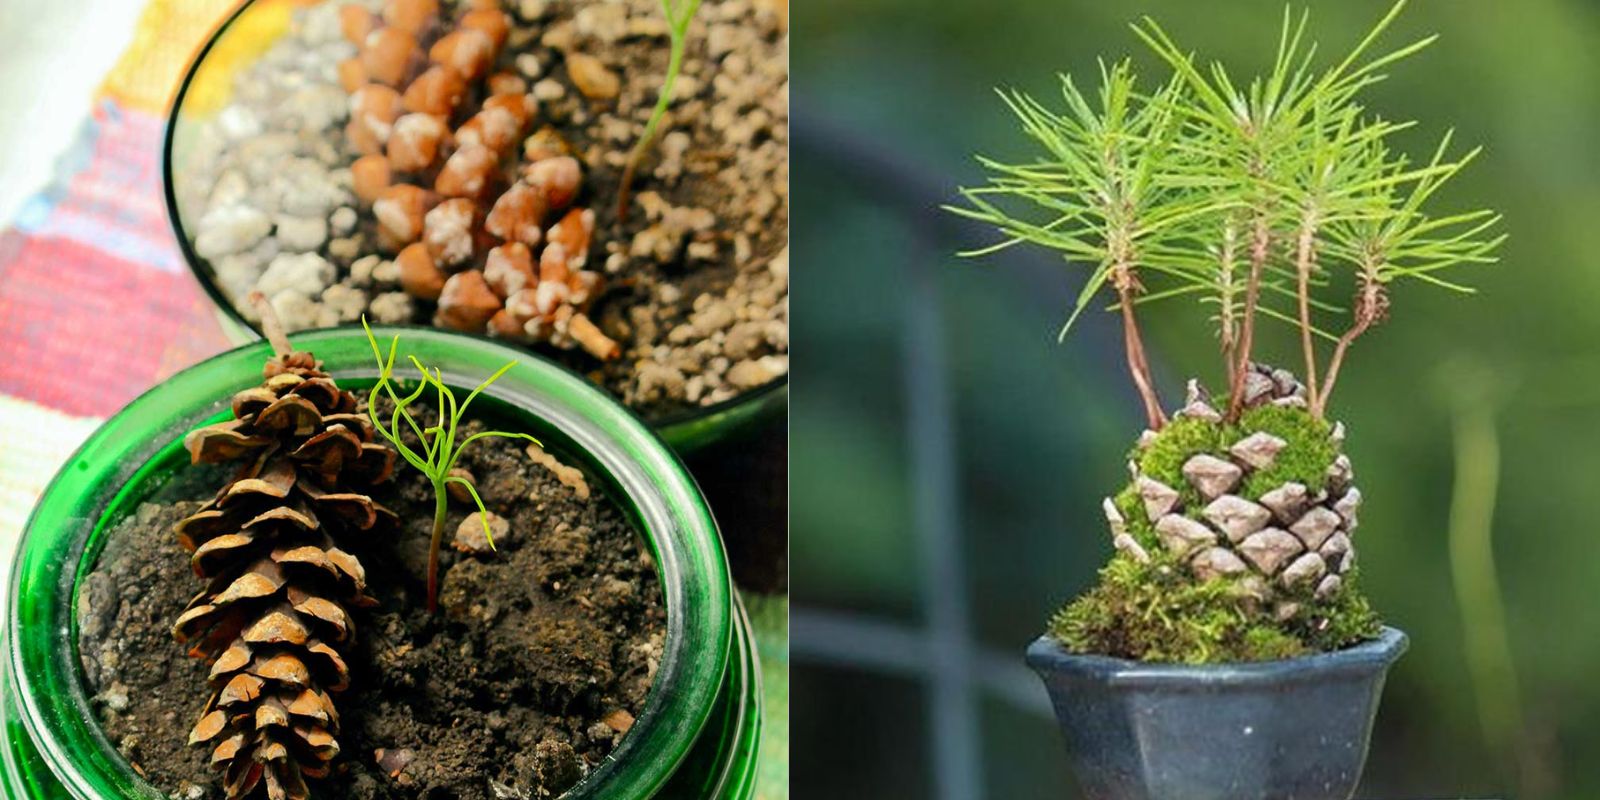
Step 1: Collect Pine Cones
The first step to growing a tree from a pine cone is to collect mature cones. Pine cones are found on pine trees, and they come in different shapes and sizes depending on the tree species. It’s best to collect pine cones that have already fallen to the ground, as these are mature and have fully developed seeds inside.
- Choose Healthy Cones: When collecting pine cones, select those that appear mature. Look for cones that have opened up naturally. Avoid cones that look damaged or shriveled, as these are less likely to contain viable seeds.
- Timing: The best time to gather pine cones is in late fall or early winter when they naturally drop from the tree. Ensure that the cones have dried out and opened up by the time you collect them.
- Varieties: Different species of pine trees produce different types of cones. For this project, any common pine species, such as Eastern White Pine or Ponderosa Pine, will work well.
Step 2: Extract the Seeds from the Pine Cone
Once you’ve collected the pine cones, the next step is to extract the seeds. Pine cones contain the seeds of the tree, which are located in the small pockets between the cone’s scales.
- Dry the Pine Cones: If the cones are not fully open, place them in a warm, dry area for a few days. You can lay them out on a newspaper or in a tray to allow them to open up further.
- Remove the Seeds: Once the cones have fully opened, gently tap them against a hard surface or shake them in a bag. This will cause the seeds to fall out. If necessary, you can also use tweezers or your fingers to remove the seeds from the cone’s pockets.
- Inspect the Seeds: Pine tree seeds are small, flat, and winged. Examine the seeds to make sure they are intact and free from cracks or damage. Only healthy, viable seeds will be able to germinate.
Step 3: Cold Stratify the Seeds
Pine tree seeds need a period of cold stratification to break dormancy and promote germination. Cold stratification mimics the natural winter chill that seeds would experience in the wild, allowing them to “wake up” and begin sprouting in the spring.
- Wrap in a Damp Paper Towel: Start by wrapping the seeds in a moist (but not soaking wet) paper towel. The moisture in the towel will help trigger the stratification process.
- Place in a Plastic Bag: Put the damp paper towel with the seeds inside a clear plastic bag or a container. Seal the bag to keep moisture in.
- Refrigerate: Store the bag in the refrigerator for 30 to 60 days. The cold environment will mimic winter conditions and help break the seed’s dormancy. Be sure to check the seeds every few weeks to make sure the paper towel remains damp.
Step 4: Prepare for Planting
After the seeds have gone through their cold stratification period, it’s time to plant them. Proper planting is key to ensuring that your pine seeds have the best chance at sprouting into healthy seedlings.
- Choose a Planting Container: Select a small container with good drainage, such as a seed-starting tray or small pots. Ensure that the container has drainage holes at the bottom to prevent water from accumulating and causing the seeds to rot.
- Prepare the Soil: Use a well-draining potting mix. Pine seeds require soil that allows for water to flow freely while holding just enough moisture. You can use a mix of regular potting soil, sand, and perlite to create an optimal environment for your seeds to grow.
- Plant the Seeds: Fill the container with the potting mix, leaving about an inch or two of space at the top. Plant each seed about 1 inch deep into the soil, ensuring it’s covered lightly with soil.
- Water Lightly: Water the soil gently to settle it around the seed. The soil should be moist, not waterlogged, as pine seeds can rot if the soil is too wet.
Step 5: Germinate the Seeds
Germination is the process where the seed begins to sprout and develop into a seedling. Pine tree seeds generally take between 2 to 4 weeks to germinate, but this can vary depending on the species and environmental conditions.
- Provide Warmth and Light: Place your planted seeds in a warm location that receives indirect sunlight. A sunny windowsill or a grow light will help provide the warmth needed for germination.
- Maintain Moisture: Keep the soil moist but not soggy. You can mist the soil with water using a spray bottle to maintain the right level of moisture without overwatering.
- Be Patient: Germination takes time, and you may not see results immediately. Continue to care for the seeds by keeping the environment warm and moist. Some seeds may take longer than others to sprout, so don’t give up too soon.
Step 6: Transplant the Seedlings
Once the pine tree seeds have sprouted and the seedlings have developed strong roots and shoots, it’s time to transplant them into larger containers or directly into the ground.
- Transplanting into Larger Pots: If you plan to keep your pine tree in a pot, transplant the seedling into a larger container once it has outgrown its original one. Use a pot that’s large enough to allow the roots to grow and spread.
- Outdoor Transplanting: If you live in an area where pine trees thrive and you want to plant your tree outdoors, choose a spot with plenty of sunlight and well-draining soil. Pine trees generally prefer slightly acidic soil, so test your soil’s pH before planting.
- Gradual Acclimatization: If you’re transplanting your pine tree outdoors, make sure to gradually acclimate the seedling to outdoor conditions. Start by placing it outside for a few hours each day and increase the time spent outdoors over the course of a week to avoid shocking the young plant.
Step 7: Care for Your Pine Tree
Once your pine tree is planted, it will require ongoing care to grow strong and healthy.
- Watering: Ensure the soil around your pine tree stays consistently moist, especially during dry periods. Be careful not to overwater, as pine trees prefer well-drained soil.
- Fertilizing: Pine trees don’t require heavy fertilization, but you can give them a light feeding of balanced fertilizer in the spring to encourage growth.
- Pruning: As your pine tree grows, you can prune dead or damaged branches to keep the tree healthy and promote strong growth.
- Protection: Keep your young tree protected from pests, especially in the early stages of growth. If you live in an area with harsh winters, consider mulching around the base of the tree to insulate the roots.
Step 8: Enjoy Your Pine Tree
As your tree grows, it will become a beautiful addition to your landscape, providing shade, beauty, and wildlife habitat. The growth of your pine tree is a slow process, but over time, you will be able to enjoy watching it grow tall and strong.
Conclusion
Growing a tree from a pine cone is a rewarding and educational process. By following the steps outlined in this guide, you can successfully grow your own pine tree from seed, contribute to the environment, and enjoy watching the process unfold from start to finish. Whether you choose to keep the tree in a pot or plant it outdoors, you’ll have the satisfaction of knowing you grew it from scratch, starting with nothing more than a simple pine cone.
Happy gardening, and enjoy the process of nurturing your very own pine tree!
#GrowATree #PineConePlanting #NatureLovers #TreePlanting #GardeningTips #SeedStarting #GardeningHacks #GreenThumb #HomeGarden #SustainableLiving